xiaobaoqiu Blog

Think More, Code Less

从代理到Spring事务2-AOP

1.Spring AOP

Spring的AOP(Aspect Oriented Programming,面向切面编程)是一个强大的机制,常用场景在日志、安全、异常处理、事务等。Spring AOP的原理正是基于代理。

我想了解的问题包括:

(1).Spring AOP使用什么机制做代理;
(2).Spring 怎么使用代理达到AOP目的;

#1.1 代理类型选择

先看看Spring是如何选择代理,先看看 Spring官方AOP文档 的说明:

1
2
3
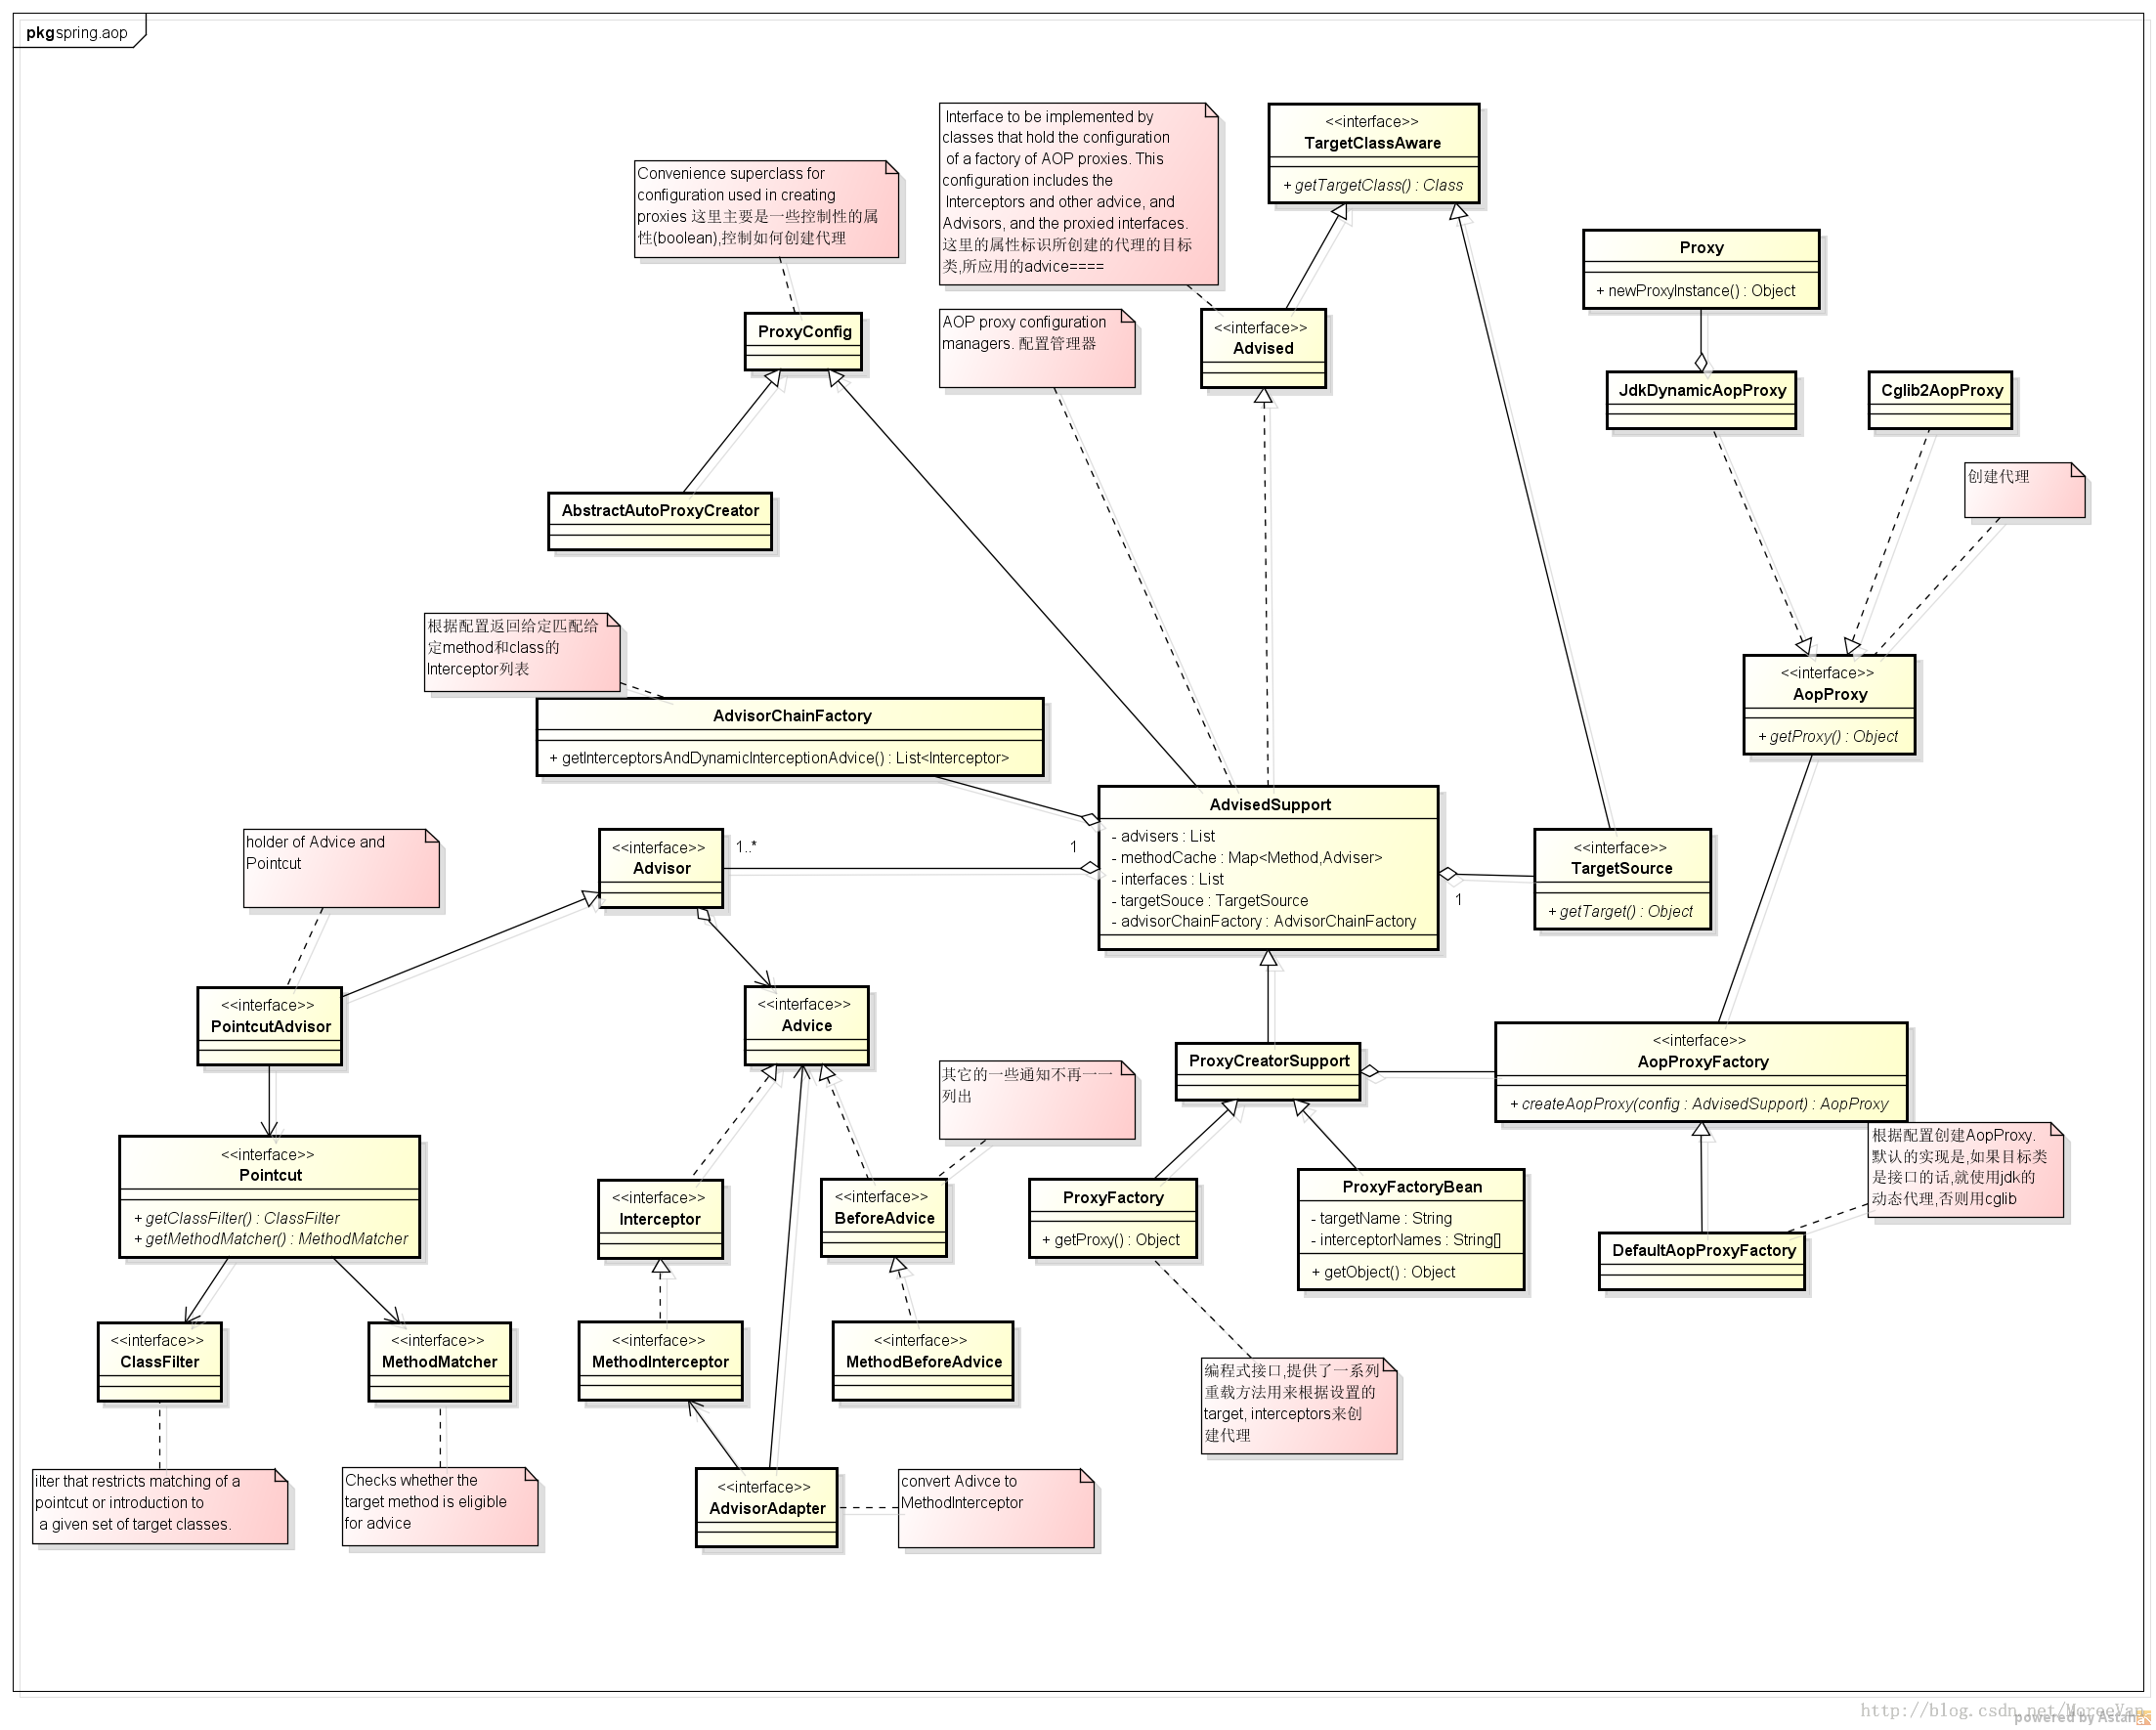
Spring AOP defaults to using standard J2SE dynamic proxies for AOP proxies. This enables any interface (or set of interfaces) to be proxied.

Spring AOP can also use CGLIB proxies. This is necessary to proxy classes, rather than interfaces. CGLIB is used by default if a business object does not implement an interface. As it is good practice to program to interfaces rather than classes, business classes normally will implement one or more business interfaces. It is possible to force the use of CGLIB, in those (hopefully rare) cases where you need to advise a method that is not declared on an interface, or where you need to pass a proxied object to a method as a concrete type.

官方文档的结论是:当业务Bean实现了一个或多个接口的时候,默认使用Java动态代理,当业务Bean没有实现任何接口的时候使用CGLib。

我们来看看相关代码,Spring使用AopProxy表示AOP中的代理,它的作用只要一个:创建代理对象。它有两个实现类:JdkDynamicAopProxy 和 CglibAopProxy :

1
2
3
4
5
6
7
8
9
10
11
12
13
14
15
16
17
18
19
20
21
22
23
24
25
26
27
28
29
30
31
32
33
34
35
36
37
38
39
40
41
42
43
44
45
46
47
public interface AopProxy {
    Object getProxy();

    Object getProxy(ClassLoader classLoader);
}

// JdkDynamicAopProxy 实现了 InvocationHandler,实际产生代理类使用 Proxy
final class JdkDynamicAopProxy implements AopProxy, InvocationHandler, Serializable {
    public Object getProxy(ClassLoader classLoader) {
        ...
        return Proxy.newProxyInstance(classLoader, proxiedInterfaces, this);
    }
}

final class CglibAopProxy implements AopProxy, Serializable {
    public Object getProxy(ClassLoader classLoader) {
        Class<?> rootClass = this.advised.getTargetClass();

        // 配置 CGLIB Enhancer...
        Enhancer enhancer = createEnhancer();
        enhancer.setSuperclass(proxySuperClass);
        enhancer.setStrategy(new UndeclaredThrowableStrategy(UndeclaredThrowableException.class));
        enhancer.setInterfaces(AopProxyUtils.completeProxiedInterfaces(this.advised));
        enhancer.setInterceptDuringConstruction(false);

        Callback[] callbacks = getCallbacks(rootClass);
        enhancer.setCallbacks(callbacks);
        enhancer.setCallbackFilter(new ProxyCallbackFilter(
                this.advised.getConfigurationOnlyCopy(), this.fixedInterceptorMap, this.fixedInterceptorOffset));

        Class<?>[] types = new Class[callbacks.length]; //CGLib的回调机制
        for (int x = 0; x < types.length; x++) {
            types[x] = callbacks[x].getClass();
        }
        enhancer.setCallbackTypes(types);

        // 产生代理类并产生代理类的一个instance
        Object proxy;
        if (this.constructorArgs != null) {
            proxy = enhancer.create(this.constructorArgTypes, this.constructorArgs);
        } else {
            proxy = enhancer.create();
        }

        return proxy;
    }
}

AopProxyFactory的默认实现类DefaultAopProxyFactory:

1
2
3
4
5
6
7
8
9
10
11
12
13
14
15
16
public AopProxy createAopProxy(AdvisedSupport config) throws AopConfigException {
    if (config.isOptimize() || config.isProxyTargetClass() || hasNoUserSuppliedProxyInterfaces(config)) {
        Class targetClass = config.getTargetClass();
        if (targetClass == null) {
            throw new AopConfigException("TargetSource cannot determine target class: " +
                    "Either an interface or a target is required for proxy creation.");
        }
        if (targetClass.isInterface()) {    //被代理类,实现了接口,就使用Java动态代理
            return new JdkDynamicAopProxy(config);
        }
        return CglibProxyFactory.createCglibProxy(config);  //没有实现接口使用 CGLib代理
    }
    else {
        return new JdkDynamicAopProxy(config);
    }
}

其中 AdvisedSupport 是 AOP配置管理的基类。这几个配置的说明可以参见 ProxyConfig 类。其中我注释的地方和官方文档是一致的。

#1.2 代理调用

得到代理对象之后的下一步就是调用代理逻辑,这部分实现直接看 JdkDynamicAopProxy.invoke() 代码:

1
2
3
4
5
6
7
8
9
10
11
12
13
14
15
16
17
18
19
20
21
22
23
24
25
26
27
public Object invoke(Object proxy, Method method, Object[] args) throws Throwable {
    //TargetSource包括被代理者的一些属性
    TargetSource targetSource = this.advised.targetSource;
    try {
        Object retVal;

        // 具体的被代理对象
        target = targetSource.getTarget();
        if (target != null) {
            targetClass = target.getClass();
        }

        // 从代理配置中获取方法上的 MethodInterceptor
        List<Object> chain = this.advised.getInterceptorsAndDynamicInterceptionAdvice(method, targetClass);

        // 没有 MethodInterceptor,直接反射调用
        if (chain.isEmpty()) {
            retVal = AopUtils.invokeJoinpointUsingReflection(target, method, args);
        } else {
            // 创建 MethodInvocation 并调用
            invocation = new ReflectiveMethodInvocation(proxy, target, method, args, targetClass, chain);
            retVal = invocation.proceed();
        }

        return retVal;
    }
}

先看看如何获取方法上的 MethodInterceptor,AdvisedSupport其实只是对这个做缓存,实际调用 DefaultAdvisorChainFactory.getInterceptorsAndDynamicInterceptionAdvice:

1
2
3
4
5
6
7
8
9
10
11
12
13
14
15
16
17
18
19
20
21
22
23
24
25
26
27
28
29
30
31
32
33
34
35
36
37
38
/**
 * 从提供的配置实例config中获取advisor列表,遍历处理这些advisor
 * 如果是PointcutAdvisor,则判断此Advisor能否应用到目标方法method上.
 * 将满足条件的Advisor通过AdvisorAdaptor转化成Interceptor列表返回
 */
public List<Object> getInterceptorsAndDynamicInterceptionAdvice(
        Advised config, Method method, Class targetClass) {

    List<Object> interceptorList = new ArrayList<Object>(config.getAdvisors().length);
    boolean hasIntroductions = hasMatchingIntroductions(config, targetClass);
    AdvisorAdapterRegistry registry = GlobalAdvisorAdapterRegistry.getInstance();
    for (Advisor advisor : config.getAdvisors()) {
        if (advisor instanceof PointcutAdvisor) {
            PointcutAdvisor pointcutAdvisor = (PointcutAdvisor) advisor;
            if (config.isPreFiltered() || pointcutAdvisor.getPointcut().getClassFilter().matches(targetClass)) {
                //将Advisor转化成Interceptor
                MethodInterceptor[] interceptors = registry.getInterceptors(advisor);
                MethodMatcher mm = pointcutAdvisor.getPointcut().getMethodMatcher();

                //检查当前advisor的pointcut是否可以匹配当前方法
                if (MethodMatchers.matches(mm, method, targetClass, hasIntroductions)) {
                    if (mm.isRuntime()) {
                        // Creating a new object instance in the getInterceptors() method
                        // isn't a problem as we normally cache created chains.
                        for (MethodInterceptor interceptor : interceptors) {
                            interceptorList.add(new InterceptorAndDynamicMethodMatcher(interceptor, mm));
                        }
                    }
                    else {
                        interceptorList.addAll(Arrays.asList(interceptors));
                    }
                }
            }
        }
        ...
    }
    return interceptorList;
}

下面看看这些 Interceptor 是如何起作用的,看 ReflectiveMethodInvocation 的 proceed() 方法逻辑:

1
2
3
4
5
6
7
8
9
10
11
12
13
14
public Object proceed() throws Throwable {
    // currentInterceptorIndex 表示 Interceptor 链中的当前调用的下标
    Object interceptorOrInterceptionAdvice = this.interceptorsAndDynamicMethodMatchers.get(++this.currentInterceptorIndex);
    if (interceptorOrInterceptionAdvice instanceof InterceptorAndDynamicMethodMatcher) {
        InterceptorAndDynamicMethodMatcher dm = (InterceptorAndDynamicMethodMatcher) interceptorOrInterceptionAdvice;
        // 运行时参数(arguments)是否满足匹配条件
        if (dm.methodMatcher.matches(this.method, this.targetClass, this.arguments)) {
            return dm.interceptor.invoke(this);
        } else {
            // 不匹配,直接跳过当前这个 Interceptor,执行下一个 Interceptor
            return proceed();
        }
    }
}

#1.3 Understanding AOP Proxies

这里其实完全参考Spring AOP官方文档的一节就行了:http://docs.spring.io/spring/docs/3.0.x/reference/aop.html#aop-understanding-aop-proxies

看懂了这一节,能很明白为什么内部调用的方法上的事务注解无效,我们日常犯的错误基本不会有了。

#1.4 Spring如何识别并解析配置

我们都是通过XML文件的形式使用Spring,Spring使用XmlBeanDefinitionReader类来读取解析XML文件,XmlBeanDefinitionReader使用DefaultBeanDefinitionDocumentReader,再调用BeanDefinitionParserDelegate,其中会根据配置的不同找到对应的NamespaceHandler来处理对应的标签。NamespaceHandler是一个接口,一个具体接口就是解析XML中的一个Element得到一个Spring容器中的一个Bean。

1
2
3
public interface NamespaceHandler {
    BeanDefinition parse(Element element, ParserContext parserContext);
}

NamespaceHandler的具体实现类很多,其中几个我们感兴趣的AopNamespaceHandler,MvcNamespaceHandler,QScheduleNamespaceHandler,QConfigNamespaceHandler,QmqClientNamespaceHandler等,看到这里大家应该很熟悉了。我们来看两个实现吧:

1
2
3
4
5
6
7
8
9
10
11
12
13
14
15
16
17
18
public class AopNamespaceHandler extends NamespaceHandlerSupport {
    public void init() {
        registerBeanDefinitionParser("config", new ConfigBeanDefinitionParser());
        registerBeanDefinitionParser("aspectj-autoproxy", new AspectJAutoProxyBeanDefinitionParser());
        registerBeanDefinitionDecorator("scoped-proxy", new ScopedProxyBeanDefinitionDecorator());
        registerBeanDefinitionParser("spring-configured", new SpringConfiguredBeanDefinitionParser());
    }
}

public class MvcNamespaceHandler extends NamespaceHandlerSupport {
    public void init() {
        registerBeanDefinitionParser("annotation-driven", new AnnotationDrivenBeanDefinitionParser());
        registerBeanDefinitionParser("default-servlet-handler", new DefaultServletHandlerBeanDefinitionParser());
        registerBeanDefinitionParser("interceptors", new InterceptorsBeanDefinitionParser());
        registerBeanDefinitionParser("resources", new ResourcesBeanDefinitionParser());
        registerBeanDefinitionParser("view-controller", new ViewControllerBeanDefinitionParser());
    }
}

就是说Spring将配置根据作用分成不同的namespace,每个NamespaceHandler只解析自己独有的几个配置,比如AopNamespaceHandler负责解析scoped-proxy等几个配置,比如我们在配置文件配上:

1
2
<!--aop就表示namespace-->
<aop:config proxy-target-class="true"/>

最后就会找到AopNamespaceHandler类解析这个配置。那出了这些带namespace的配置,正常的配置谁来解析?DefaultBeanDefinitionDocumentReader。

spring在解析的过程中,会去收集spring.*.jar/META-INF下的spring.handlers,spring.schemas文件,这2个文件就是指明了解析spring中自定义标签的Namespace类。如果自己开发Spring组件,需要增加新的标签,也可以按照这个机制。我司的同学可以看看qmq-client包下的META-INF下的这两个文件。

到目前为止,大致知道了谁来解析AOP相关的标签。我们继续看看 AopNamespaceHandler 的代码,它的init()的方法就是给每个标签找一个解析器,比如 aop:config 这个配置就会找到 ConfigBeanDefinitionParser 这个解析器。,些解析器只有一个parse入口函数。

最后放一张AOP相关的图(来源:http://blog.csdn.net/moreevan/article/details/11977115)

#1.5 Spring如何使用代理实现AOP

最后我们整理一下Spring使用代理实现AOP整个流程的步骤。

1.我们在代码中使用引入bean; 2.Spring从BeanFactory总获取bean(ApplicationContext.getBean),参见AbstractBeanFactory.getBean代码:

1
2
3
4
5
6
7
8
9
10
11
12
13
14
15
16
17
18
19
20
21
public Object getBean(String name) throws BeansException {
    return doGetBean(name, null, null, false);
}
protected <T> T doGetBean(final String name, final Class<T> requiredType, final Object[] args, boolean typeCheckOnly)
        throws BeansException {

    final String beanName = transformedBeanName(name);
    Object bean;

    // 创建单例的bean
    if (mbd.isSingleton()) {
        sharedInstance = getSingleton(beanName, new ObjectFactory<Object>() {
            public Object getObject() throws BeansException {
                try {
                    return createBean(beanName, mbd, args);    //创建Bean
                }
            }
        });
        bean = getObjectForBeanInstance(sharedInstance, name, beanName, mbd);
    }
}

3.触发Bean的创建,参考AbstractAutowireCapableBeanFactory.createBean代码:

1
2
3
4
5
6
7
8
9
10
11
12
13
14
15
16
17
18
19
20
21
22
23
24
25
26
27
28
29
30
31
32
33
34
35
36
37
38
39
40
41
42
43
44
public Object createBean(Class beanClass, int autowireMode, boolean dependencyCheck) throws BeansException {
    // Use non-singleton bean definition, to avoid registering bean as dependent bean.
    RootBeanDefinition bd = new RootBeanDefinition(beanClass, autowireMode, dependencyCheck);
    bd.setScope(BeanDefinition.SCOPE_PROTOTYPE);
    return createBean(beanClass.getName(), bd, null);       //---1
}
protected Object createBean(final String beanName, final RootBeanDefinition mbd, final Object[] args)
        throws BeanCreationException {
    ...
    Object beanInstance = doCreateBean(beanName, mbd, args);        //---2
    return beanInstance;
}
protected Object doCreateBean(final String beanName, final RootBeanDefinition mbd, final Object[] args) {
    // Eagerly cache singletons to be able to resolve circular references
    // even when triggered by lifecycle interfaces like BeanFactoryAware.
    boolean earlySingletonExposure = (mbd.isSingleton() && this.allowCircularReferences &&
            isSingletonCurrentlyInCreation(beanName));
    if (earlySingletonExposure) {
        addSingletonFactory(beanName, new ObjectFactory() {
            public Object getObject() throws BeansException {
                return getEarlyBeanReference(beanName, mbd, bean);      //---3
            }
        });
    }

    // Initialize the bean instance.
    ...
    return exposedObject;
}
protected Object getEarlyBeanReference(String beanName, RootBeanDefinition mbd, Object bean) {
    Object exposedObject = bean;
    if (bean != null && !mbd.isSynthetic() && hasInstantiationAwareBeanPostProcessors()) {
        for (BeanPostProcessor bp : getBeanPostProcessors()) {
            if (bp instanceof SmartInstantiationAwareBeanPostProcessor) {
                SmartInstantiationAwareBeanPostProcessor ibp = (SmartInstantiationAwareBeanPostProcessor) bp;
                exposedObject = ibp.getEarlyBeanReference(exposedObject, beanName);     //---逐层包装bean
                if (exposedObject == null) {
                    return exposedObject;
                }
            }
        }
    }
    return exposedObject;
}
  1. 触发代理类对象的创建,见 AbstractAutoProxyCreator,这个其实是一个 BeanPostProcessor,关于BeanPostProcessor的作用见它的注释:
1
2
 * Factory hook that allows for custom modification of new bean instances,
 * e.g. checking for marker interfaces or wrapping them with proxies.

AbstractAutoProxyCreator代码:

1
2
3
4
5
6
7
8
9
10
11
12
13
14
15
16
17
18
19
20
21
22
23
24
25
26
27
28
29
30
31
32
33
34
35
36
37
38
39
40
41
42
public Object getEarlyBeanReference(Object bean, String beanName) throws BeansException {
    Object cacheKey = getCacheKey(bean.getClass(), beanName);
    this.earlyProxyReferences.put(cacheKey, Boolean.TRUE);
    return wrapIfNecessary(bean, beanName, cacheKey);
}
protected Object wrapIfNecessary(Object bean, String beanName, Object cacheKey) {
    // 获取被代理bean上的所有的 Advisor
    Object[] specificInterceptors = getAdvicesAndAdvisorsForBean(bean.getClass(), beanName, null);
    if (specificInterceptors != DO_NOT_PROXY) {
        this.advisedBeans.put(cacheKey, Boolean.TRUE);
        //为制定类创建代理bean
        Object proxy = createProxy(bean.getClass(), beanName, specificInterceptors, new SingletonTargetSource(bean));
        this.proxyTypes.put(cacheKey, proxy.getClass());
        return proxy;
    }
}

protected Object createProxy(
        Class<?> beanClass, String beanName, Object[] specificInterceptors, TargetSource targetSource) {
    // ProxyFactory 继承自 ProxyConfig,局部变量
    ProxyFactory proxyFactory = new ProxyFactory();
    proxyFactory.copyFrom(this);

    // shouldProxyTargetClass表示显示的定义了proxy-target-class="true"
    // 没有定义则可能需要被代理类的 interface 信息
    if (!shouldProxyTargetClass(beanClass, beanName)) {
        Class<?>[] targetInterfaces = ClassUtils.getAllInterfacesForClass(beanClass, this.proxyClassLoader);
        for (Class<?> targetInterface : targetInterfaces) {
            proxyFactory.addInterface(targetInterface);
        }
    }

    Advisor[] advisors = buildAdvisors(beanName, specificInterceptors);
    for (Advisor advisor : advisors) {
        proxyFactory.addAdvisor(advisor);
    }

    proxyFactory.setTargetSource(targetSource); //被代理者
    ...
    // 创建代理对象
    return proxyFactory.getProxy(this.proxyClassLoader);
}

ProxyFactory.java:

1
2
3
4
5
6
7
8
9
public Object getProxy(ClassLoader classLoader) {
    return createAopProxy().getProxy(classLoader);
}
protected final synchronized AopProxy createAopProxy() {
    if (!this.active) {
        activate();
    }
    return getAopProxyFactory().createAopProxy(this);
}

DefaultAopProxyFactory.java的createAopProxy,回到了我们 1.1 代理类型选择 中涉及的内容,整个过程串起来了。