xiaobaoqiu Blog

Think More, Code Less

一个死锁问题

最近线上业务报了几次死锁问题,决定跟进。

1.背景

有一个业务数据表business,维护了一个名为c_id的外键,一个c_id对应多个business数据。

在业务数据新增或者修改的时候,需要同步的维护 business 的数据,这时候正确的做法是diff新旧数据,得到需要删除的一部分数据,需要新增的一部分数据以及需要更新的一部分数据,这种实现有点麻烦(其实也不麻烦,使用Guava的集合操作),因此工程师们的通常做法是先根据c_id删除现有数据,再插入新数据。这个时候很容易出现死锁。

这里也解释一下外键,在业务DB中,出于性能考虑,通常禁止使用外键,通常的做法是,外键这种关系的维护都体现在表中手动维护一个外键。

在交代一下数据库相关的背景:

1
2
DB:Mysql 5.6
tx_isolation:REPEATABLE-READ

2.问题重现

我们在本地重现死锁信息。

建表语句已经初始化的数据如下:

1
2
3
4
5
6
7
8
9
10
11
12
13
14
15
16
17
18
19
20
21
22
CREATE TABLE `business` (
  `id` int(11) unsigned NOT NULL AUTO_INCREMENT COMMENT '',
  `c_id` int(11) NOT NULL DEFAULT '0' COMMENT '',
  `business_id` tinyint(3) unsigned NOT NULL DEFAULT '0' COMMENT '',
  PRIMARY KEY (`id`),
  UNIQUE KEY `uniq_idx_c_id_business_id` (`c_id`,`business_id`)
) ENGINE=InnoDB DEFAULT CHARSET=utf8mb4 COMMENT='';

mysql> select * from business;
+----+-------------+-------------+
| id | c_id | business_id |
+----+-------------+-------------+
| 20 |           1 |           2 |
| 21 |           1 |           3 |
| 23 |           1 |           4 |
| 22 |           1 |           5 |
| 10 |           2 |           1 |
| 11 |           2 |           2 |
|  5 |           3 |           1 |
|  6 |           4 |           1 |
|  7 |           5 |           1 |
+----+-------------+-------------+

我们模拟同时两个新数据的插入过程:

步骤 事务1 事务2 备注
1 begin
2 begin
3 mysql> delete from business where c_id = 6;

Query OK, 0 rows affected (0.00 sec)
事务1:Gap锁,锁住区域(5, +∞)
4 mysql> delete from business where c_id = 7;

Query OK, 0 rows affected (0.00 sec)
事务2:Gap锁,锁住区域(5, +∞)
5 mysql> insert into business (c_id, business_id) values (6, 1);

等待…
事务1:插入意向锁(Insert Intention Lock),期望获取(5, 6)这个Gap锁和一个c_id=6的Recored锁。
但是因为 事务2 已经锁住了区域(5, +∞)因此这时候,事务1只能等待 事务2 释放锁.
6 mysql> insert into business (c_id, business_id) values (7, 1);

ERROR 1213 (40001): Deadlock found when trying to get lock; try restarting transaction
和上面第5步类似, 事务2:等待获取事务1的锁

出现循环等待,死锁(roll back这个事务,事务2的锁释放)
7 Query OK, 2 rows affected (2.89 sec)
Records: 2 Duplicates: 0 Warnings: 0

事务2 rollback了,事务1的insert成功
事务1等待的锁得到,事务1成功。

第 5 步的锁信息如下:

1
2
3
4
5
6
7
8
9
10
11
12
13
14
15
16
17
18
// 锁信息
// 事务1( 即这里的事务id:203797) 持有一个Gap锁,事务2( 即这里的事务id:203798) 持有一个Gap锁
mysql> select * from INNODB_LOCKS;
+---------------+-------------+-----------+-----------+-------------------------------+----------------------------------+------------+-----------+----------+------------------------+
| lock_id       | lock_trx_id | lock_mode | lock_type | lock_table                    | lock_index                       | lock_space | lock_page | lock_rec | lock_data              |
+---------------+-------------+-----------+-----------+-------------------------------+----------------------------------+------------+-----------+----------+------------------------+
| 203797:20:4:1 | 203797      | X         | RECORD    | `test`.`business` | uniq_idx_c_id_business_id |         20 |         4 |        1 | supremum pseudo-record |
| 203798:20:4:1 | 203798      | X         | RECORD    | `test`.`business` | uniq_idx_c_id_business_id |         20 |         4 |        1 | supremum pseudo-record |
+---------------+-------------+-----------+-----------+-------------------------------+----------------------------------+------------+-----------+----------+------------------------+

// 锁等待信息
// 事务1( 即这里的事务id:203797) 等待事务2(即这里的事务id:203798 )的锁
mysql> select * from INNODB_LOCK_WAITS;
+-------------------+-------------------+-----------------+------------------+
| requesting_trx_id | requested_lock_id | blocking_trx_id | blocking_lock_id |
+-------------------+-------------------+-----------------+------------------+
| 203797            | 203797:20:4:1     | 203798          | 203798:20:4:1    |
+-------------------+-------------------+-----------------+------------------+

有些人可能迷惑 lock_data 的 supremum pseudo-record 是什么东西,我们先看看 lock_data 的解释,这里面解释了 supremum pseudo-record,简单说就是正无穷。

1
2
3
4
5
Primary key value(s) of the locked record if LOCK_TYPE='RECORD', otherwise NULL. 
This column contains the value(s) of the primary key column(s) in the locked row, formatted as a valid SQL string (ready to be copied to SQL commands). 
If there is no primary key then the InnoDB internal unique row ID number is used. 
If a gap lock is taken for key values or ranges above the largest value in the index, LOCK_DATA reports “supremum pseudo-record”. 
When the page containing the locked record is not in the buffer pool (in the case that it was paged out to disk while the lock was held), InnoDB does not fetch the page from disk, to avoid unnecessary disk operations. Instead, LOCK_DATA is set to NULL.

死锁信息:

1
2
3
4
5
6
7
8
9
10
11
12
13
14
15
16
17
18
19
20
21
22
23
24
25
26
27
28
29
30
31
32
33
34
35
36
37
mysql> show engine innodb status \G
...
------------------------
LATEST DETECTED DEADLOCK
------------------------
2016-07-21 19:11:05 7f6b90de8700
*** (1) TRANSACTION:
TRANSACTION 203797, ACTIVE 42 sec inserting
mysql tables in use 1, locked 1
LOCK WAIT 3 lock struct(s), heap size 360, 2 row lock(s), undo log entries 1
MySQL thread id 9, OS thread handle 0x7f6b90db7700, query id 144 localhost root update
insert into business (c_id, business_id) values (6, 1)
*** (1) WAITING FOR THIS LOCK TO BE GRANTED:
RECORD LOCKS space id 20 page no 4 n bits 80 index `uniq_idx_c_id_business_id` of table `test`.`business` trx id 203797 lock_mode X insert intention waiting
Record lock, heap no 1 PHYSICAL RECORD: n_fields 1; compact format; info bits 0
 0: len 8; hex 73757072656d756d; asc supremum;;

*** (2) TRANSACTION:
TRANSACTION 203798, ACTIVE 38 sec inserting
mysql tables in use 1, locked 1
3 lock struct(s), heap size 360, 2 row lock(s), undo log entries 1
MySQL thread id 10, OS thread handle 0x7f6b90de8700, query id 147 localhost root update
insert into business (c_id, business_id) values (7, 1)
*** (2) HOLDS THE LOCK(S):
RECORD LOCKS space id 20 page no 4 n bits 80 index `uniq_idx_c_id_business_id` of table `test`.`business` trx id 203798 lock_mode X
Record lock, heap no 1 PHYSICAL RECORD: n_fields 1; compact format; info bits 0
 0: len 8; hex 73757072656d756d; asc supremum;;

*** (2) WAITING FOR THIS LOCK TO BE GRANTED:
RECORD LOCKS space id 20 page no 4 n bits 80 index `uniq_idx_c_id_business_id` of table `test`.`business` trx id 203798 lock_mode X insert intention waiting
Record lock, heap no 1 PHYSICAL RECORD: n_fields 1; compact format; info bits 0
 0: len 8; hex 73757072656d756d; asc supremum;;

*** WE ROLL BACK TRANSACTION (2)
------------
TRANSACTIONS
------------

从死锁信息中,我们也可以看到事务1(事务id:203797) 和 事务2(事务id:203798) 持有的锁是锁住相同的一块区域:

1
 0: len 8; hex 73757072656d756d; asc supremum;;

参考:mysql InnoDB锁等待的查看及分析

3.死锁分析

有两个点需要我们知道的信息:各种SQL语句都加什么锁,为什么这里的两个delete的锁没有冲突。

3.1 SQL加锁

关于各种SQL语句加什么锁,参见Mysql官方文档:Locks Set by Different SQL Statements in InnoDB

我们这里来说涉及的删除和插入,先说删除:

1
2
3
4
5
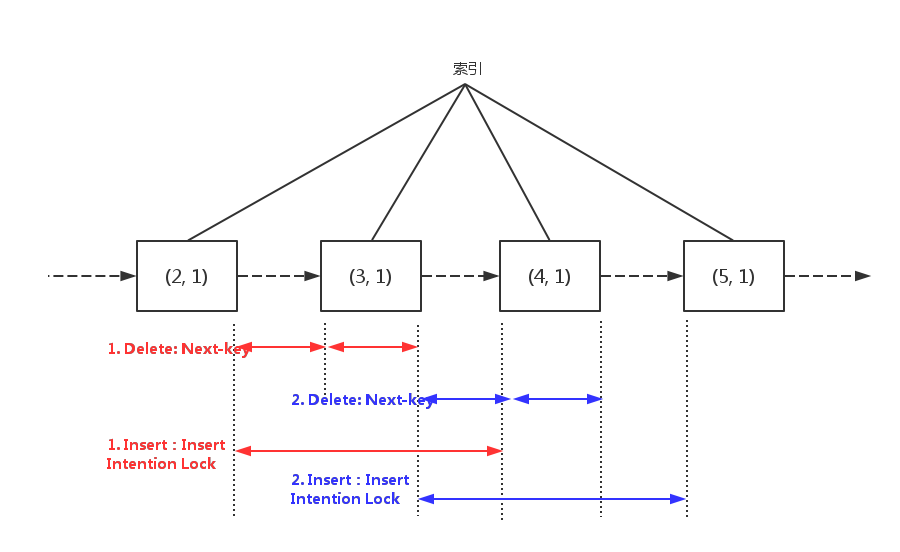
//删除,会在满足条件的记录上加一个next-key锁,也就是锁住之前的Gap和待删除的记录。
DELETE FROM ... WHERE ... sets an exclusive next-key lock on every record the search encounters.

//显然,如果删除的数据比现有最大数据max还大,就会锁(max, +∞)这个Gap
//同理,如果删除的数据比现有最小数据min还小,就会锁(-∞, min)这个Gap

再说插入,插入比较麻烦,因为涉及到插入意向锁(Insert Intention Lock),还是参考Mysql官方文档:InnoDB Locking

1
2
3
An insert intention lock is a type of gap lock set by INSERT operations prior to row insertion. 
This lock signals the intent to insert in such a way that multiple transactions inserting into the same index gap need not wait for each other if they are not inserting at the same position within the gap. 
Suppose that there are index records with values of 4 and 7. Separate transactions that attempt to insert values of 5 and 6, respectively, each lock the gap between 4 and 7 with insert intention locks prior to obtaining the exclusive lock on the inserted row, but do not block each other because the rows are nonconflicting.

简单的是说,插入意向锁可以归结为如下:

1
2
3
4
锁的类型:Gap Lock
加锁时间:插入之前
锁的区域:待插入的区域,比如已有数据4,7,想要插入5,就会锁住(4, 7)这个区域
锁的冲突:只要两个插入的数据不在同一个位置(其实可以理解为同一个数据),插入意向锁之间就不会冲突

插入的锁如下:

1
2
3
INSERT sets an exclusive lock on the inserted row. This lock is an index-record lock, not a next-key lock (that is, there is no gap lock) and does not prevent other sessions from inserting into the gap before the inserted row.

Prior to inserting the row, a type of gap lock called an insert intention gap lock is set. This lock signals the intent to insert in such a way that multiple transactions inserting into the same index gap need not wait for each other if they are not inserting at the same position within the gap. 

就是说插入之前会加一把插入意向锁,除此之外,会在插入的记录上加一把锁。

3.2 锁冲突

关于锁冲突,我们熟知的肯定是S和S兼容,X和其他所有都不兼容。事实上并没有这么简单。比如我们这里前面的例子,两个delete都加了X型的Gap锁,应该排斥才对,但事实上是兼容的。这里参考了从一个死锁看mysql innodb的锁机制这篇文章的结论(准备读源码验证):

1
2
3
4
5
6
7
8
9
10
下面这个是 precise mode 的兼容矩阵:(这个兼容矩阵发生在X与X,S与X不兼容的情况下再进行比对的)

    G    I     R    N (已经存在的锁,包括等待的锁)
G   +     +    +     + 
I    -      +    +     -
R   +     +     -     -
N   +     +     -     -

+ 代表兼容, -代表不兼容. I代表插入意图锁,
G代表Gap锁,I代表插入意图锁,R代表记录锁,N代表Next-Key锁.

其实仔细读Mysql官方文档,我们也能发现上面的两个delete的Gap锁是兼容的:

1
2
Gap locks in InnoDB are “purely inhibitive”, which means they only stop other transactions from inserting to the gap. 
They do not prevent different transactions from taking gap locks on the same gap. Thus, a gap X-lock has the same effect as a gap S-lock.

意思就是说Gap锁的作用是只防止其他事务在这个Gap内的插入,而不排斥其他事务在同一个Gap加上Gap锁。因此Gap X锁和Gap S锁效果相同。 (真心文档每句话都需要仔细理解哈。)

4.解决

DBA的建议:先根据 c_id 查询id,根据 id 删除;

其实只要保证数据存在再区删除就没问题,我们假设我们执行两个以存在数据的先删除再插入。

一个辅助的示意图如下:

5.锁等待

其实上面的例子中会出现一个因为 UNIQUE KEY 导致的锁等待问题,我们可以重现,现有数据如下:

1
2
3
4
5
6
7
8
9
10
11
12
13
14
mysql> select * from business;
+----+-------------+-------------+
| id | c_id | business_id |
+----+-------------+-------------+
| 20 |           1 |           2 |
| 21 |           1 |           3 |
| 23 |           1 |           4 |
| 22 |           1 |           5 |
| 10 |           2 |           1 |
| 11 |           2 |           2 |
|  5 |           3 |           1 |
| 30 |           4 |           1 |
|  7 |           5 |           1 |
+----+-------------+-------------+

过程如下:

步骤 事务1 事务2
1 begin |
2 begin |
3 mysql> delete from business where c_id = 3;

Query OK, 0 rows affected (0.00 sec)
4 mysql> delete from business where c_id = 4;

Query OK, 0 rows affected (0.00 sec)
5 mysql> insert into business (c_id, business_id) values (3, 1);

等待…

INNODB_LOCKS信息及INNODB_LOCK_WAITS信息如下:

1
2
3
4
5
6
7
8
9
10
11
12
13
14
15
mysql> select * from INNODB_LOCK_WAITS;
+-------------------+-------------------+-----------------+------------------+
| requesting_trx_id | requested_lock_id | blocking_trx_id | blocking_lock_id |
+-------------------+-------------------+-----------------+------------------+
| 204349            | 204349:20:4:12    | 204350          | 204350:20:4:12   |
+-------------------+-------------------+-----------------+------------------+
1 row in set (0.00 sec)

mysql> select * from INNODB_LOCKS;
+----------------+-------------+-----------+-----------+-------------------------------+----------------------------------+------------+-----------+----------+-----------+
| lock_id        | lock_trx_id | lock_mode | lock_type | lock_table                    | lock_index                       | lock_space | lock_page | lock_rec | lock_data |
+----------------+-------------+-----------+-----------+-------------------------------+----------------------------------+------------+-----------+----------+-----------+
| 204349:20:4:12 | 204349      | S         | RECORD    | `test`.`business` | uniq_idx_c_id_business_id |         20 |         4 |       12 | 4, 1      |
| 204350:20:4:12 | 204350      | X         | RECORD    | `test`.`business` | uniq_idx_c_id_business_id |         20 |         4 |       12 | 4, 1      |
+----------------+-------------+-----------+-----------+-------------------------------+----------------------------------+------------+-----------+----------+-----------+

show engine innodb status信息如下:

1
2
3
4
5
6
7
8
9
10
11
12
13
14
---TRANSACTION 204350, ACTIVE 24 sec
4 lock struct(s), heap size 1184, 3 row lock(s), undo log entries 1
MySQL thread id 22, OS thread handle 0x7fd7ee4f0700, query id 245 localhost root cleaning up
---TRANSACTION 204349, ACTIVE 31 sec inserting
mysql tables in use 1, locked 1
LOCK WAIT 5 lock struct(s), heap size 1184, 4 row lock(s), undo log entries 2
MySQL thread id 20, OS thread handle 0x7fd7ee4bf700, query id 250 localhost root update
insert into business (c_id, business_id) values (3, 1)
------- TRX HAS BEEN WAITING 6 SEC FOR THIS LOCK TO BE GRANTED:
RECORD LOCKS space id 20 page no 4 n bits 80 index `uniq_idx_c_id_business_id` of table `test`.`business` trx id 204349 lock mode S waiting
Record lock, heap no 12 PHYSICAL RECORD: n_fields 3; compact format; info bits 32
 0: len 4; hex 80000004; asc     ;;
 1: len 1; hex 01; asc  ;;
 2: len 4; hex 0000001e; asc     ;;

这里没明白的一点好事务1(事务id:204349)的insert一个(3, 1)的数据为什么会在(4, 1)上加一个S锁?

不过实验了一下,去掉UNIQUE KEY,使用普通的key,就没有这个锁等到问题,所以这个锁是因为UNIQUE KEY引发的。 这个问题有待进一步深入查资料。

http://songuooo.com/2015/1/7/deadlock-detected-on-concurrent-insert

从代理到Spring事务2-AOP

1.Spring AOP

Spring的AOP(Aspect Oriented Programming,面向切面编程)是一个强大的机制,常用场景在日志、安全、异常处理、事务等。Spring AOP的原理正是基于代理。

我想了解的问题包括:

(1).Spring AOP使用什么机制做代理;
(2).Spring 怎么使用代理达到AOP目的;

#1.1 代理类型选择

先看看Spring是如何选择代理,先看看 Spring官方AOP文档 的说明:

1
2
3
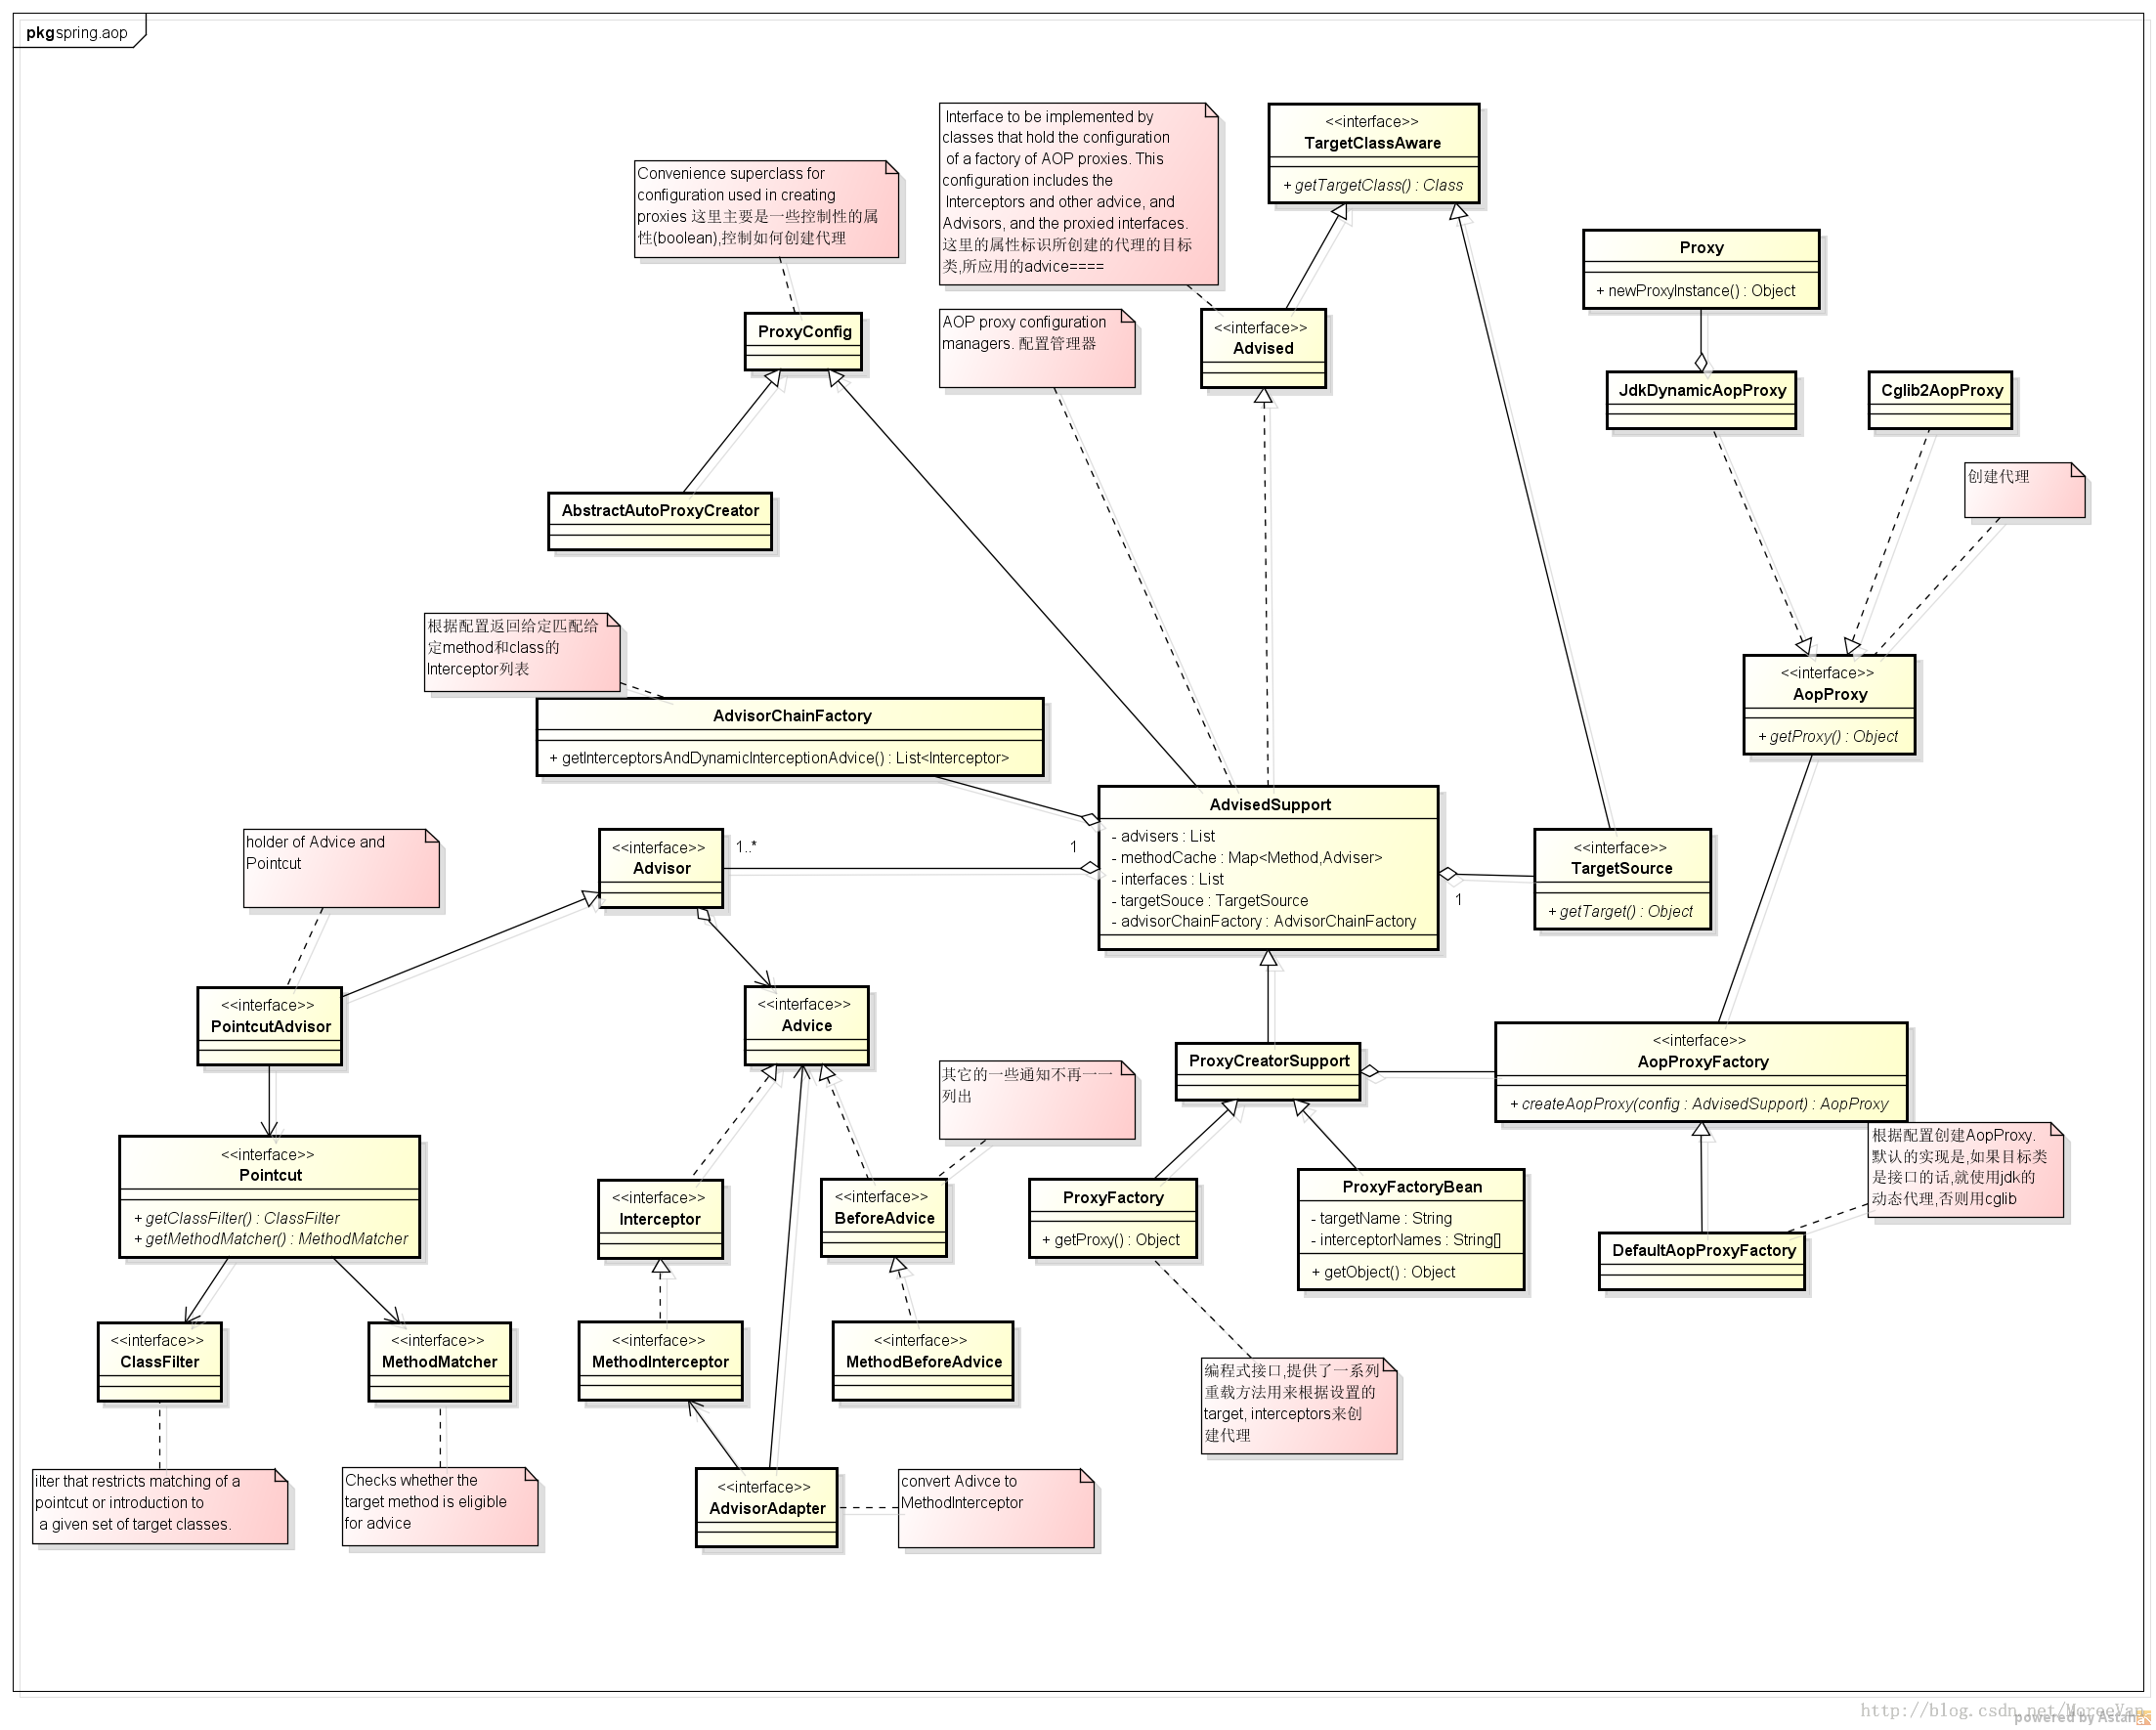
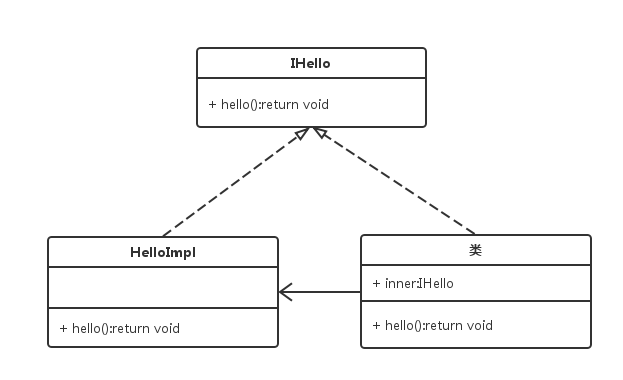
Spring AOP defaults to using standard J2SE dynamic proxies for AOP proxies. This enables any interface (or set of interfaces) to be proxied.

Spring AOP can also use CGLIB proxies. This is necessary to proxy classes, rather than interfaces. CGLIB is used by default if a business object does not implement an interface. As it is good practice to program to interfaces rather than classes, business classes normally will implement one or more business interfaces. It is possible to force the use of CGLIB, in those (hopefully rare) cases where you need to advise a method that is not declared on an interface, or where you need to pass a proxied object to a method as a concrete type.

官方文档的结论是:当业务Bean实现了一个或多个接口的时候,默认使用Java动态代理,当业务Bean没有实现任何接口的时候使用CGLib。

我们来看看相关代码,Spring使用AopProxy表示AOP中的代理,它的作用只要一个:创建代理对象。它有两个实现类:JdkDynamicAopProxy 和 CglibAopProxy :

1
2
3
4
5
6
7
8
9
10
11
12
13
14
15
16
17
18
19
20
21
22
23
24
25
26
27
28
29
30
31
32
33
34
35
36
37
38
39
40
41
42
43
44
45
46
47
public interface AopProxy {
    Object getProxy();

    Object getProxy(ClassLoader classLoader);
}

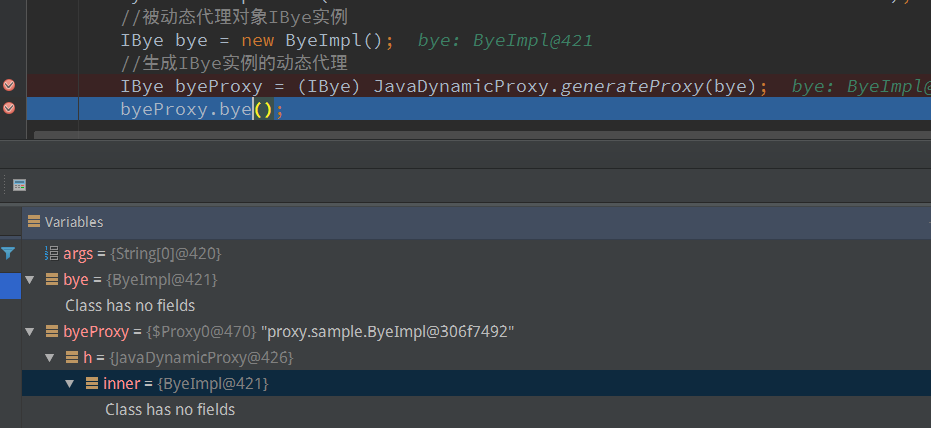
// JdkDynamicAopProxy 实现了 InvocationHandler,实际产生代理类使用 Proxy
final class JdkDynamicAopProxy implements AopProxy, InvocationHandler, Serializable {
    public Object getProxy(ClassLoader classLoader) {
        ...
        return Proxy.newProxyInstance(classLoader, proxiedInterfaces, this);
    }
}

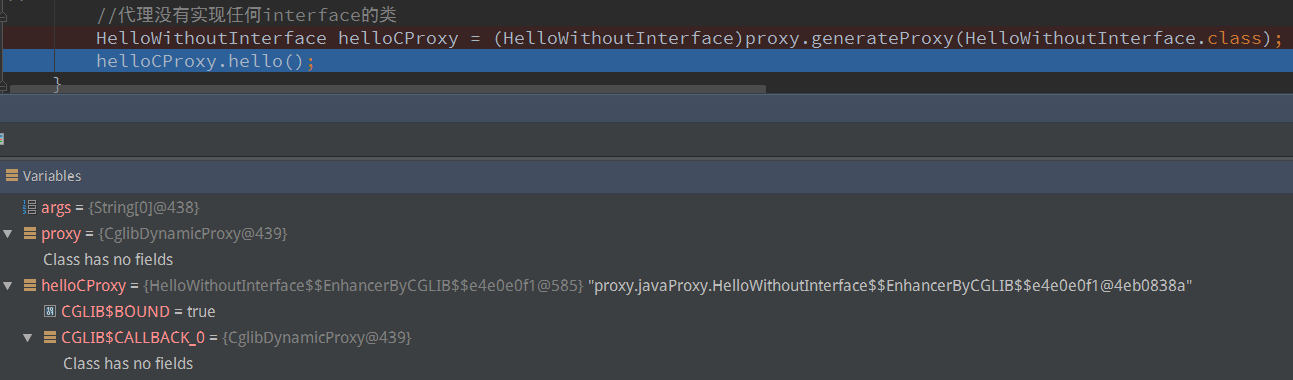
final class CglibAopProxy implements AopProxy, Serializable {
    public Object getProxy(ClassLoader classLoader) {
        Class<?> rootClass = this.advised.getTargetClass();

        // 配置 CGLIB Enhancer...
        Enhancer enhancer = createEnhancer();
        enhancer.setSuperclass(proxySuperClass);
        enhancer.setStrategy(new UndeclaredThrowableStrategy(UndeclaredThrowableException.class));
        enhancer.setInterfaces(AopProxyUtils.completeProxiedInterfaces(this.advised));
        enhancer.setInterceptDuringConstruction(false);

        Callback[] callbacks = getCallbacks(rootClass);
        enhancer.setCallbacks(callbacks);
        enhancer.setCallbackFilter(new ProxyCallbackFilter(
                this.advised.getConfigurationOnlyCopy(), this.fixedInterceptorMap, this.fixedInterceptorOffset));

        Class<?>[] types = new Class[callbacks.length]; //CGLib的回调机制
        for (int x = 0; x < types.length; x++) {
            types[x] = callbacks[x].getClass();
        }
        enhancer.setCallbackTypes(types);

        // 产生代理类并产生代理类的一个instance
        Object proxy;
        if (this.constructorArgs != null) {
            proxy = enhancer.create(this.constructorArgTypes, this.constructorArgs);
        } else {
            proxy = enhancer.create();
        }

        return proxy;
    }
}

AopProxyFactory的默认实现类DefaultAopProxyFactory:

1
2
3
4
5
6
7
8
9
10
11
12
13
14
15
16
public AopProxy createAopProxy(AdvisedSupport config) throws AopConfigException {
    if (config.isOptimize() || config.isProxyTargetClass() || hasNoUserSuppliedProxyInterfaces(config)) {
        Class targetClass = config.getTargetClass();
        if (targetClass == null) {
            throw new AopConfigException("TargetSource cannot determine target class: " +
                    "Either an interface or a target is required for proxy creation.");
        }
        if (targetClass.isInterface()) {    //被代理类,实现了接口,就使用Java动态代理
            return new JdkDynamicAopProxy(config);
        }
        return CglibProxyFactory.createCglibProxy(config);  //没有实现接口使用 CGLib代理
    }
    else {
        return new JdkDynamicAopProxy(config);
    }
}

其中 AdvisedSupport 是 AOP配置管理的基类。这几个配置的说明可以参见 ProxyConfig 类。其中我注释的地方和官方文档是一致的。

#1.2 代理调用

得到代理对象之后的下一步就是调用代理逻辑,这部分实现直接看 JdkDynamicAopProxy.invoke() 代码:

1
2
3
4
5
6
7
8
9
10
11
12
13
14
15
16
17
18
19
20
21
22
23
24
25
26
27
public Object invoke(Object proxy, Method method, Object[] args) throws Throwable {
    //TargetSource包括被代理者的一些属性
    TargetSource targetSource = this.advised.targetSource;
    try {
        Object retVal;

        // 具体的被代理对象
        target = targetSource.getTarget();
        if (target != null) {
            targetClass = target.getClass();
        }

        // 从代理配置中获取方法上的 MethodInterceptor
        List<Object> chain = this.advised.getInterceptorsAndDynamicInterceptionAdvice(method, targetClass);

        // 没有 MethodInterceptor,直接反射调用
        if (chain.isEmpty()) {
            retVal = AopUtils.invokeJoinpointUsingReflection(target, method, args);
        } else {
            // 创建 MethodInvocation 并调用
            invocation = new ReflectiveMethodInvocation(proxy, target, method, args, targetClass, chain);
            retVal = invocation.proceed();
        }

        return retVal;
    }
}

先看看如何获取方法上的 MethodInterceptor,AdvisedSupport其实只是对这个做缓存,实际调用 DefaultAdvisorChainFactory.getInterceptorsAndDynamicInterceptionAdvice:

1
2
3
4
5
6
7
8
9
10
11
12
13
14
15
16
17
18
19
20
21
22
23
24
25
26
27
28
29
30
31
32
33
34
35
36
37
38
/**
 * 从提供的配置实例config中获取advisor列表,遍历处理这些advisor
 * 如果是PointcutAdvisor,则判断此Advisor能否应用到目标方法method上.
 * 将满足条件的Advisor通过AdvisorAdaptor转化成Interceptor列表返回
 */
public List<Object> getInterceptorsAndDynamicInterceptionAdvice(
        Advised config, Method method, Class targetClass) {

    List<Object> interceptorList = new ArrayList<Object>(config.getAdvisors().length);
    boolean hasIntroductions = hasMatchingIntroductions(config, targetClass);
    AdvisorAdapterRegistry registry = GlobalAdvisorAdapterRegistry.getInstance();
    for (Advisor advisor : config.getAdvisors()) {
        if (advisor instanceof PointcutAdvisor) {
            PointcutAdvisor pointcutAdvisor = (PointcutAdvisor) advisor;
            if (config.isPreFiltered() || pointcutAdvisor.getPointcut().getClassFilter().matches(targetClass)) {
                //将Advisor转化成Interceptor
                MethodInterceptor[] interceptors = registry.getInterceptors(advisor);
                MethodMatcher mm = pointcutAdvisor.getPointcut().getMethodMatcher();

                //检查当前advisor的pointcut是否可以匹配当前方法
                if (MethodMatchers.matches(mm, method, targetClass, hasIntroductions)) {
                    if (mm.isRuntime()) {
                        // Creating a new object instance in the getInterceptors() method
                        // isn't a problem as we normally cache created chains.
                        for (MethodInterceptor interceptor : interceptors) {
                            interceptorList.add(new InterceptorAndDynamicMethodMatcher(interceptor, mm));
                        }
                    }
                    else {
                        interceptorList.addAll(Arrays.asList(interceptors));
                    }
                }
            }
        }
        ...
    }
    return interceptorList;
}

下面看看这些 Interceptor 是如何起作用的,看 ReflectiveMethodInvocation 的 proceed() 方法逻辑:

1
2
3
4
5
6
7
8
9
10
11
12
13
14
public Object proceed() throws Throwable {
    // currentInterceptorIndex 表示 Interceptor 链中的当前调用的下标
    Object interceptorOrInterceptionAdvice = this.interceptorsAndDynamicMethodMatchers.get(++this.currentInterceptorIndex);
    if (interceptorOrInterceptionAdvice instanceof InterceptorAndDynamicMethodMatcher) {
        InterceptorAndDynamicMethodMatcher dm = (InterceptorAndDynamicMethodMatcher) interceptorOrInterceptionAdvice;
        // 运行时参数(arguments)是否满足匹配条件
        if (dm.methodMatcher.matches(this.method, this.targetClass, this.arguments)) {
            return dm.interceptor.invoke(this);
        } else {
            // 不匹配,直接跳过当前这个 Interceptor,执行下一个 Interceptor
            return proceed();
        }
    }
}

#1.3 Understanding AOP Proxies

这里其实完全参考Spring AOP官方文档的一节就行了:http://docs.spring.io/spring/docs/3.0.x/reference/aop.html#aop-understanding-aop-proxies

看懂了这一节,能很明白为什么内部调用的方法上的事务注解无效,我们日常犯的错误基本不会有了。

#1.4 Spring如何识别并解析配置

我们都是通过XML文件的形式使用Spring,Spring使用XmlBeanDefinitionReader类来读取解析XML文件,XmlBeanDefinitionReader使用DefaultBeanDefinitionDocumentReader,再调用BeanDefinitionParserDelegate,其中会根据配置的不同找到对应的NamespaceHandler来处理对应的标签。NamespaceHandler是一个接口,一个具体接口就是解析XML中的一个Element得到一个Spring容器中的一个Bean。

1
2
3
public interface NamespaceHandler {
    BeanDefinition parse(Element element, ParserContext parserContext);
}

NamespaceHandler的具体实现类很多,其中几个我们感兴趣的AopNamespaceHandler,MvcNamespaceHandler,QScheduleNamespaceHandler,QConfigNamespaceHandler,QmqClientNamespaceHandler等,看到这里大家应该很熟悉了。我们来看两个实现吧:

1
2
3
4
5
6
7
8
9
10
11
12
13
14
15
16
17
18
public class AopNamespaceHandler extends NamespaceHandlerSupport {
    public void init() {
        registerBeanDefinitionParser("config", new ConfigBeanDefinitionParser());
        registerBeanDefinitionParser("aspectj-autoproxy", new AspectJAutoProxyBeanDefinitionParser());
        registerBeanDefinitionDecorator("scoped-proxy", new ScopedProxyBeanDefinitionDecorator());
        registerBeanDefinitionParser("spring-configured", new SpringConfiguredBeanDefinitionParser());
    }
}

public class MvcNamespaceHandler extends NamespaceHandlerSupport {
    public void init() {
        registerBeanDefinitionParser("annotation-driven", new AnnotationDrivenBeanDefinitionParser());
        registerBeanDefinitionParser("default-servlet-handler", new DefaultServletHandlerBeanDefinitionParser());
        registerBeanDefinitionParser("interceptors", new InterceptorsBeanDefinitionParser());
        registerBeanDefinitionParser("resources", new ResourcesBeanDefinitionParser());
        registerBeanDefinitionParser("view-controller", new ViewControllerBeanDefinitionParser());
    }
}

就是说Spring将配置根据作用分成不同的namespace,每个NamespaceHandler只解析自己独有的几个配置,比如AopNamespaceHandler负责解析scoped-proxy等几个配置,比如我们在配置文件配上:

1
2
<!--aop就表示namespace-->
<aop:config proxy-target-class="true"/>

最后就会找到AopNamespaceHandler类解析这个配置。那出了这些带namespace的配置,正常的配置谁来解析?DefaultBeanDefinitionDocumentReader。

spring在解析的过程中,会去收集spring.*.jar/META-INF下的spring.handlers,spring.schemas文件,这2个文件就是指明了解析spring中自定义标签的Namespace类。如果自己开发Spring组件,需要增加新的标签,也可以按照这个机制。我司的同学可以看看qmq-client包下的META-INF下的这两个文件。

到目前为止,大致知道了谁来解析AOP相关的标签。我们继续看看 AopNamespaceHandler 的代码,它的init()的方法就是给每个标签找一个解析器,比如 aop:config 这个配置就会找到 ConfigBeanDefinitionParser 这个解析器。,些解析器只有一个parse入口函数。

最后放一张AOP相关的图(来源:http://blog.csdn.net/moreevan/article/details/11977115)

#1.5 Spring如何使用代理实现AOP

最后我们整理一下Spring使用代理实现AOP整个流程的步骤。

1.我们在代码中使用引入bean; 2.Spring从BeanFactory总获取bean(ApplicationContext.getBean),参见AbstractBeanFactory.getBean代码:

1
2
3
4
5
6
7
8
9
10
11
12
13
14
15
16
17
18
19
20
21
public Object getBean(String name) throws BeansException {
    return doGetBean(name, null, null, false);
}
protected <T> T doGetBean(final String name, final Class<T> requiredType, final Object[] args, boolean typeCheckOnly)
        throws BeansException {

    final String beanName = transformedBeanName(name);
    Object bean;

    // 创建单例的bean
    if (mbd.isSingleton()) {
        sharedInstance = getSingleton(beanName, new ObjectFactory<Object>() {
            public Object getObject() throws BeansException {
                try {
                    return createBean(beanName, mbd, args);    //创建Bean
                }
            }
        });
        bean = getObjectForBeanInstance(sharedInstance, name, beanName, mbd);
    }
}

3.触发Bean的创建,参考AbstractAutowireCapableBeanFactory.createBean代码:

1
2
3
4
5
6
7
8
9
10
11
12
13
14
15
16
17
18
19
20
21
22
23
24
25
26
27
28
29
30
31
32
33
34
35
36
37
38
39
40
41
42
43
44
public Object createBean(Class beanClass, int autowireMode, boolean dependencyCheck) throws BeansException {
    // Use non-singleton bean definition, to avoid registering bean as dependent bean.
    RootBeanDefinition bd = new RootBeanDefinition(beanClass, autowireMode, dependencyCheck);
    bd.setScope(BeanDefinition.SCOPE_PROTOTYPE);
    return createBean(beanClass.getName(), bd, null);       //---1
}
protected Object createBean(final String beanName, final RootBeanDefinition mbd, final Object[] args)
        throws BeanCreationException {
    ...
    Object beanInstance = doCreateBean(beanName, mbd, args);        //---2
    return beanInstance;
}
protected Object doCreateBean(final String beanName, final RootBeanDefinition mbd, final Object[] args) {
    // Eagerly cache singletons to be able to resolve circular references
    // even when triggered by lifecycle interfaces like BeanFactoryAware.
    boolean earlySingletonExposure = (mbd.isSingleton() && this.allowCircularReferences &&
            isSingletonCurrentlyInCreation(beanName));
    if (earlySingletonExposure) {
        addSingletonFactory(beanName, new ObjectFactory() {
            public Object getObject() throws BeansException {
                return getEarlyBeanReference(beanName, mbd, bean);      //---3
            }
        });
    }

    // Initialize the bean instance.
    ...
    return exposedObject;
}
protected Object getEarlyBeanReference(String beanName, RootBeanDefinition mbd, Object bean) {
    Object exposedObject = bean;
    if (bean != null && !mbd.isSynthetic() && hasInstantiationAwareBeanPostProcessors()) {
        for (BeanPostProcessor bp : getBeanPostProcessors()) {
            if (bp instanceof SmartInstantiationAwareBeanPostProcessor) {
                SmartInstantiationAwareBeanPostProcessor ibp = (SmartInstantiationAwareBeanPostProcessor) bp;
                exposedObject = ibp.getEarlyBeanReference(exposedObject, beanName);     //---逐层包装bean
                if (exposedObject == null) {
                    return exposedObject;
                }
            }
        }
    }
    return exposedObject;
}
  1. 触发代理类对象的创建,见 AbstractAutoProxyCreator,这个其实是一个 BeanPostProcessor,关于BeanPostProcessor的作用见它的注释:
1
2
 * Factory hook that allows for custom modification of new bean instances,
 * e.g. checking for marker interfaces or wrapping them with proxies.

AbstractAutoProxyCreator代码:

1
2
3
4
5
6
7
8
9
10
11
12
13
14
15
16
17
18
19
20
21
22
23
24
25
26
27
28
29
30
31
32
33
34
35
36
37
38
39
40
41
42
public Object getEarlyBeanReference(Object bean, String beanName) throws BeansException {
    Object cacheKey = getCacheKey(bean.getClass(), beanName);
    this.earlyProxyReferences.put(cacheKey, Boolean.TRUE);
    return wrapIfNecessary(bean, beanName, cacheKey);
}
protected Object wrapIfNecessary(Object bean, String beanName, Object cacheKey) {
    // 获取被代理bean上的所有的 Advisor
    Object[] specificInterceptors = getAdvicesAndAdvisorsForBean(bean.getClass(), beanName, null);
    if (specificInterceptors != DO_NOT_PROXY) {
        this.advisedBeans.put(cacheKey, Boolean.TRUE);
        //为制定类创建代理bean
        Object proxy = createProxy(bean.getClass(), beanName, specificInterceptors, new SingletonTargetSource(bean));
        this.proxyTypes.put(cacheKey, proxy.getClass());
        return proxy;
    }
}

protected Object createProxy(
        Class<?> beanClass, String beanName, Object[] specificInterceptors, TargetSource targetSource) {
    // ProxyFactory 继承自 ProxyConfig,局部变量
    ProxyFactory proxyFactory = new ProxyFactory();
    proxyFactory.copyFrom(this);

    // shouldProxyTargetClass表示显示的定义了proxy-target-class="true"
    // 没有定义则可能需要被代理类的 interface 信息
    if (!shouldProxyTargetClass(beanClass, beanName)) {
        Class<?>[] targetInterfaces = ClassUtils.getAllInterfacesForClass(beanClass, this.proxyClassLoader);
        for (Class<?> targetInterface : targetInterfaces) {
            proxyFactory.addInterface(targetInterface);
        }
    }

    Advisor[] advisors = buildAdvisors(beanName, specificInterceptors);
    for (Advisor advisor : advisors) {
        proxyFactory.addAdvisor(advisor);
    }

    proxyFactory.setTargetSource(targetSource); //被代理者
    ...
    // 创建代理对象
    return proxyFactory.getProxy(this.proxyClassLoader);
}

ProxyFactory.java:

1
2
3
4
5
6
7
8
9
public Object getProxy(ClassLoader classLoader) {
    return createAopProxy().getProxy(classLoader);
}
protected final synchronized AopProxy createAopProxy() {
    if (!this.active) {
        activate();
    }
    return getAopProxyFactory().createAopProxy(this);
}

DefaultAopProxyFactory.java的createAopProxy,回到了我们 1.1 代理类型选择 中涉及的内容,整个过程串起来了。

从代理到Spring事务3-Spring事务

1.Spring事务

我们使用事务的目标:

1
The most common reason for using transactions in an application is to maintain a high degree of data integrity and consistency.

我的理解Spring事务中包括的几个主要要素,下面会一一讲解:

1
2
3
1.事务定义:事务包含哪些属性
2.事务管理器:如何将我们对事务的诉求转化为数据库层面的实现
3.事务切面:Spring底层是如何将业务和事务串起来的

关于事务的使用是最简单的,通常分为 编程式事务 和 注解式事务:

编程式事务

代码直接使用PlatformTransactionManager,因此需要使用者自己管理事务的创建,提交,回滚,挂起等逻辑。

优点:灵活度大; 缺点:使用难度大,易出错,业务代码侵入大;

一个编程式事务的完整Demo

我们可以使用 Spring 提供的 TransactionTemplate 类来简化编程事务:

1
2
3
4
5
6
7
8
9
10
TransactionTemplate template = new TransactionTemplate();
template.setIsolationLevel(org.springframework.transaction.TransactionDefinition.ISOLATION_DEFAULT);
template.setPropagationBehavior(org.springframework.transaction.TransactionDefinition.PROPAGATION_REQUIRED);
template.setTransactionManager(transactionManager);
template.execute(new TransactionCallback<UserAo>() {
    @Override
    public UserAo doInTransaction(TransactionStatus status) {
         //business logic
    }
});

我们可以看一下 TransactionTemplate 的实现代码,TransactionTemplate继承了DefaultTransactionDefinition(实现了TransactionDefinition),使用TransactionDefinition需要我们给定一个TransactionManager,可以修改 事务隔离级别,事务传播行为等事务属性(其实是DefaultTransactionDefinition提供的功能)。

1
2
3
4
5
6
7
8
9
10
11
12
13
14
15
16
17
18
19
20
21
public <T> T execute(TransactionCallback<T> action) throws TransactionException {
    TransactionStatus status = this.transactionManager.getTransaction(this);    //获取并初始化事务,处理比如事务传播形式等
    T result;
    try {
        result = action.doInTransaction(status);    //业务逻辑,包括自定义的回滚
    } catch (RuntimeException ex) {
        // Transactional code threw application exception -> rollback
        rollbackOnException(status, ex);
        throw ex;
    } catch (Error err) {
        // Transactional code threw error -> rollback
        rollbackOnException(status, err);
        throw err;
    } catch (Exception ex) {
        // Transactional code threw unexpected exception -> rollback
        rollbackOnException(status, ex);
        throw new UndeclaredThrowableException(ex, "TransactionCallback threw undeclared checked exception");
    }
    this.transactionManager.commit(status); //事务提交
    return result;
}

其中 transactionManager.getTransaction(this) 的代码后面会详细分析。

注解式事务

使用 @Transactional 来管理事务,我们需要声明一个全局的事务管理器,以及事务对注解的支持:

1
2
3
4
5
<bean id="txManager" class="org.springframework.jdbc.datasource.DataSourceTransactionManager">
    <property name="dataSource" ref="dataSource"/>
</bean>

<tx:annotation-driven transaction-manager="txManager"/>

优点:使用简单,业务代码侵入小; 缺点:理解有难度;

注意:Spring建议在具体业务实现类上使用Transactional注解,而不是在接口或则接口的方法上配置@Transactional注解:

1
2
3
4
The Spring team’s recommendation is that you only annotate concrete classes with the @Transactional annotation, as opposed to annotating interfaces. 
You certainly can place the @Transactional annotation on an interface (or an interface method), but this will only work as you would expect it to if you are using interface-based proxies. 
The fact that annotations are not inherited means that if you are using class-based proxies (proxy-target-class=“true“) or the weaving-based aspect (mode=“aspectj“) then the transaction settings will not be recognised by the proxying/weaving infrastructure and the object will not be wrapped in a transactional proxy (which would be decidedly bad). 
So please do take the Spring team’s advice and only annotate concrete classes (and the methods of concrete classes) with the @Transactional annotation.

Transactional注解上可以设置很多事务相关的参数:

1
2
3
4
5
6
7
8
9
10
11
12
13
14
15
16
17
18
19
20
21
22
23
24
25
26
27
28
29
30
31
32
33
34
35
36
37
38
39
40
41
42
43
44
45
46
47
48
49
public @interface Transactional {
    /**
     * 用于配置事务管理器,当系统中存在多个数据源多个事务管理器的时候有用
     * 配置 txManager1 这种 bean name
     */
    String value() default "";

    /**
     * 事务传播级别
     */
    Propagation propagation() default Propagation.REQUIRED;

    /**
     * 事务隔离级别
     */
    Isolation isolation() default Isolation.DEFAULT;

    /**
     * 事务超时时间
     */
    int timeout() default TransactionDefinition.TIMEOUT_DEFAULT;

    /**
     * 事务是否read-only
     * 注意:这个设置对真实的事务执行系统是一个 hint 而不是 强制要求有这个配置的情况下 write 一定导致失败
     */
    boolean readOnly() default false;

    /**
     * 定义0个或多个exception,当事务遇到这些异常的时候,事务会回滚
     */
    Class<? extends Throwable>[] rollbackFor() default {};

    /**
     * 定义0个或多个exception的name,当事务遇到这些异常的时候,事务会回滚
     * 最好定义完整的路径,比如 javax.servlet.ServletException 会代表 ServletException 本身及子类
     */
    String[] rollbackForClassName() default {};

    /**
     * 定义0个或多个exception,当事务遇到这些异常的时候,事务不会回滚
     */
    Class<? extends Throwable>[] noRollbackFor() default {};

    /**
     * 定义0个或多个exception的name,当事务遇到这些异常的时候,事务不会回滚
     */
    String[] noRollbackForClassName() default {};
}

1.1 事务定义

如何定义一个事务,Spring中使用 TransactionDefinition 来定义一个事务的属性,使用接口的形式:

1
2
3
4
5
6
7
8
9
10
11
12
13
14
15
16
17
18
19
20
21
22
23
24
25
26
27
28
public interface TransactionDefinition {
    /**
     * 事务传播行为,可选项参见 TransactionDefinition 中定义的 PROPAGATION_XXX
     */
    int getPropagationBehavior();

    /**
     * 事务隔离级别,可选项参见 TransactionDefinition 中定义的 ISOLATION_XXX
     * 只在 PROPAGATION_REQUIRED 和 PROPAGATION_REQUIRES_NEW 这两个事务传播行为配置下有效
     */
    int getIsolationLevel();

    /**
     * 事务超时时间,单位秒
     * 默认 TIMEOUT_DEFAULT = -1 表示使用底层实现的超时时间或者没有(不支持事务超时时间)
     * 只在 PROPAGATION_REQUIRED 和 PROPAGATION_REQUIRES_NEW 这两个事务传播行为配置下有效
     * 如果事务管理器不支持设置超时时间,而调用了这个接口会抛出异常
     */
    int getTimeout();

    boolean isReadOnly();

    /**
     * 事务name,允许为null
     * 对于申明式事务,默认的name为:完整的class名称.metho名称
     */
    String getName();
}

TransactionDefinition 有一个默认实现 DefaultTransactionDefinition,其中定义了事务几个属性的默认值:

1
2
3
4
private int propagationBehavior = PROPAGATION_REQUIRED;
private int isolationLevel = ISOLATION_DEFAULT;
private int timeout = TIMEOUT_DEFAULT;
private boolean readOnly = false;
事务传播

关于事务的传播行为,这里简单介绍一下:

1
2
3
4
5
6
7
8
9
10
11
12
13
14
15
16
17
18
19
20
21
22
23
24
25
26
27
28
29
30
31
32
33
34
/**
 * 如果已经存在事务直接使用,如果不存在则创建一个新事务
 */
int PROPAGATION_REQUIRED = 0;

/**
 * 如果已经存在事务直接使用,如果不存在则不使用事务
 */
int PROPAGATION_SUPPORTS = 1;

/**
 * 如果已经存在事务直接使用,如果不存在则抛出异常
 */
int PROPAGATION_MANDATORY = 2;

/**
 * 创建一个新事务,如果如果已经存在事务则将当前事务挂起
 */
int PROPAGATION_REQUIRES_NEW = 3;

/**
 * 不使用事务,如果当前已经存在事务则将当前事务挂起
 */
int PROPAGATION_NOT_SUPPORTED = 4;

/**
 * 不使用事务,如果当前存在事务则跑出异常
 */
int PROPAGATION_NEVER = 5;

/**
 * 如果已经存在事务直接使用,则执行一个嵌套事务,如果当前没有事务就创建一个新事务
 */
int PROPAGATION_NESTED = 6;

其中 PROPAGATION_NESTED 理解有点困难,可以参考 Spring 的文档

1
2
3
PROPAGATION_NESTED uses a single physical transaction with multiple savepoints that it can roll back to. 
Such partial rollbacks allow an inner transaction scope to trigger a rollback for its scope, with the outer transaction being able to continue the physical transaction despite some operations having been rolled back. 
This setting is typically mapped onto JDBC savepoints, so will only work with JDBC resource transactions. See Spring's DataSourceTransactionManager.

大致意思就是关于 SavePoint,JDBC定义了java.sql.SavePoint接口,提供在一个更细粒度的事务控制机制。当设置了一个保存点后,可以rollback到该保存点处的状态,而不是rollback整个事务。Connection接口的setSavepoint和releaseSavepoint方法可以设置和释放保存点。 而Spring中定义了 SavepointManager,用于 SavePoint 的创建(createSavepoint),回滚(rollbackToSavepoint),释放(releaseSavepoint)。

事务隔离级别

关于事务的隔离级别,也简单介绍一下,除了 ISOLATION_DEFAULT ,其余均使用 java.sql.Connection 中的隔离级别的定义:

1
2
3
4
5
6
7
8
9
10
11
12
13
14
15
16
17
18
19
20
21
22
23
24
25
/**
 * 使用底层数据源的隔离级别
 * 参考:java.sql.Connection.getTransactionIsolation()
 */
int ISOLATION_DEFAULT = -1;

/**
 * READ_UNCOMMITTED
 */
int ISOLATION_READ_UNCOMMITTED = Connection.TRANSACTION_READ_UNCOMMITTED;

/**
 * READ_COMMITTED
 */
int ISOLATION_READ_COMMITTED = Connection.TRANSACTION_READ_COMMITTED;

/**
 * REPEATABLE_READ
 */
int ISOLATION_REPEATABLE_READ = Connection.TRANSACTION_REPEATABLE_READ;

/**
 * SERIALIZABLE
 */
int ISOLATION_SERIALIZABLE = Connection.TRANSACTION_SERIALIZABLE;

1.2 事务管理器

事务管理 Spring 使用 PlatformTransactionManager 定义,其中包含一个事务的三个主要操作,在业务开始之前开始事务,执行业务逻辑之后提交事务,业务逻辑异常则回滚事务:

1
2
3
4
5
6
7
8
9
10
11
12
13
14
15
16
17
18
19
20
public interface PlatformTransactionManager {
    /**
     * 根据事务定义(TransactionDefinition),返回当前active事务或者创建一个新的事务
     * 注意:
     * 1.TransactionDefinition 中的隔离级别超时时间等设置只在创建了新事物的时候有效,如果使用当前已存在的事务则无效
     * 2.不是所有的事务管理器都支持 TransactionDefinition 中的所有属性,当事务管理器遇到不支持的属性则抛异常
     * 3.上条规则的例外是 read-only这个属性,如果事务管理器不支持这个属性直接忽略
     */
    TransactionStatus getTransaction(TransactionDefinition definition) throws TransactionException;

    /**
     * 事务提交
     */
    void commit(TransactionStatus status) throws TransactionException;

    /**
     * 回滚事务
     */
    void rollback(TransactionStatus status) throws TransactionException;
}

我们熟悉的 JDBC 支持的事务管理器 DataSourceTransactionManager 就是其一个实现,其他还包括 JtaTransactionManager 等。

同时,Spring提供了一个 TransactionStatus 的就看便于再代码中控制事务以及获取事物状态。在PlatformTransactionManager中获取事务的返回值就是一个 TransactionStatus 对象。

1.3 How Transactional Works

下面会讲解我们使用的 Transactional 注解的工作原理,即当我们在Service的某个public方法上加上 @Transactional之后,从编译到调用这个方法整个过程中会发生什么,事务再其中如何起作用。

这个好像没什么讲的,就是AOP的实现原理。简单的说就是创建Bean的时候会创建一个代理Bean,使用AOP实现事务,参考上一届的AOP实现原理。我们可以参考 TransactionInterceptor 的代码。

1.4 线程保持

1.5 Roll Back

主要关注Spring事务的回滚,其实主要就是要搞明白Spring在什么情况下会回滚。

1.6 Pitfalls

事务的坑 http://www.ibm.com/developerworks/library/j-ts1/

代理实现选择器: AdviceMode TransactionManagementConfigurationSelector

声明事务切面实现: TransactionInterceptor

事务实现 Connection关闭自动提交 ConnectionHolder来保持Connection

参考: http://openwares.net/java/spring_mybatis_transaction.html http://my.oschina.net/guanzhenxing/blog/214228 http://www.mybatis.org/spring/zh/transactions.html http://tracylihui.github.io/2015/07/28/spring/Spring%E5%A3%B0%E6%98%8E%E5%BC%8F%E4%BA%8B%E5%8A%A1%E7%AE%A1%E7%90%86/ http://www.cnblogs.com/davenkin/archive/2013/02/16/java-tranaction-1.html http://www.importnew.com/12300.html 详细介绍Spring事务管理: http://developer.51cto.com/art/200906/129854.htm spring事务原理1-事务的抽象: http://sqtds.github.io/2014/06/09/2014/spring-tx1/ Spring官方文档Transaction Management: http://docs.spring.io/autorepo/docs/spring/3.2.x/spring-framework-reference/html/transaction.html Spring官方文档Aspect Oriented Programming with Spring: http://docs.spring.io/spring/docs/3.0.x/reference/aop.html StackOverFlow Spring - @Transactional - What happens in background?: http://stackoverflow.com/questions/1099025/spring-transactional-what-happens-in-background Transaction strategies: Understanding transaction pitfalls: http://www.ibm.com/developerworks/library/j-ts1/ Annotation-based Transactions in Spring: http://springinpractice.com/2008/03/18/annotation-based-transactions-in-spring Design principle behind Transaction framework with Spring 3: http://stackoverflow.com/questions/11789857/design-principle-behind-transaction-framework-with-spring-3 Chapter 6. 使用Spring进行面向切面编程(AOP): http://shouce.jb51.net/spring/aop.html wiki: http://wiki.corp.qunar.com/display/~yushen.ma/Spring+3.x-JDBC+Transaction spring事务: http://wiki.corp.qunar.com/pages/viewpage.action?pageId=52084161 spring 事务: http://wiki.corp.qunar.com/pages/viewpage.action?pageId=93338632 aspectj事务: http://wiki.corp.qunar.com/pages/viewpage.action?pageId=92656954

Demo: 编程事务: http://www.tutorialspoint.com/spring/programmatic_management.htm 声明事务: http://www.tutorialspoint.com/spring/declarative_management.htm

@Transactional注解工作原理:http://blog.csdn.net/dslztx/article/details/46636079 分布式事务系列(1.2)Spring的事务体系: https://yq.aliyun.com/articles/39046 spring transaction源码分析–事务架构:http://www.cnblogs.com/davidwang456/p/4309038.html

http://blog.csdn.net/szwangdf/article/details/41516239

AopProxy DefaultAopProxyFactory

Activiti入门

最近在项目中涉及到工作流的知识,需要调研各个工作流引擎,顺道总结.

如何做流程服务,通常而言两种选择(在我的认知范围内的):

1.状态机
2.工作流

状态机通常意味着需要和业务状态绑定在一起,因此无法做到业务和流程分离,通常的后果就是业务和流程紧耦合.

因此,当我们的多个业务系统涉及到流程时候,可以考虑工作流.

1.工作流的基本知识

1.1 背景

先介绍几个术语:

1
2
3
4
5
6
7
8
9
10
11
12
1.BPM
业务流程管理(Business Process Management),基本内容是管理既定工作的流程,通过服务编排,统一调控各个业务流程,以确保工作在正确的时间被正确的人执行,达到优化整体业务过程的目的.
BPM概念的贯彻执行,需要有标准化的流程定义语言来支撑,使用统一的语言遵循一致的标准描述具体业务过程,这些流程定义描述由专有引擎去驱动执行,这个引擎就是工作流引擎.

2.Workflow
全部或者部分由计算机支持或自动处理的业务过程

3.WfMC
工作流管理联盟

4.BPMN
业务流程建模与标注(Business Process Modeling Notation),又叫业务流程建模符号.可以理解为工作流的建模语言.2004年5月发布了BPMN1.0规范.2011年BPMN2.0新规范的发布为各工作流产品互容互通提供了统一的标准,结束了各工作流厂商各自为政相互抵斥的局面.

参考: BPMN2新规范与Activiti5 BPMN2.0规范

1.2 工作流使用场景

具体什么场景下适合使用工作流,参考前任的总结:

when-to-use-windows-workflow-foundation

1
2
3
4
5
You may need WF only if any of the following are true:

1.You have a long-running process.
2.You have a process that changes frequently.
3.You want a visual model of the process

我理解,注意这里的第三点说的流程可视化的目的并不是为了展示,而是说工作流提供了一种给非开发人员(如运营人员)在线修改流程并且流程实时生效的途径(当然,需要业务支持).

when-to-use-workflow-engines

1
2
A workflow engine is useful when you need to go from a start to a finish but there are many different paths/logic/rules to get there.
if you have processes that are variable from start to end, use a workflow. If the same process can be used by everyone, then you don't need a workflow.

1.3 BPMN基本元素

简单介绍BPMN中的基本元素,详细内容可以在BPMN 2.0规范官网下载PDF版本(章节7.2).包含5个基本元素,每个基本元素下面又包含集中类型的元素,其中Flow Objects是最重要的:

1
2
3
4
5
1. Flow Objects 流对象
2. Data 数据
3. Connecting Objects 连接对象
4. Swimlanes 泳道
5. Artifacts 工件
(1).Flow Objects

Flow Objects包含了工作流的三个基本执行语义

1
2
3
4
5
6
7
8
(1).Events 事件
发生在流程执行过程中的事情.像流程的启动,结束,边界条件以及每个活动的创建,开始,流转等都是流程事件,利用事件机制,可以通过事件控制器为系统增加辅助功能.如其它业务系统集成及活动预警等

(2).Activities 活动
在工作流中所有具备生命周期状态的都可以称之为活动,如原子级的任务(Task)以及子流程(Sub-Process)等.任务是流程模型中最小工作单元,不能继续分解.

(3).Gateways 网关
Gateways用来决定流程流转指向的,简单理解就是判断条件.比如同意走一个流程,驳回走另外一个流程.

事件有三种类型:Start, Intermediate, End

(2).Data
1
2
3
4
Data Objects 数据对象
Data Inputs 数据输入
Data Outputs 数据输出
Data Stores 数据存储
(3).Connecting Objects

连接对象用来把各个流对象或流对象与其他信息连接起来

1
2
3
4
5
6
7
8
9
10
11
(1).Sequence Flows 序列流
表示流对象的前后执行顺序

(2).Message Flows 消息流
表示公开流程或协作模型里参与者之间的消息,交互

(3).Associations 结合关系
为流程中的元素关联信息或数据

(4).Data Associations 数据结合关系
表示数据在流程、活动和数据对象之间的传递
(4).Swimlanes

使用泳道来区分不同部门或者不同参与者的功能和职责。

1
2
Pools 池
Lanes 道
(5).Artifacts
1
2
Group 组
Text Annotation 文本注释

各种基本元素的示意图字节参考BPMN 2.0规范给出的图吧:

几个在线画图的应用如processon都支持BPMN图形.

参考: BPMN这点事-BPMN基本元素(上) BPMN这点事-BPMN基本元素(下)

2.常见的工作流引擎

2.1 jBPM

jBPM官网

2.2 Activiti

Activiti官网 Activiti用户手册 Activiti 5.16 用户手册中文版

2.3 FixFlow

FixFlow国人开发的工作流引擎 FixFlow github地址

2.4 如何选择

主要从易用性,维护成本等几个角度考虑:

1
2
3
4
1.流程设计器的支持;
2.嵌入到业务的成本,比如对Spring的支持等;
3.事务支持;
4.使用范围

目前来看,Activiti的使用是最简单方便的.

3.Activiti

支持最新BPMN2.0规范的开源工作流引擎Activit5,实现了对规范的绝大多数图元的定义(包括一些自己的扩展定义),能够满足企业工作流的各种复杂应用. 它是一个无侵入的,支持嵌入式和独立部署的开源工作流引擎,是Tom Bayen离开jBoss加入Alfresco公司后的另立山头之作.

关于Activiti的一些关键特性:

1
2
3
4
5
6
7
8
9
支持的流程格式: BPMN2、xPDL、jPDL等
引擎核心: PVM(流程虚拟机)
技术前身: jBPM3、jBPM4

数据库持久层: ORM MyBatis3
事务管理: MyBatis机制/Spring事务控制
数据库连接方式: Jdbc/DataSource
支持数据库: Oracle、SQL Server、MySQL等多数数据库
集成接口: SOAP、Mule、RESTful

几个关键的概念:

1
2
3
4
5
6
7
8
9
10
11
1.流程定义
BPMN语法定义的流程定义;比如请假流程定义:开始-->申请人发起-->直属leader审批-->部门leader审批-->人力审批-->结束;

2.流程实例
启动一个流程case,比如张三发起一个请假流程,这时候就会生成一个请假流程的实例;

3.历史流程实例
已经结束的流程,还是可以被查询到

4.任务
最常见的用户任务,即需要人参与的流程节点. 比如请假流程中的直属leader审批这个节点就会生成一个用户任务.

3.1 如何使用

这里主要大致说一下怎么结合Spring使用Activiti

Maven依赖

1
2
3
4
5
6
7
8
9
10
<dependency>
  <groupId>org.activiti</groupId>
  <artifactId>activiti-engine</artifactId>
  <version>5.14</version>
</dependency>
<dependency>
  <groupId>org.activiti</groupId>
  <artifactId>activiti-spring</artifactId>
  <version>5.14</version>
</dependency>

其中activiti-spring主要是提供了SpringProcessEngineConfiguration这个配置入口,并且提供ProcessEngineFactoryBean这个流程引擎的Bean,通过这个Bean,我们就可以获取Activiti内部的各种Service:

1
2
3
4
5
6
7
RepositoryService
RuntimeService
TaskService
HistoryService
ManagementService
IdentityService
FormService

activiti将其内部的表的建表语句和对应的Mybatis配置文件都打包在依赖jar包中,可以参考activiti-engine中的org.activiti.db这个包路径下的内容.

整合Acitiviti在线流程设计器 Activiti - 新一代的开源 BPM 引擎 http://www.infoq.com/cn/articles/bpmn2-activiti5

4.业务如何使用工作流

一般使用方式两种:

1
2
3
4
5
6
7
8
9
10
1.独立部署的工作流服务
对外服务方式: 接口
和业务交互方式: 接口或者MQ
优点: 彻底隔离工作流和业务;可以为多套业务提供服务;
缺点: 无法保证业务数据的强一致性

2.嵌入到业务系统
和业务交互方式: 直接调用
优点: 能保证业务数据的强一致性
缺点: 每套业务都需要自己单独使用工作流(存在重复工作)

从代理到Spring事务1-代理

最近再项目中发现不少同事(包括自己)不太理解默认情况下的Spring事务的运行机制(主要是不理解AOP机制),导致随意使用事务注解.因此也在很多场景事务不生效。因此想从代理机制开始理一下整个Spring声明式事务的原理。

因为篇幅太长,分成三个部分:

(1).代理
(2).Spring的AOP
(3).Spring的事务

1.代理

通常,我们代码中处理核心的业务逻辑,还包含一些枝节性的代码和功能,比如日志记录、消息发送、安全、事务保证和监控等。

我们通常期望将这些枝节性的代码功能和我们的核心业务逻辑分离,减少业务功能和枝节功能的耦合。这时候我们就要使用代理来达到我们的目的。

代理的作用是:为其它对象提供一种代理以控制对这个对象的访问。简单理解就是中间的作用。代理一般涉及到三个角色:

(1).抽象角色:声明真实对象和代理对象的共同接口;
(2).代理角色:代理对象内部包含有真实角色的引用,从而可以操作真实角色,同时代理对象与真实对象有相同的接口,能在任何时候代替真实对象,同时代理对象可以在执行真实对 象前后加入特定的逻辑以实现功能的扩展;
(3).真实角色:代理角色所代表的真实对象,是我们最终要引用的对象;

1.1 代理模式

代理模式是一个经典的设计模式,介绍往上很多。

下面是一个最简单的实现:

1
2
3
4
5
6
7
8
9
10
11
12
13
14
15
16
17
18
19
20
21
22
23
24
25
26
27
28
29
30
31
32
33
34
35
36
37
public interface IHello {
    void hello();
}

public class HelloImpl implements IHello {
    @Override
    public void hello() {
        System.out.println("HelloImpl: Hello World.");
    }
}

public class HelloProxyImpl implements IHello {

    private IHello inner;

    public HelloProxyImpl(IHello inner) {
        this.inner = inner;
    }

    @Override
    public void hello() {
        doSomethingBefore();
        
        inner.hello();
        
        doSomethingAfter();
    }

    private void doSomethingBefore() {
        System.out.println("HelloProxyImpl: Before hello()...");
    }

    private void doSomethingAfter() {
        System.out.println("HelloProxyImpl: After hello()...");
    }

}

UML图大致如下:

从代码上我们可以看出,代理模式要求(这也是它的限制所在):

(1).代理类需要和被代理者一样实现相同的接口;
(2).代理类包含被代理者的引用;

1.2 Java动态代理

代理模式我们可以理解为一种静态代理,其问题是需要我们显示的为每个需要被代理的类实现一个代理类,即一个代理类只能为i一个被代理者做代理的功能。如果有上千个类需要代理,估计要骂娘了。

java动态代理正是为了解决这个问题。主要通过java.lang.reflect.Proxy类和java.lang.reflect.InvocationHandler接口。我们只需要实现InvocationHandler接口,在实现invoke()方法的时候加上我们的代理逻辑。

一个简单的使用实例如下:

1
2
3
4
5
6
7
8
9
10
11
12
13
14
15
16
17
18
19
20
21
22
23
24
25
26
27
28
29
30
31
32
33
34
35
36
37
38
39
40
41
42
43
44
45
46
47
48
49
50
51
52
53
54
55
56
57
58
59
60
61
62
63
64
65
66
67
/**
 * @author xiaobaoqiu  Date: 16-3-10 Time: 下午6:18
 */
public class JavaDynamicProxy implements InvocationHandler {

    /**
     * 被代理者
     */
    private Object inner;

    /**
     * 生成代理类
     */
    public static Object generateProxy(Object inner) {
        return Proxy.newProxyInstance(
                inner.getClass().getClassLoader(),
                inner.getClass().getInterfaces(),
                new JavaDynamicProxy(inner));
    }

    private JavaDynamicProxy(Object inner) {
        this.inner = inner;
    }

    public Object invoke(Object proxy, Method method, Object[] args) throws Throwable {
        doSomethingBefore();

        Object result = method.invoke(inner, args);

        doSomethingAfter();

        return result;
    }

    private void doSomethingBefore() {
        System.out.println("JavaDynamicProxy: Before...");
    }

    private void doSomethingAfter() {
        System.out.println("JavaDynamicProxy: After...");
    }
}

//使用
public static void main(String[] args) {
        //被动态代理的IHello实例对象A
        IHello helloA = new HelloImpl();
        //生成对象A的动态代理
        IHello helloAProxy = (IHello) JavaDynamicProxy.generateProxy(helloA);
        helloAProxy.hello();

        System.out.println("-------------------------------------------------");
        // 一个JavaDynamicProxy可以一直使用

        //被动态代理的IHello实例对象B
        IHello helloB = new HelloWithLogImpl();
        //生成对象B的动态代理
        IHello helloBProxy = (IHello) JavaDynamicProxy.generateProxy(helloB);
        helloBProxy.hello();

        System.out.println("-------------------------------------------------");
        //被动态代理对象IBye实例
        IBye bye = new ByeImpl();
        //生成IBye实例的动态代理
        IBye byeProxy = (IBye) JavaDynamicProxy.generateProxy(bye);
        byeProxy.bye();
}

JavaDynamicProxy.generateProxy的输出会是一个动态的代理类。debug信息如下,从debug信息我们大致知道,这个代理类的类名称为$Proxy0,内部包含一个属性名为h的属性,h指向的就是我们实现的InvocationHandler的类(这里即JavaDynamicProxy)的实例。

但是Java动态代理的限制是:

(1).被代理的类要求至少实现了一个Interface;
(2).被代理的类要求有public的构造函数(即没有显示的将其设置为private等);
(3).被代理的类要求不是final;

如下代理一个没有实现任何接口的类会报错

1
2
3
4
5
6
    //没有实现任何interface的类使不能被动态代理的
    System.out.println("-------------------------------------------------");
    HelloWithoutInterface helloC = new HelloWithoutInterface();
    //生成对象C的动态代理
    HelloWithoutInterface helloCProxy = (HelloWithoutInterface) JavaDynamicProxy.generateProxy(helloC);
    helloCProxy.hello();

错误信息如下:

1
2
3
4
5
6
7
Exception in thread "main" java.lang.ClassCastException: com.sun.proxy.$Proxy2 cannot be cast to proxy.javaProxy.HelloWithoutInterface
  at proxy.javaProxy.JavaProxyMain.main(JavaProxyMain.java:42)
  at sun.reflect.NativeMethodAccessorImpl.invoke0(Native Method)
  at sun.reflect.NativeMethodAccessorImpl.invoke(NativeMethodAccessorImpl.java:57)
  at sun.reflect.DelegatingMethodAccessorImpl.invoke(DelegatingMethodAccessorImpl.java:43)
  at java.lang.reflect.Method.invoke(Method.java:606)
  at com.intellij.rt.execution.application.AppMain.main(AppMain.java:140)

Java动态代理的机制是利用反射机制生成。具体代码可以debug,主要的代码如下:

1
2
3
4
5
6
7
8
9
10
11
12
13
14
15
16
17
18
19
20
21
22
23
24
25
26
27
28
29
30
31
32
33
//Proxy.java
public static Object newProxyInstance(ClassLoader loader, Class<?>[] interfaces, InvocationHandler h) throws IllegalArgumentException {
  ...
  Class<?> cl = getProxyClass0(loader, intfs);  //生成代理类
  ...
  return newInstance(cons, ih);   // 生成代理类的实例
}

private static Class<?> getProxyClass0(ClassLoader loader,  Class<?>... interfaces) {
        //生成代理类的主要逻辑在ProxyClassFactory
        return proxyClassCache.get(loader, interfaces);
}

//ProxyClassFactory的apply方法
public Class<?> apply(ClassLoader loader, Class<?>[] interfaces) {
  ...
            String proxyPkg = null;     // 生成代理类的包路径
            ...
            if (proxyPkg == null) {
                // if no non-public proxy interfaces, use com.sun.proxy package
                proxyPkg = ReflectUtil.PROXY_PACKAGE + ".";   //默认路径在com.sun.proxy下面
            }

            long num = nextUniqueNumber.getAndIncrement();    //代理类的序号, 我们熟悉的$Proxy0中的0
            String proxyName = proxyPkg + proxyClassNamePrefix + num; //代理类的类名称

            //使用ProxyGenerator生成代理类的字节码
            byte[] proxyClassFile = ProxyGenerator.generateProxyClass(proxyName, interfaces);
            //生成代理类
            return defineClass0(loader, proxyName, proxyClassFile, 0, proxyClassFile.length);
}

//ProxyGenerator.generateProxyClass的代码太恶心的...

我们可以自己使用ProxyGenerator来生成代理类并将其字节码记录下来:

1
2
3
// 获取代理类的字节码
byte[] classFile = ProxyGenerator.generateProxyClass("$Proxy0", ByeImpl.class.getInterfaces());
//将字节码写文件,建议写成.class文件

获取的字节码如下:

1
2
3
4
5
6
7
8
9
10
11
12
13
14
15
16
17
18
19
20
21
22
23
24
25
26
27
28
29
30
31
32
33
34
35
36
37
38
39
40
41
42
43
44
45
46
47
48
49
50
51
52
53
54
55
56
57
58
59
60
61
62
63
64
65
66
67
68
69
import java.lang.reflect.InvocationHandler;
import java.lang.reflect.Method;
import java.lang.reflect.Proxy;
import java.lang.reflect.UndeclaredThrowableException;
import proxy.sample.IBye;

public final class $Proxy0 extends Proxy implements IBye {
    private static Method m1;
    private static Method m3;
    private static Method m0;
    private static Method m2;

    public $Proxy0(InvocationHandler var1) throws  {
        super(var1);
    }

    public final boolean equals(Object var1) throws  {
        try {
            return ((Boolean)super.h.invoke(this, m1, new Object[]{var1})).booleanValue();
        } catch (RuntimeException | Error var3) {
            throw var3;
        } catch (Throwable var4) {
            throw new UndeclaredThrowableException(var4);
        }
    }

    public final void bye() throws  {
        try {
            super.h.invoke(this, m3, (Object[])null);
        } catch (RuntimeException | Error var2) {
            throw var2;
        } catch (Throwable var3) {
            throw new UndeclaredThrowableException(var3);
        }
    }

    public final int hashCode() throws  {
        try {
            return ((Integer)super.h.invoke(this, m0, (Object[])null)).intValue();
        } catch (RuntimeException | Error var2) {
            throw var2;
        } catch (Throwable var3) {
            throw new UndeclaredThrowableException(var3);
        }
    }

    public final String toString() throws  {
        try {
            return (String)super.h.invoke(this, m2, (Object[])null);
        } catch (RuntimeException | Error var2) {
            throw var2;
        } catch (Throwable var3) {
            throw new UndeclaredThrowableException(var3);
        }
    }

    static {
        try {
            m1 = Class.forName("java.lang.Object").getMethod("equals", new Class[]{Class.forName("java.lang.Object")});
            m3 = Class.forName("proxy.sample.IBye").getMethod("bye", new Class[0]);
            m0 = Class.forName("java.lang.Object").getMethod("hashCode", new Class[0]);
            m2 = Class.forName("java.lang.Object").getMethod("toString", new Class[0]);
        } catch (NoSuchMethodException var2) {
            throw new NoSuchMethodError(var2.getMessage());
        } catch (ClassNotFoundException var3) {
            throw new NoClassDefFoundError(var3.getMessage());
        }
    }
}

从生成的类我们知道,代理类继承Proxy类(这就是为什么Proxy类内的InvocationHandler实例未protected)并实现我们需要的被代理者的Interface(比如这里的bye()方法),另外它只要一个接受一个InvocationHandler为参数的构造函数。当我们调用代理类的bye()方法时候,其实是调用我们实现的InvocationHandler(即上面的JavaDynamicProxy)的invoke()方法,在invoke()方法里面,我们实现了我的代理逻辑。

我们这里这个Demo的大致UML图如下:

参考:http://www.cnblogs.com/cruze/p/3819761.html

1.3 CGLib动态代理

鉴于Java动态代理的限制,我们有需要代理没有任何实现接口的类的时候,可以考虑使用CGLib。CGLib的全称是Code Generate Library。CGLib的使用使用十分广泛,我们这里要讲的Spring AOP,以及EasyMock等。

同样先上Demo代码,我们只需要实现MethodInterceptor接口:

1
2
3
4
5
6
7
8
9
10
11
12
13
14
15
16
17
18
19
20
21
22
23
24
25
26
27
28
29
30
31
32
33
34
35
36
37
38
39
40
41
42
43
44
45
46
47
48
49
50
51
52
53
54
55
56
/**
 * @author xiaobaoqiu  Date: 16-3-10 Time: 下午7:15
 */
public class CglibDynamicProxy implements MethodInterceptor {

    /**
     * 动态生成代理类
     */
    public Object generateProxy(Class cls) {
        Enhancer enhancer = new Enhancer();
        enhancer.setCallback(this);
//        enhancer.setCallbackFilter(); //filter
        enhancer.setSuperclass(cls);
        return enhancer.create(); // Enhancer也包含带参数的create方法
    }

    public Object intercept(Object obj, Method method, Object[] args, MethodProxy proxy) throws Throwable {
        doSomethingBefore();

        Object result = proxy.invokeSuper(obj, args);

        doSomethingAfter();

        return result;
    }

    private void doSomethingBefore() {
        System.out.println("CglibDynamicProxy: Before...");
    }

    private void doSomethingAfter() {
        System.out.println("CglibDynamicProxy: After...");
    }
}

//使用
public static void main(String[] args) {
        CglibDynamicProxy proxy = new CglibDynamicProxy();
        //注意: 原始类的instance不需要存在,只需要Class类型

        //用接口IHello接, 或者 HelloImpl 接
        IHello helloAProxy = (IHello)proxy.generateProxy(HelloImpl.class);
        helloAProxy.hello();

        System.out.println("-------------------------------------------------");

        //用接口IHello接, 或者 HelloWithLogImpl 接
        IHello helloBProxy = (IHello)proxy.generateProxy(HelloWithLogImpl.class);
        helloBProxy.hello();

        System.out.println("-------------------------------------------------");

        //代理没有实现任何interface的类
        HelloWithoutInterface helloCProxy = (HelloWithoutInterface)proxy.generateProxy(HelloWithoutInterface.class);
        helloCProxy.hello();
}

同样我们debug一下,得到的信息如下,同样生成了代理类,类名称为proxy.sample.HelloImpl$$EnhancerByCGLIB$$b46b6f06,这个稀奇古怪的类名我们后面会分析:

下面还是尝试分析CGLib动态代理的原理。默认情况下生成的代理class文件只存储在内存中,我们可以在代码中设置一个环境变量:

1
System.setProperty(DebuggingClassWriter.DEBUG_LOCATION_PROPERTY, "/home/xiaobaoqiu/cglib_proxy");

之后我们在目标目录下得到很多的class,其中的proxy目录包含了生成的class文件。我们发现一大堆的class文件,类名都是稀奇古怪:

1
2
3
4
5
xiaobaoqiu@xiaobaoqiu:~/cglib_proxy/proxy/javaProxy$ ll
-rw-rw-r-- 1 xiaobaoqiu xiaobaoqiu 2227  3月 21 18:38 HelloWithoutInterface$$EnhancerByCGLIB$$7d786e36.class
-rw-rw-r-- 1 xiaobaoqiu xiaobaoqiu 5555  3月 21 18:38 HelloWithoutInterface$$EnhancerByCGLIB$$e4e0e0f1.class
-rw-rw-r-- 1 xiaobaoqiu xiaobaoqiu 7744  3月 21 18:38 HelloWithoutInterface$$EnhancerByCGLIB$$e4e0e0f1$$FastClassByCGLIB$$814877d5.class
-rw-rw-r-- 1 xiaobaoqiu xiaobaoqiu 2673  3月 21 18:45 HelloWithoutInterface$$FastClassByCGLIB$$32a767a1.class

我们先看看class文件的生成策略。每个Class Generator(比如这里的Enhancer)都继承自AbstractClassGenerator(实现接口ClassGenerator,这个接口只有一个generateClass的方法),需要实现其generateClass()方法。generateClassName()方法用来生成Class名称:

1
2
3
4
5
6
7
8
9
10
11
12
13
14
15
16
17
18
private String generateClassName(Predicate nameTestPredicate) {
        return namingPolicy.getClassName(namePrefix, source.name, key, nameTestPredicate);
}

//namingPolicy的默认实现NamingPolicy
public String getClassName(String prefix, String source, Object key, Predicate names) {
  //prefix为被代理类的路径,
        String base =
            prefix + "$$" +                       //prefix为被代理类的路径
            source.substring(source.lastIndexOf('.') + 1) +       //获取生成代理类的类,比如我们这里的Enhancer
            getTag() + "$$" +                     //getTag()默认为ByCGLIB
            Integer.toHexString(STRESS_HASH_CODE ? 0 : key.hashCode());   //hashcode
        String attempt = base;
        int index = 2;
        while (names.evaluate(attempt))       //如果有重复,则再在后面加上下标,小标从2开始
            attempt = base + "_" + index++;
        return attempt;
}

下面正式进入class文件的生成原理分析,还是从源代码入手,enhancer.create()最终进入AbstractClassGenerator.create()方法,我们发现最终return的Object是从内部变量obj得来,因此,我们看看ClassLoaderData的生成逻辑:

1
2
3
4
5
6
7
8
9
10
11
12
13
14
15
16
17
18
19
20
21
22
23
24
25
26
27
28
29
30
31
32
33
34
protected Object create(Object key) {
            ClassLoader loader = getClassLoader();
            Map<ClassLoader, ClassLoaderData> cache = CACHE;
            ClassLoaderData data = cache.get(loader);
            if (data == null) {
                synchronized (AbstractClassGenerator.class) {
                    data = cache.get(loader);
                    if (data == null) {
                        Map<ClassLoader, ClassLoaderData> newCache = new WeakHashMap<ClassLoader, ClassLoaderData>(cache);
                        data = new ClassLoaderData(classLoader);
                        newCache.put(classLoader, data);
                        CACHE = newCache;
                    }
                }
            }
            this.key = key;
            Object obj = data.get(this);
            if (obj instanceof Class) {
                return firstInstance((Class) obj);
            }
            return nextInstance(obj);
}

public ClassLoaderData(ClassLoader classLoader) {
            this.classLoader = new WeakReference<ClassLoader>(classLoader);
            Function<AbstractClassGenerator, Object> load =
                    new Function<AbstractClassGenerator, Object>() {
                        public Object apply(AbstractClassGenerator gen) {
                            Class klass = gen.generate(ClassLoaderData.this); //生成class的关键代码
                            return gen.wrapCachedClass(klass);
                        }
                    };
            generatedClasses = new LoadingCache<AbstractClassGenerator, Object, Object>(GET_KEY, load);
}

因此我们将目光转到generate()中:

1
2
3
4
5
6
7
8
9
10
11
12
13
14
15
16
17
18
19
20
21
22
23
24
25
26
27
28
29
30
31
32
33
34
35
36
//Enhancer的generate()方法
protected Class generate(ClassLoaderData data) {
        validate();
        if (superclass != null) {
            setNamePrefix(superclass.getName());
        } else if (interfaces != null) {
            setNamePrefix(interfaces[ReflectUtils.findPackageProtected(interfaces)].getName());
        }
        return super.generate(data);  //父类AbstractClassGenerator
}
// AbstractClassGenerator的generate()方法
protected Class generate(ClassLoaderData data) {
            //...
            ClassLoader classLoader = data.getClassLoader();
            this.setClassName(generateClassName(data.getUniqueNamePredicate()));  //代理类的类名称的生成逻辑
            //...
            byte[] b = strategy.generate(this);       //生成策略,默认实现DefaultGeneratorStrategy,生成class文件的字节码
            String className = ClassNameReader.getClassName(new ClassReader(b));
            ProtectionDomain protectionDomain = getProtectionDomain();
            synchronized (classLoader) { // just in case
                if (protectionDomain == null) {
                    gen = ReflectUtils.defineClass(className, b, classLoader);
                } else {
                    gen = ReflectUtils.defineClass(className, b, classLoader, protectionDomain);
                }
            }
            return gen;
            ...//异常处理
}

//DefaultGeneratorStrategy的generate()方法
public byte[] generate(ClassGenerator cg) throws Exception {
        DebuggingClassWriter cw = getClassVisitor();
        transform(cg).generateClass(cw);      //这里调用最终的generateClass()逻辑,Visitor模式
        return transform(cw.toByteArray());   //通过Visitor得到最后的字节码
}

所以最终的调用是Enhancer的generateClass()调用。这代码好晦涩,感觉和JVM加载字节码相关。

看一下CGLib生成的class文件,这个代理类继承了我们的被代理类并且实现了Factory类,类定义如下:

1
2
3
4
5
6
7
8
9
10
11
12
13
14
15
16
17
18
19
20
21
22
23
24
25
26
27
28
29
30
31
32
33
34
35
36
37
38
39
40
41
42
43
44
45
46
47
48
49
50
51
52
53
54
55
56
57
58
59
60
61
62
63
64
public class HelloWithoutInterface$$EnhancerByCGLIB$$e4e0e0f1 extends proxy.javaProxy.HelloWithoutInterface implements net.sf.cglib.proxy.Factory {
    private boolean CGLIB$BOUND;
    public static java.lang.Object CGLIB$FACTORY_DATA;
    private static final java.lang.ThreadLocal CGLIB$THREAD_CALLBACKS;
    private static final net.sf.cglib.proxy.Callback[] CGLIB$STATIC_CALLBACKS;
    private net.sf.cglib.proxy.MethodInterceptor CGLIB$CALLBACK_0;
    private static final java.lang.reflect.Method CGLIB$hello$0$Method;
    private static final net.sf.cglib.proxy.MethodProxy CGLIB$hello$0$Proxy;
    private static final java.lang.Object[] CGLIB$emptyArgs;
    private static final java.lang.reflect.Method CGLIB$equals$1$Method;
    private static final net.sf.cglib.proxy.MethodProxy CGLIB$equals$1$Proxy;
    private static final java.lang.reflect.Method CGLIB$toString$2$Method;
    private static final net.sf.cglib.proxy.MethodProxy CGLIB$toString$2$Proxy;
    private static final java.lang.reflect.Method CGLIB$hashCode$3$Method;
    private static final net.sf.cglib.proxy.MethodProxy CGLIB$hashCode$3$Proxy;
    private static final java.lang.reflect.Method CGLIB$clone$4$Method;
    private static final net.sf.cglib.proxy.MethodProxy CGLIB$clone$4$Proxy;

    static void CGLIB$STATICHOOK1() { /* compiled code */ }

    final void CGLIB$hello$0() { /* compiled code */ }    //代理的方法

    public final void hello() { /* compiled code */ } //代理的方法

    final boolean CGLIB$equals$1(java.lang.Object o) { /* compiled code */ }

    public final boolean equals(java.lang.Object o) { /* compiled code */ }

    final java.lang.String CGLIB$toString$2() { /* compiled code */ }

    public final java.lang.String toString() { /* compiled code */ }

    final int CGLIB$hashCode$3() { /* compiled code */ }

    public final int hashCode() { /* compiled code */ }

    final java.lang.Object CGLIB$clone$4() throws java.lang.CloneNotSupportedException { /* compiled code */ }

    protected final java.lang.Object clone() throws java.lang.CloneNotSupportedException { /* compiled code */ }

    public static net.sf.cglib.proxy.MethodProxy CGLIB$findMethodProxy(net.sf.cglib.core.Signature signature) { /* compiled code */ }

    public HelloWithoutInterface$$EnhancerByCGLIB$$e4e0e0f1() { /* compiled code */ }

    public static void CGLIB$SET_THREAD_CALLBACKS(net.sf.cglib.proxy.Callback[] callbacks) { /* compiled code */ }

    public static void CGLIB$SET_STATIC_CALLBACKS(net.sf.cglib.proxy.Callback[] callbacks) { /* compiled code */ }

    private static final void CGLIB$BIND_CALLBACKS(java.lang.Object o) { /* compiled code */ }

    public java.lang.Object newInstance(net.sf.cglib.proxy.Callback[] callbacks) { /* compiled code */ }

    public java.lang.Object newInstance(net.sf.cglib.proxy.Callback callback) { /* compiled code */ }

    public java.lang.Object newInstance(java.lang.Class[] classes, java.lang.Object[] objects, net.sf.cglib.proxy.Callback[] callbacks) { /* compiled code */ }

    public net.sf.cglib.proxy.Callback getCallback(int i) { /* compiled code */ }

    public void setCallback(int i, net.sf.cglib.proxy.Callback callback) { /* compiled code */ }

    public net.sf.cglib.proxy.Callback[] getCallbacks() { /* compiled code */ }

    public void setCallbacks(net.sf.cglib.proxy.Callback[] callbacks) { /* compiled code */ }
}

注意,我们生成的动态代理包含两个hello()相关的方法。我们可以使用javap获取其字节码,我们发现和我们被代理者同名的hello()方法是带代理逻辑的,而CGLIB$hello$0()这个则是原始被代理者的直接调用(不包含代理逻辑):

1
2
3
4
5
6
7
8
9
10
11
12
13
14
15
16
17
18
19
20
21
22
23
24
25
26
27
28
29
30
31
xiaobaoqiu@xiaobaoqiu:~/cglib_proxy/proxy/javaProxy$ javap -c HelloWithoutInterface\$\$EnhancerByCGLIB\$\$e4e0e0f1.class
...
  final void CGLIB$hello$0();
    Code:
       0: aload_0
       1: invokespecial #36                 // Method proxy/javaProxy/HelloWithoutInterface.hello:()V
       4: return

  public final void hello();
    Code:
       0: aload_0
       1: getfield      #38                 // Field CGLIB$CALLBACK_0:Lnet/sf/cglib/proxy/MethodInterceptor;
       4: dup
       5: ifnonnull     17
       8: pop
       9: aload_0
      10: invokestatic  #42                 // Method CGLIB$BIND_CALLBACKS:(Ljava/lang/Object;)V
      13: aload_0
      14: getfield      #38                 // Field CGLIB$CALLBACK_0:Lnet/sf/cglib/proxy/MethodInterceptor;
      17: dup
      18: ifnull        37
      21: aload_0
      22: getstatic     #44                 // Field CGLIB$hello$0$Method:Ljava/lang/reflect/Method;
      25: getstatic     #46                 // Field CGLIB$emptyArgs:[Ljava/lang/Object;
      28: getstatic     #48                 // Field CGLIB$hello$0$Proxy:Lnet/sf/cglib/proxy/MethodProxy;
      31: invokeinterface #54,  5           // InterfaceMethod net/sf/cglib/proxy/MethodInterceptor.intercept:(Ljava/lang/Object;Ljava/lang/reflect/Method;[Ljava/lang/Object;Lnet/sf/cglib/proxy/MethodProxy;)Ljava/lang/Object;
      36: return
      37: aload_0
      38: invokespecial #36                 // Method proxy/javaProxy/HelloWithoutInterface.hello:()V
      41: return
...

遗留问题: (1).为什么一个类会生成多个代理类,各个代理类都是什么用处;

CGLib代理同样存在限制:

(1).private方法无法代理;
(2).final方法无法代理;

private方法和final方法看代理类的字节码会发现,代理类不会这些重写函数(子类没法重写),因此会自动调用父类的。

参考: cglib源码分析(四):cglib 动态代理原理分析

CGLib: The Missing Manual

#1.4 Java动态代理 VS CGLib动态代理

简单总结对比一下两种动态代理:

代理 没有实现interface的类 protected方法 private方法 final类 final方法 构造函数private的类
Java动态代理 不支持 不支持 不支持 支持 支持 支持
CGLib动态代理 支持 支持 不支持 不支持 不支持 不支持

关于CGLib对protected方法的支持,可以在生成的代理类中看到.

1
2
3
4
CGLib报错信息:
final类: Cannot subclass final class proxy.javaProxy.HelloWithFinal
构造方法私有的类: No visible constructors in class proxy.javaProxy.HelloWithoutConstructor
final方法: 不报错,但没有代理逻辑

在性能方面,通常认为Java动态代理生成代理类比CGLib生成代理类快,但是CGLib的代理类运行期性能会优于Java动态代理的代理类。不过通常性能都不是问题,如果确实很关心性能,建议直接使用ASM。

参考: Why do you think CGLib proxies are faster than JDK Proxies?

Implement Your Own Proxy-Based AOP Framework Blog

BeanDefinitionParserDelegate AnnotationDrivenBeanDefinitionParser

参考: Spring加载资源分析:http://www.blogjava.net/heavensay/archive/2013/10/28/405699.html

事务的坑 http://www.ibm.com/developerworks/library/j-ts1/

代理实现选择器: AdviceMode TransactionManagementConfigurationSelector

声明事务切面实现: TransactionInterceptor

事务实现 Connection关闭自动提交 ConnectionHolder来保持Connection

参考: http://openwares.net/java/spring_mybatis_transaction.html http://my.oschina.net/guanzhenxing/blog/214228 http://www.mybatis.org/spring/zh/transactions.html http://tracylihui.github.io/2015/07/28/spring/Spring%E5%A3%B0%E6%98%8E%E5%BC%8F%E4%BA%8B%E5%8A%A1%E7%AE%A1%E7%90%86/ http://www.cnblogs.com/davenkin/archive/2013/02/16/java-tranaction-1.html http://www.importnew.com/12300.html 详细介绍Spring事务管理: http://developer.51cto.com/art/200906/129854.htm spring事务原理1-事务的抽象: http://sqtds.github.io/2014/06/09/2014/spring-tx1/ Spring官方文档Transaction Management: http://docs.spring.io/autorepo/docs/spring/3.2.x/spring-framework-reference/html/transaction.html Spring官方文档Aspect Oriented Programming with Spring: http://docs.spring.io/spring/docs/3.0.x/reference/aop.html StackOverFlow Spring - @Transactional - What happens in background?: http://stackoverflow.com/questions/1099025/spring-transactional-what-happens-in-background Transaction strategies: Understanding transaction pitfalls: http://www.ibm.com/developerworks/library/j-ts1/ Annotation-based Transactions in Spring: http://springinpractice.com/2008/03/18/annotation-based-transactions-in-spring Design principle behind Transaction framework with Spring 3: http://stackoverflow.com/questions/11789857/design-principle-behind-transaction-framework-with-spring-3 Chapter 6. 使用Spring进行面向切面编程(AOP): http://shouce.jb51.net/spring/aop.html wiki: http://wiki.corp.qunar.com/display/~yushen.ma/Spring+3.x-JDBC+Transaction spring事务: http://wiki.corp.qunar.com/pages/viewpage.action?pageId=52084161 spring 事务: http://wiki.corp.qunar.com/pages/viewpage.action?pageId=93338632 aspectj事务: http://wiki.corp.qunar.com/pages/viewpage.action?pageId=92656954

Demo: 编程事务: http://www.tutorialspoint.com/spring/programmatic_management.htm 声明事务: http://www.tutorialspoint.com/spring/declarative_management.htm

@Transactional注解工作原理:http://blog.csdn.net/dslztx/article/details/46636079 分布式事务系列(1.2)Spring的事务体系: https://yq.aliyun.com/articles/39046 spring transaction源码分析–事务架构:http://www.cnblogs.com/davidwang456/p/4309038.html

http://blog.csdn.net/szwangdf/article/details/41516239

AopProxy DefaultAopProxyFactory