xiaobaoqiu Blog

Think More, Code Less

Mysql Thread_pool_size

最近项目中的beta环境,多个应用(10+个)连接数据库,使用的是连接池管理数据库连接.

最近应用中经常抛出数据库连接异常(我们使用的连接池是druid),简单的就是说无法获取Mysql的连接,创建连接失败(create connection error):

1
2
3
4
5
6
7
8
9
10
11
12
13
14
15
16
17
18
19
20
21
22
23
24
25
26
27
28
29
30
31
32
33
34
35
36
37
38
[2015-05-14 15:50:51 ERROR com.alibaba.druid.pool.DruidDataSource:1363] create connection error 
com.mysql.jdbc.exceptions.jdbc4.CommunicationsException: Communications link failure

The last packet sent successfully to the server was 0 milliseconds ago. The driver has not received any packets from the server.
    at sun.reflect.NativeConstructorAccessorImpl.newInstance0(Native Method) ~[na:1.7.0_45]
    at sun.reflect.NativeConstructorAccessorImpl.newInstance(NativeConstructorAccessorImpl.java:57) ~[na:1.7.0_45]
    at sun.reflect.DelegatingConstructorAccessorImpl.newInstance(DelegatingConstructorAccessorImpl.java:45) ~[na:1.7.0_45]
    at java.lang.reflect.Constructor.newInstance(Constructor.java:526) ~[na:1.7.0_45]
    at com.mysql.jdbc.Util.handleNewInstance(Util.java:411) ~[mysql-connector-java-5.1.21.jar:na]
    at com.mysql.jdbc.SQLError.createCommunicationsException(SQLError.java:1117) ~[mysql-connector-java-5.1.21.jar:na]
    at com.mysql.jdbc.MysqlIO.<init>(MysqlIO.java:350) ~[mysql-connector-java-5.1.21.jar:na]
    at com.mysql.jdbc.ConnectionImpl.coreConnect(ConnectionImpl.java:2393) ~[mysql-connector-java-5.1.21.jar:na]
    at com.mysql.jdbc.ConnectionImpl.connectOneTryOnly(ConnectionImpl.java:2430) ~[mysql-connector-java-5.1.21.jar:na]
    at com.mysql.jdbc.ConnectionImpl.createNewIO(ConnectionImpl.java:2215) ~[mysql-connector-java-5.1.21.jar:na]
    at com.mysql.jdbc.ConnectionImpl.<init>(ConnectionImpl.java:813) ~[mysql-connector-java-5.1.21.jar:na]
    at com.mysql.jdbc.JDBC4Connection.<init>(JDBC4Connection.java:47) ~[mysql-connector-java-5.1.21.jar:na]
    at sun.reflect.GeneratedConstructorAccessor34.newInstance(Unknown Source) ~[na:na]
    at sun.reflect.DelegatingConstructorAccessorImpl.newInstance(DelegatingConstructorAccessorImpl.java:45) ~[na:1.7.0_45]
    at java.lang.reflect.Constructor.newInstance(Constructor.java:526) ~[na:1.7.0_45]
    at com.mysql.jdbc.Util.handleNewInstance(Util.java:411) ~[mysql-connector-java-5.1.21.jar:na]
    at com.mysql.jdbc.ConnectionImpl.getInstance(ConnectionImpl.java:399) ~[mysql-connector-java-5.1.21.jar:na]
    at com.mysql.jdbc.NonRegisteringDriver.connect(NonRegisteringDriver.java:334) ~[mysql-connector-java-5.1.21.jar:na]
    at com.alibaba.druid.pool.DruidAbstractDataSource.createPhysicalConnection(DruidAbstractDataSource.java:1296) ~[druid-0.2.18.jar:0.2.18]
    at com.alibaba.druid.pool.DruidAbstractDataSource.createPhysicalConnection(DruidAbstractDataSource.java:1352) ~[druid-0.2.18.jar:0.2.18]
    at com.alibaba.druid.pool.DruidDataSource$CreateConnectionThread.run(DruidDataSource.java:1361) ~[druid-0.2.18.jar:0.2.18]
Caused by: java.net.ConnectException: Connection refused
        at java.net.PlainSocketImpl.socketConnect(Native Method) ~[na:1.7.0_45]
        at java.net.AbstractPlainSocketImpl.doConnect(AbstractPlainSocketImpl.java:339) ~[na:1.7.0_45]
        at java.net.AbstractPlainSocketImpl.connectToAddress(AbstractPlainSocketImpl.java:200) ~[na:1.7.0_45]
        at java.net.AbstractPlainSocketImpl.connect(AbstractPlainSocketImpl.java:182) ~[na:1.7.0_45]
        at java.net.SocksSocketImpl.connect(SocksSocketImpl.java:392) ~[na:1.7.0_45]
        at java.net.Socket.connect(Socket.java:579) ~[na:1.7.0_45]
        at java.net.Socket.connect(Socket.java:528) ~[na:1.7.0_45]
        at java.net.Socket.<init>(Socket.java:425) ~[na:1.7.0_45]
        at java.net.Socket.<init>(Socket.java:241) ~[na:1.7.0_45]
        at com.mysql.jdbc.StandardSocketFactory.connect(StandardSocketFactory.java:257) ~[mysql-connector-java-5.1.21.jar:na]
        at com.mysql.jdbc.MysqlIO.<init>(MysqlIO.java:300) ~[mysql-connector-java-5.1.21.jar:na]
        ... 14 common frames omitted

开始怀疑机器的压力过大,将一些应用停止,还是出现这个问题.

但是相同的代码在dev环境一切正常,beta环境的机器配置要优于dev环境的.

1.Druid配置

首先怀疑那块的代码问题导致的Mysql连接没有被释放.

由于我们使用Druid连接池,尝试使用Druid的removeAbandoned功能,这个配置的意义就是连接泄漏监测,通过这个监控没有发现异常.

当程序存在缺陷时,申请的连接忘记关闭,这时候,就存在连接泄漏了。Druid提供了RemoveAbandanded相关配置,用来关闭长时间不使用的连接.

配置removeAbandoned对性能会有一些影响,建议怀疑存在泄漏之后再打开。

1
2
3
<property name="removeAbandoned" value="true" /> <!-- 打开removeAbandoned功能-->
<property name="removeAbandonedTimeout" value="600" /> <!-- 600秒,也就是10分钟-->
<property name="logAbandoned" value="true" /> <!-- 关闭abanded连接时输出错误日志-->

` 当removeAbandoned=true之后,可以在内置监控界面datasource.html中的查看ActiveConnection StackTrace属性的,可以看到未关闭连接的具体堆栈信息,从而方便查出哪些连接泄漏了。

参考: https://github.com/alibaba/druid/wiki/%E8%BF%9E%E6%8E%A5%E6%B3%84%E6%BC%8F%E7%9B%91%E6%B5%8B

2.diff mysql status

既然dev环境正常,因此我们的做法是拿出dev环境和beta环境的show status结果进行diff,结果发现了一个比较可疑的参数的配置有差异:

1
thread_pool_size

dev环境配置是16,而beta环境是4,同时线上环境的配置是24.初步判断beta环境的thread_pool_size设置应该是有问题的.

3.thread_pool_size

参考官网的描述

1
2
3
4
5
6
7
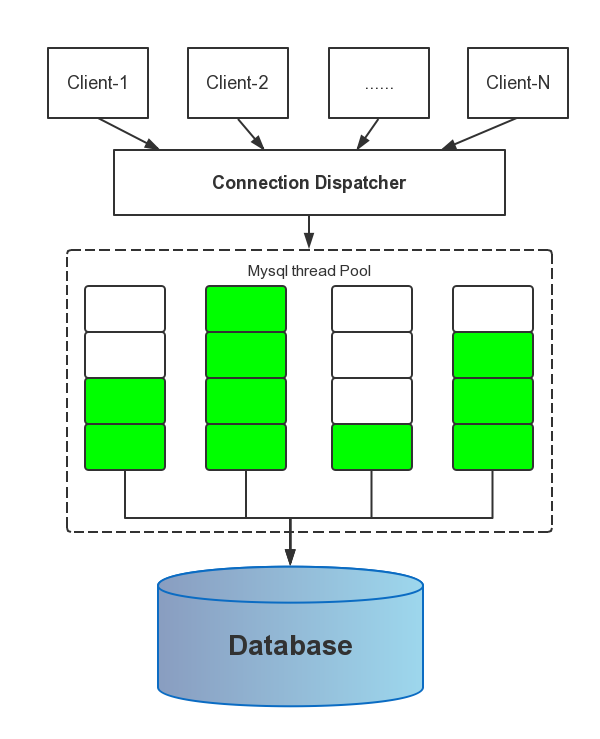
thread_pool_size is the most important parameter controlling thread pool performance. It can be set only at server startup. Our experience in testing the thread pool indicates the following:

If the primary storage engine is InnoDB, the optimal thread_pool_size setting is likely to be between 16 and 36, with the most common optimal values tending to be from 24 to 36. We have not seen any situation where the setting has been optimal beyond 36. There may be special cases where a value smaller than 16 is optimal.

For workloads such as DBT2 and Sysbench, the optimum for InnoDB seems to be usually around 36. For very write-intensive workloads, the optimal setting can sometimes be lower.

If the primary storage engine is MyISAM, the thread_pool_size setting should be fairly low. We tend to get optimal performance for values from 4 to 8. Higher values tend to have a slightly negative but not dramatic impact on performance.

简单的翻译一下: thread_pool_size是控制线程池性能最重要的一个参数,这个参数只能在Mysql服务启动的时候设置(这是官网5.5版本的文档,5.6版本证明是可以动态修改的).官网的推荐设置:

1.如果存储引擎是InnoDB,thread_pool_size值设置16到36之间比较好,一般配置在24到36之间;
2.如果存储引擎是MyISAM,thread_pool_size值应该被设置得相当小,倾向于设置在4到8之间;

官方网站: https://dev.mysql.com/doc/refman/5.5/en/thread-pool-tuning.html

3.1 thread_pool_size意义

参数thread_pool_size的命令可能会让大家产生误解,它不是指的线程池的大小,而是线程组的大小。

类似所有创建的线程都在某一个group里,group的编号从1~thread_pool_size,每个group里的worker线程数可以通过参数thread_pool_oversubscribe来控制(默认为3).

同时活跃的最大worker线程数=thread_pool_size * (thread_pool_oversubscribe + 1);

thread_pool_size默认值为CPU核心数,最大为128(MAX_THREAD_GROUPS),在启动时,就会把128个Group对应的结构体(all_groups)初始化好。每个group(编号小于等于thread_pool_size)会创建一个epoll对象;

当MySQL建立connection时, MySQL根据connection的thread id对thread_pool_size取模,将 connection发起的sql语句分配到对应的group.若worker达到最大数量后还是不足以处理回话请求, 则连接在本group上等待,导致sql语句的RT(Response time)增大。

简单示意图如下:

所有之前的问题出现的情况是:

1.thread_pool_size为4,即mysql每个thread pool的group中work线程的大小为4,如果有多个应用,恰好多个线程的connection被分发到某一个group上(假设为group-2),并且相当长一段时间一致在占有(比如我们在beta环境的连接,会占用并忙碌长达半小时),这时候,新来的连接正好也分发到group-2上,这时候Mysql上的group-2就没有多余的work线程来为其服务,即其无法和mysql创建连接,从而出现create connection error的异常.

参考: http://get.jobdeer.com/908.get http://chuansong.me/n/1192563 http://mysqllover.com/?p=826

Spring AOP无效

最近在重构项目,有一个场景:根据方法的返回值判断是否成功,成功则从入参里获取需要的参数,构造消息(Msg)并发送通知其他模块.

因为是比较通用的逻辑(判断返回值,获取参数,发送消息),因此做成Spring注解的形式,注解中会用AOP拦截方法获取方法的返回值和参数.

其中获取参数使用的是Spring SpEL表达式.

1.使用背景

碰到的一个问题是AOP拦截无法获取private,protected和inner方法的参数.使用场景如下:

1.1 注解定义

首先定义注解用于获取

1
2
3
4
5
6
7
8
9
10
11
12
13
@Target(ElementType.METHOD)
@Retention(RetentionPolicy.RUNTIME)
public @interface Param {
    /**
     * 参数定义,标识了参数的获取方式,或常量值
     */
    String[] params();

    /**
     * 操作类型,标识了当前这注解该被哪个处理类来处理
     */
    String[] operate();
}

1.2 定义切面

1
2
3
4
5
6
7
8
9
10
11
12
13
14
15
16
17
18
19
20
21
22
23
@Aspect
public class testAspect {
    /**
     * 根据注解获取切面
     */
    @Pointcut("@annotation(com.aaa.bbb.ccc.ParamGrabber)")
    public void aspectPointCut() {
    }

    /**
    * AOP, 定义方法返回之后的操作
    */
    @AfterReturning(value = "aspectPointCut()", returning = "returnValue")
    public void afterReturning(JoinPoint point, Object returnValue){
        //1.获取拦截的类和方法

        //2.获取方法上我们定义的特定注解

        //3.根据注解的参数中的spel表达式,从方法入参中获取我们需要的参数

        //4.一些列的Processor处理逻辑
    }
}

1.3 处理类

定义获取的参数之后的处理类的逻辑:

1
2
3
4
5
6
7
8
9
10
11
12
13
14
15
16
17
public interface Processor {
    /**
     * 本processor可以处理的操作类型
     */
    List<String> supportOperates();

    /**
     *
     * 此processor的处理逻辑
     */
    void process(XxxContext context);

    /**
     * 返回值验证,是否需要执行process操作
     */
    boolean isReturnValid(XxxContext context, Object returnValue);
}

之后利用Spring就可以获取上下问中所有的实现类:

1
2
3
4
5
6
7
8
9
10
11
12
13
14
15
16
17
18
19
20
21
22
23
24
25
26
27
28
public class ProcessorSupport implements ApplicationContextAware, InitializingBean {
    // Spring上下文
    private ApplicationContext applicationContext;

    private final Multimap<String, Processor> processorMap = HashMultimap.create();

    @Override
    public void setApplicationContext(ApplicationContext applicationContext) throws BeansException {
        this.applicationContext = applicationContext;
    }

    @Override
    public void afterPropertiesSet() throws Exception {
        // 从Spring上下文获取Processor的所有具体实现类
        Map<String, Processor> beansOfType = applicationContext.getBeansOfType(Processor.class);
        for(Processor processor : beansOfType.values()) {
            for(String op : processor.supportOperates()) {
                processorMap.put(op, processor);
            }
        }
    }

    //根据注解中定义的operate来获取具体的处理类Processor
    @Override
    public Collection<Processor> getProcessor(String operate) {
        return processorMap.get(operate);
    }
}

1.4 使用

使用的时候,首先得实现一个具体的Processor:

1
2
3
4
5
6
7
8
9
10
11
12
13
14
15
16
17
18
19
20
21
22
23
24
25
26
27
28
public class MyProcessor implements Processor {

    public static final String SPECIFIC_PROCESSOR_KEY = "SPECIFIC_PROCESSOR_KEY";

    @Override
    public List<String> supportOperates() {
        return ImmutableList.of(
                SPECIFIC_PROCESSOR_KEY
        );
    }

    @Override
    public void process(XxxContext context) {
        //获取注解解析得到的参数
        Map<String, Object> parsedParam = context.getParsedParam();

        //构建发送的消息内容
        Msg msg = buildNoticeMsg(parsedParam);

        //发送消息
        noticeService.doNotice(msg);
    }

    @Override
    public boolean isReturnValid(XxxContext context, Object returnValue) {
        //判断返回值是否有效...
    }
}

具体使用的地方:

1
2
3
4
5
6
7
8
9
10
11
12
13
/**
* 根据SPECIFIC_PROCESSOR_KEY找到MyProcessor
* params中使用SpEL获取参数中的某个属性
*/
@Param(operate = MyProcessor.SPECIFIC_PROCESSOR_KEY, params = {
        CrateConstants.KEYS_KEY + "={#p0.![propertyName]}"})
public int batchInsert(List<Tag> tagList) {
    if (CollectionUtils.isEmpty(tagList)) {
        return 0;
    }

    return tagDao.insertBatchly(tagList);
}

2.问题

2.1 private和protected方法无效

private和protected方法(通常为类的inner方法)无法使用我们定义的注解来达到目的,如下:

1
2
3
4
5
6
7
8
9
10
11
12
13
14
15
16
17
//供外部调用的方法
public class XxxService {
    public int outerMethod(List<Tag> tagList) {
        return innerMethod(tagList);
    }
}

//被当前类的其他方法调用的内部方法
@Param(operate = MyProcessor.SPECIFIC_PROCESSOR_KEY, params = {
        CrateConstants.KEYS_KEY + "={#p0.![propertyName]}"})
private int innerMethod(List<Tag> tagList) {
    if (CollectionUtils.isEmpty(tagList)) {
        return 0;
    }

    return tagDao.insertBatchly(tagList);
}

2.2 inner public方法无效

定义如下:

1
2
3
4
5
6
7
8
9
10
11
12
13
14
15
16
17
//供外部调用的方法
public class XxxService {
    public int outerMethod(List<Tag> tagList) {
        return innerMethod(tagList);
    }
}

//被当前类的其他方法调用的内部方法
@Param(operate = MyProcessor.SPECIFIC_PROCESSOR_KEY, params = {
        CrateConstants.KEYS_KEY + "={#p0.![propertyName]}"})
public int innerMethod(List<Tag> tagList) {
    if (CollectionUtils.isEmpty(tagList)) {
        return 0;
    }

    return tagDao.insertBatchly(tagList);
}

调用的时候调用

1
xxxServiceIns.outerMethod(...);

3.原因

3.1 private和protected方法无效

Spring的AOP框架基于代理实现的(proxy-based).使用原生的Java的代理是无法代理protected和private类型的方法(详见后续结束).

而CGLIB的代理虽然在技术上可以代理protected和private类型的方法,但是用于AOP的时候不推荐代理protected和private类型的方法.

结论就是,任何定义的pointcut只在public方法上有效.

参考:

http://stackoverflow.com/questions/15093894/aspectj-pointcut-for-annotated-private-methods

spring官方文档关于AOP的解释中也有相关的说明:

http://docs.spring.io/spring/docs/3.1.x/spring-framework-reference/html/aop.html#aop-introduction-spring-defn

3.2 inner public方法无效

原因其实就是一句话:Spring AOP是基于代理机制的.

考虑如下场景,当你拿到一个无代理的、无任何特殊之处的对象引用时:

1
2
3
4
5
6
7
8
9
10
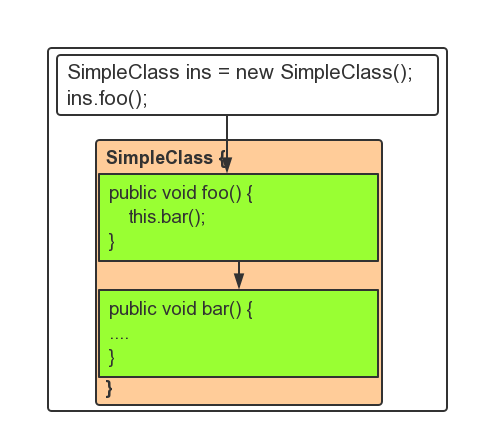
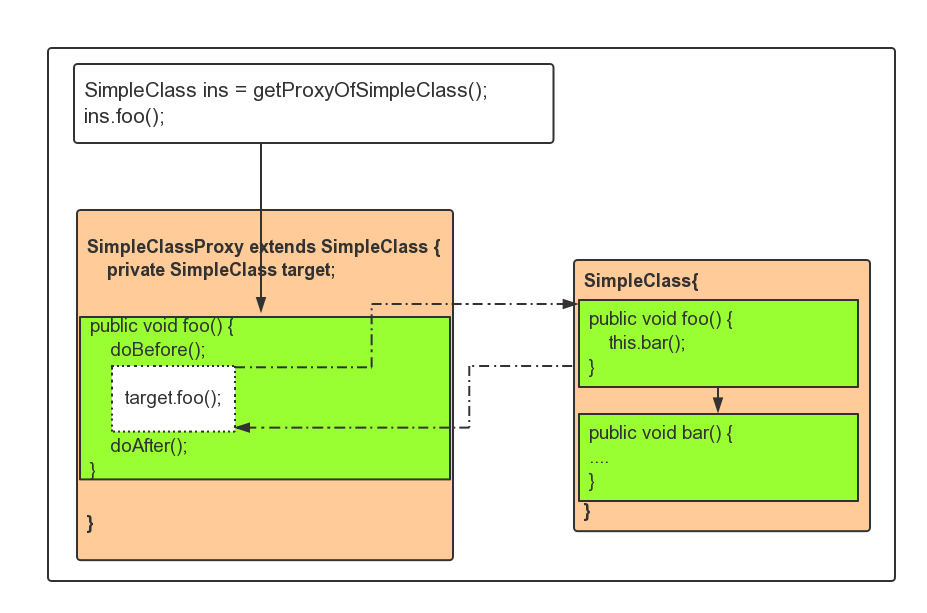
public class SimplePojo implements SimpleInterface {
    public void foo() {
       // this next method invocation is a direct call on the 'this' reference
       this.bar();
    }
                
    public void bar() {
        // some logic...
    }
}

当你调用一个对象引用的方法时,此对象引用上的方法直接被调用,如下所示:

1
2
3
4
5
public static void main(String[] args) {
   SimplePojo ins = new SimplePojo();
   // this is a direct method call on the 'ins' reference
   ins.foo();
}

当客户代码所持有的引用是一个代理的时候则略有不同了,当调用foo()方法时候,首先会调用原始foo()方法上的@Before的代码逻辑,然后调用原始的foo()方法,原始foo()方法内的bar()调用的是原始对象的this.bar(),即一旦调用最终抵达了目标对象 (此处为SimplePojo类的引用),任何对自身的调用例如this.bar()将对this引用进行调用而非代理。

这一点意义重大,它意味着自我调用将不会导致和方法调用关联的AOP通知得到执行的机会。

1
2
SimplePojo proxy = proxyFactory.getProxy(Pojo.class);
proxy.foo();

参考: http://m.oschina.net/blog/161387

4.Spring AOP代理

Spring AOP使用JDK动态代理或者CGLIB来为目标对象创建代理。

如果被代理的目标对象实现了至少一个接口,则会使用JDK动态代理。所有该目标类型实现的接口都将被代理。 若该目标对象没有实现任何接口,则创建一个CGLIB代理。

如果你希望强制使用CGLIB代理,(例如:希望代理目标对象的所有方法,而不只是实现自接口的方法) 那也可以。但是需要考虑以下问题:

1.无法通知(advise)final方法,因为他们不能被覆写。
2.代理对象的构造器会被调用两次。因为在CGLIB代理模式下每一个代理对象都会 产生一个子类。每一个代理实例会生成两个对象:实际代理对象和它的一个实现了通知的子类实例 而是用JDK代理时不会出现这样的行为。通常情况下,调用代理类型的构造器两次并不是问题, 因为除了会发生指派外没有任何真正的逻辑被实现。
3.CGLib的效率没有使用JDK代理机制高,速度平均要慢8倍左右。

强制使用CGLIB代理需要将<aop:config>的proxy-target-class属性设为true:

1
2
3
<aop:config proxy-target-class="true">
   ...
</aop:config>

当使用@AspectJ自动代理时要强制使用CGLIB,请将<aop:aspectj-autoproxy>的proxy-target-class属性设置为true:

1
<aop:aspectj-autoproxy proxy-target-class="true"/>

Crate环境搭建

1.Crate简介

最近工作中使用Crate来做搜索.总结工作中Crate的知识.

官方网站:https://crate.io/

2.Crate安装要求

Crate最低版本要求Java 7,并且Crate的所有节点和客户端需要使用相同的JVM版本. 并且Java 7要求update 55或者之后的版本,Java 8则要求update 20或者之后的版本.

警告:JAVA 7之前的版本会造成脏数据和数据丢失.

3.Crate安装

这里选择最基本的通过下载tar.gz安装包的形式安装,还可以通过Docker等形式安装

详见:https://crate.io/docs/en/latest/installation.html

3.1.下载

从下面的url下载最新的稳定版本: https://crate.io/download/

所有可下载版本见: https://cdn.crate.io/downloads/releases/

这里下载的是0.47.7版本:

1
wget https://cdn.crate.io/downloads/releases/crate-0.47.7.tar.gz --no-check-certificate

3.2.解压

自动生成crate-0.47.7目录

1
2
cd /home/work
sudo tar zxf ~/crate-0.47.7.tar.gz

4.Crate配置

Crate配置参考: https://crate.io/docs/en/latest/configuration.html

Crate的有一套默认配置,通常情况下不需要额外的配置.

Crate的配置主要通过config/crate.yml文件,下载中的config/crate.yml包含了所有的配置项,包括其默认值和注释.

启动Crate的时候可以指定自己的配置文件

1
./bin/crate -Des.config=/path/to/config.yml

任何配置都可以在配置文件中指定或者作为启动时候的系统属性.比如据群名称的设置可以在启动时设置:

1
./bin/crate -Des.cluster.name=cluster

也可以在配置文件中配置:

1
cluster.name = cluster

配置的优先级如下,越往后优先级越大(即后面的配置会覆盖前面的配置):

1.internal defaults
2.system properties
3.options from config file
4.command-line properties

4.1 基本配置

一些基本的配置,工作目录和机器列表等:

1
2
3
4
5
6
7
8
9
10
11
12
13
path.data: /home/work/crate/data
path.work: /home/work/crate/work
path.logs: /home/work/crate/logs

discovery.zen.minimum_master_nodes: 2
discovery.zen.ping.timeout: 6s
discovery.zen.ping.multicast.enabled: false
discovery.zen.ping.unicast.hosts: ["192.168.1.100:4300", "192.168.1.101:4300", "192.168.1.102:4300"]
discovery.zen.fd.ping_interval: 10s

cluster.name: crate1
transport.tcp.port: 4300
http.port: 4200

5.Crate运行

5.1.启动

在前台运行(可以通过Control-C中断其运行):

1
2
cd ./crate-0.47.7
./bin/crate

加上-d参数让crate在后台运行.

5.2.Crash

bin下面还包含Crash(The Crate Shell),需要python环境运行,可以通过这个Crash输入诸如sql等命令

1
2
3
4
5
6
7
8
9
10
[/workspace/crate/bin]$ ./crash
...
CONNECT OK
cr> select count(1) from test;
+----------+
| count(1) |
+----------+
|   522835 |
+----------+
SELECT 1 row in set (0.032 sec)

5.3.Admin

Crate同时也提供了一个基于web的administration接口.在端口4200上提供服务,可以在浏览器中通过机器名访问:

1
http://host1.example.com:4200/_plugin/crate-admin/#/console

这个Admin在Crate的每个节点上都可以运行.

6.Crate安装简单示例

这里使用3台机器搭建Crate集群,假设三台机器的IP如下:

host1.example.com    192.168.1.100
host2.example.com    192.168.1.101
host3.example.com    192.168.1.102

每台机器上做相同的工作:

1
2
3
4
5
6
7
8
9
10
11
12
13
14
15
16
17
18
19
20
21
22
23
24
25
26
27
28
29
30
31
32
33
34
1.将Crate下载到自己的目录
wget https://cdn.crate.io/downloads/releases/crate-0.47.7.tar.gz --no-check-certificate

2.解压
cd /home/work
sudo tar zxf ~/crate-0.47.7.tar.gz

3.创建Crate工作目录
cd /home/work
sudo mkdir crate
cd crate
sudo mkdir data
sudo mkdir logs
sudo mkdir work

4.修改基本配置(/config/crate.yml文件)
path.data: /home/work/crate/data
path.work: /home/work/crate/work
path.logs: /home/work/crate/logs

discovery.zen.minimum_master_nodes: 2
discovery.zen.ping.timeout: 6s
discovery.zen.ping.multicast.enabled: false
discovery.zen.ping.unicast.hosts: ["192.168.1.100:4300", "192.168.1.101:4300", "192.168.1.102:4300"]
discovery.zen.fd.ping_interval: 10s

5.配置内存大小(/bin/crate文件)
CRATE_HEAP_SIZE=4g

6.启动Crate
sudo /home/work/crate-0.47.7/bin/crate -d

7.查看启动日志
tail -f /home/work/crate/logs/crate.log

三台机器都启动了,它们之间会相互感应,形成一个集群.

7.Crate SQL

crate的sql操作和mysql基本一致,详细可以参考: https://crate.io/docs/en/latest/sql/index.html

8.Crate运维脚本

因为dev环境需求,搭建了6套dev的crate环境,发现每次启动停止crate比较麻烦,因此自己写了点基本的维护脚本,只适用于我当前的环境,即在/home/q/crate_workspace下存在6套环境,其他环境可以根据情况自行修改使用:

1
2
3
4
5
6
7
8
9
drwxr-xr-x 4 root root 4096 Apr 28 17:37 crate1
drwxr-xr-x 4 root root 4096 Apr 28 17:37 crate2
drwxr-xr-x 4 root root 4096 Apr 28 17:37 crate3
drwxr-xr-x 4 root root 4096 Apr 30 11:25 crate4
drwxr-xr-x 4 root root 4096 Apr 28 17:37 crate5
drwxr-xr-x 4 root root 4096 Apr 28 17:37 crate6
-rwxr-xr-x 1 root root   53 Apr 28 15:41 restart_crate.sh
-rwxr-xr-x 1 root root  724 Apr 28 16:31 start_crate.sh
-rwxr-xr-x 1 root root 1041 Apr 28 17:15 stop_crate.sh

每套环境之下有自己的配置(crate-source)和工作目录(crate)和一个存放crate线程id的文件:

1
2
3
drwxr-xr-x 6 root root 4096 Apr 28 15:05 crate
drwxr-xr-x 6 root root 4096 Apr 28 15:54 crate-source
-rw-r--r-- 1 root root    5 Apr 28 17:37 pid

脚本如下,启动crate的脚本start_crate.sh:

1
2
3
4
5
6
7
8
9
10
11
12
13
14
15
16
17
18
19
20
21
22
23
24
25
26
27
28
29
30
31
32
#!/bin/bash

if echo $1 | grep -q "/home/q/crate_workspace"
then
    export CRATE_BASE=${1%/}
else
    export CRATE_BASE=/home/q/crate_workspace/${1%/}
fi
echo -e $CRATE_BASE

if ! [ -e $CRATE_BASE/crate-source/bin/crate ]
then
    echo -e " usage: $0 home/q/crate_workspace/CRATE_DIR\n"
    exit 1;
fi

if [ -e $CRATE_BASE/pid ]
then
    CRATE_ID=`cat $CRATE_BASE/pid`
    echo "crate(${CRATE_ID}) still running now , please shutdown it firest";
    exit 2;
fi

#CRATE_START_LOG=`$CRATE_BASE/crate-source/bin/crate -p $CRATE_BASE/pid -d`
$CRATE_BASE/crate-source/bin/crate -p $CRATE_BASE/pid -d

if [ "$?" = "0" ]; then
    echo "$0 ${1%/} start succeed"
else
    echo "$0 ${1%/} start failed"
    echo $CRATE_START_LOG
fi

停止crate的脚本stop_crate.sh:

1
2
3
4
5
6
7
8
9
10
11
12
13
14
15
16
17
18
19
20
21
22
23
24
25
26
27
28
29
30
31
32
33
34
35
36
37
38
39
40
41
42
43
44
45
46
47
48
49
50
51
52
53
#!/bin/bash

if echo $1 | grep -q "/home/q/crate_workspace"
then
    export CRATE_BASE=${1%/}
else
    export CRATE_BASE=/home/q/crate_workspace/${1%/}
fi
echo -e $CRATE_BASE

if ! [ -e $CRATE_BASE/crate-source/bin/crate ]
then
    echo -e " usage: $0 home/q/crate_workspace/CRATE_DIR\n"
    exit 1;
fi

if ! [ -e $CRATE_BASE/pid ]
then
    echo "crate instance not found : ${1%/}";
    exit;
fi

CRATE_ID=`cat $CRATE_BASE/pid`

for i in {1..10}; do
    if [ -e $CRATE_BASE/pid ]; then
        CRATE_ID=`cat $CRATE_BASE/pid`
        if [ "$i" = "1" ]; then
            echo -n "trying stop ($CRATE_ID): $i"
        else
            echo -n -e "\b$i"
        fi
        
        if [ $i -ge 5 ]; then
            kill "$CRATE_ID"
            rm -f "$CRATE_BASE/pid"
        fi

        sleep 1 
    else
        if [ $i -gt 5 ]; then
            echo -e "\n$CRATE_BASE was killed($i)"
        else
            echo -e "\n$CRATE_BASE was stoped"
        fi

        exit;
    fi
done;

kill -9 "$CRATE_ID"

echo "$CRATE_BASE was force killed"

重启crate的脚本restart_crate.sh:

1
2
3
4
5
#!/bin/bash

./stop_crate.sh $1

./start_crate.sh $1

Telnet Dubbo

Dubbo 2.0.5版本以后支持telnet命令,可以用来debug各个dubbo接口。

Dubbo官网:http://dubbo.io/User+Guide-zh.htm

telnet涉及的命令包括:

1
2
3
4
5
6
7
8
9
10
11
12
ls
ps
cd
pwd
trace
count
invoke
status
log
help
clear
exit

1.telnet

连接dubbo的provider:

1
telnet 127.0.0.1 20880

2.ls

ls显示服务列表,ls -l显示服务详细信息列表:

1
2
3
dubbo>ls
Xxx.xx.xxx.service.ConsumerMessageHandler
...

ls XxxService显示服务的方法列表,ls -l XxxService显示服务的方法详细信息列表

1
ls -l Xxx.xx.xxx.service.ConsumerMessageHandler

3.ps

ps显示服务端口列表,ps -l显示服务地址列表(ip + 端口):

1
2
dubbo>ps -l
dubbo://10.100.11.222:30003

ps 20880显示端口上的连接信息,ps -l 20880显示端口上的连接详细信息:

1
2
3
dubbo>ps -l 20880
/127.0.0.1:51478 -> /127.0.0.1:20880
...

4.cd

改变缺省服务,当设置了缺省服务,凡是需要输入服务名作为参数的命令,都可以省略服务参数。

cd /可以取消缺省服务

1
2
3
dubbo>cd Xxx.xx.xxx.service.ConsumerMessageHandler 
Used the Xxx.xx.xxx.service.ConsumerMessageHandler as default.
You can cancel default service by command: cd /

5.pwd

显示当前缺省服务

1
2
3
4
5
6
7
8
dubbo>pwd
Xxx.xx.xxx.service.ConsumerMessageHandler

dubbo>cd /
Cancelled default service qunar.tc.qmq.service.ConsumerMessageHandler.

dubbo>pwd 
/

6.trace

trace用来跟踪调用情况,当响应的Service的方法被调有,就会有调用日志:

trace XxxService                跟踪1次服务任意方法的调用情况
trace XxxService 10             跟踪10次服务任意方法的调用情况
trace XxxService xxxMethod      跟踪1次服务方法的调用情况
trace XxxService xxxMethod 10   跟踪10次服务方法的调用情况

7.count

count XxxService                统计1次服务任意方法的调用情况。
count XxxService 10             统计10次服务任意方法的调用情况。
count XxxService xxxMethod      统计1次服务方法的调用情况。
count XxxService xxxMethod 10   统计10次服务方法的调用情况。
1
2
3
4
5
6
7
8
dubbo>count Xxx.xx.xxx.service.ConsumerMessageHandler
dubbo>
+-------------------+-------+--------+--------+---------+-----+
| method            | total | failed | active | average | max |
+-------------------+-------+--------+--------+---------+-----+
| queryMessageState | 0     | 0      | 0      | 0ms     | 0ms |
| handle            | 0     | 0      | 0      | 0ms     | 0ms |
+-------------------+-------+--------+--------+---------+-----+

8.invoke

调用服务的某个方法:  invoke XxxService.xxxMethod({"prop": "value"})
调用服务的方法(自动查找包含此方法的服务):  invoke xxxMethod({"prop": "value"})
1
invoke Xxx.xx.xxx.service..batchGetExpiredList({"batch":1})

9.status

status:显示汇总状态,该状态将汇总所有资源的状态,当全部OK时则显示OK,只要有一个ERROR则显示ERROR,只要有一个WARN则显示WARN

status -l:显示状态列表。

所有的资源包括:

load        cpu数据,包括当前load,cpu核数
server      ip+port的列表(ps -l的数据)
datasource  数据库连接参数
threadpool  线程池参数
memory      当前JVM的内存使用情况(max,used,free)
registry    注册中心参数
spring      spring的配置文件
summary     上面这些信息中出现的Error等信息的汇总

示例如下 +————+——–+———————————-+ | resource | status | message | +————+——–+———————————-+ | load | OK | load:0.61,cpu:4 | | spring | OK | classpath:applicationContext.xml | | summary | ERROR | registry | +————+——–+———————————-+

10.log

2.0.6以上版本支持

log  error:     修改dubbo logger的日志级别
log 100:        查看file logger的最后100字符的日志

11.help

help        显示telnet命帮助信息
help Xxx    显示xxx命令的详细帮助信息
1
2
3
4
5
6
7
8
9
10
11
12
13
14
15
dubbo>help 
Please input "help [command]" show detail.
 log level                        - Change log level or show log 
 pwd                              - Print working default service.
 trace [service] [method] [times] - Trace the service.
 clear [lines]                    - Clear screen.
 exit                             - Exit the telnet.
 help [command]                   - Show help.
 info                             - show dubbo info
 ls [-l] [service]                - List services and methods.
 invoke [service.]method(args)    - Invoke the service method.
 ps [-l] [port]                   - Print server ports and connections.
 cd [service]                     - Change default service.
 status [-l]                      - Show status.
 count [service] [method] [times] - Count the service.

12.clear

clear           清除屏幕上的内容
clear 100       清除屏幕上的指定行数的内容

13.exit

exit    退出当前telnet命令行。

Spring SpEL语法

最近项目中遇到一个问题,无意中发现Spring SpEL语法,Spring的Cache正是基于此实现的,感觉很强大,学习一下。

1.简介

SpEL官网:http://docs.spring.io/spring/docs/current/spring-framework-reference/html/expressions.html

Spring表达式语言全称为Spring Expression Language(缩写为SpEL),能在运行时构建复杂表达式、存取对象图属性、对象方法调用等等,并且能与Spring功能完美整合,如能用来配置Bean定义。 表达式语言给静态Java语言增加了动态功能。

SpEL是单独模块,只依赖于core模块,不依赖于其他模块,可以单独使用。

SpEL支持以下功能:

1.文本表达式(Literal expressions)
2.布尔操作和关系操作(Boolean and relational operators)
3.正则表达式(Regular expressions)
4.类表达式(Class expressions)
5.访问属性,数组,list和map(Accessing properties, arrays, lists, maps)
6.方法调用(Method invocation)
7.关系操作符(Relational operators)
8.赋值(Assignment)
9.调用构造器(Calling constructors)
10.Bean引用(Bean references)
11.数组构造(Array construction)
12.内脸list(Inline lists)
13.内联Map(Inline maps)
14.三元运算符(Ternary operator)
15.变量(Variables)
16.自定义函数(User defined functions)
17.集合投影(Collection projection)
18.集合筛选(Collection selection)
19.模板表达式(Templated expressions)

2.SpEL使用

下面通过一些简单的case来示范SpEL的使用.

2.1 第一个SpEL

SpEL表达式可以直接使用ExpressionParser解析,主要是调用ExpressionParser的parseExpression()方法:

1
2
3
4
5
public static void test2_1(){
    Expression expression = parser.parseExpression("'Testing Spring Expression Framework'");
    String message = (String) expression.getValue();
    System.out.println("Message is " + message);
}

2.2 字面量表达式

SpEL支持的字面量包括字符串、数字类型(int、long、float、double)、bool类型、null类型,注意字符串必须要单引号括起来:

1
2
3
4
5
6
7
8
9
10
public static void test2_2(){
    // evals to "Hello World"
    String helloWorld = (String) parser.parseExpression("'Hello World'").getValue();
    double avogadrosNumber = (Double) parser.parseExpression("6.0221415E+23").getValue();

    // evals to 2147483647
    int maxValue = (Integer) parser.parseExpression("0x7FFFFFFF").getValue();
    boolean trueValue = (Boolean) parser.parseExpression("true").getValue();
    Object nullValue = parser.parseExpression("null").getValue();
}

2.3 算数运算表达式

SpEL支持加(+)、减(-)、乘(*)、除(/)、求余(%)、幂(^)运算,SpEL还提供求余(MOD)和除(DIV)而外两个运算符,与"%“和”/“等价,不区分大小写:

1
2
3
4
5
public static void test2_3(){
    int result1 = parser.parseExpression("1+2-3*4/2").getValue(Integer.class);
    int result2 = parser.parseExpression("4%3").getValue(Integer.class);
    int result3 = parser.parseExpression("2^3").getValue(Integer.class);
}

2.4 关系表达式

等于(==)、不等于(!=)、大于(>)、大于等于(>=)、小于(<)、小于等于(<=),区间(between)运算:

1
2
3
4
public static void test2_4(){
    boolean result1 = parser.parseExpression("1>2").getValue(boolean.class);
    boolean result2 = parser.parseExpression("1 between {1, 2}").getValue(boolean.class);
}

between运算符右边操作数必须是列表类型,且只能包含2个元素。第一个元素为开始,第二个元素为结束,区间运算是包含边界值的。

SpEL同样提供了等价的"EQ" 、"NE"、 “GT"、"GE"、 "LT” 、"LE"来表示等于、不等于、大于、大于等于、小于、小于等于,不区分大小写。

2.5 逻辑表达式

且(and)、或(or)、非(!或NOT),注意,逻辑运算符不支持 Java中的 && 和 ||:

1
2
3
4
5
6
7
public static void test2_5() {
    String expression1 = "2>1 and (!true or !false)";
    boolean result1 = parser.parseExpression(expression1).getValue(boolean.class);

    String expression2 = "2>1 and (NOT true or NOT false)";
    boolean result2 = parser.parseExpression(expression2).getValue(boolean.class);
}

2.6 字符串连接及截取表达式

使用"+“进行字符串连接,使用”‘String’[0] [index]“来截取一个字符,目前只支持截取一个,如”‘Hello ’ + ‘World!’“得到"Hello World!";而”‘Hello World!’[0]“将返回"H"。

1
2
3
4
5
6
7
8
9
10
public static void test2_6() {
//    String expression1 = "'Hello Spring SpEL'[0] [5]";
//    String result1 = parser.parseExpression(expression1).getValue(String.class);
//    System.out.println("result1=" + result1);

    String expression2 = "'Hello' + 'Spring' + 'SpEL.'";
    String result2 = parser.parseExpression(expression2).getValue(String.class);
//    System.out.println("result1=" + result1);
    System.out.println("result2=" + result2);
}

2.7 三目运算

三目运算符 “表达式1?表达式2:表达式3"用于构造三目运算表达式,如"2>1?true:false"将返回true;

1
2
3
4
public static void test2_7() {
    boolean result1 = parser.parseExpression("2>1?true:false").getValue(boolean.class);
    System.out.println("result1=" + result1);
}

2.8 正则表达式

可以正则,格式为:str matches regex

1
2
3
4
public static void test2_8() {
    boolean result1 = parser.parseExpression("'123' matches '\\d{3}'").getValue(boolean.class);
    System.out.println("result1=" + result1);
}

2.9 括号优先级表达式

使用"(表达式)“构造,括号里的具有高优先级

1
2
3
4
5
6
public static void test2_9() {
    int result1 = parser.parseExpression("1+2-3*4/2").getValue(Integer.class);
    int result2 = parser.parseExpression("1+(2-3)*4/2").getValue(Integer.class);
    System.out.println("result1=" + result1);
    System.out.println("result2=" + result2);
}

2.10 类类型表达式

使用"T(Type)“来表示java.lang.Class实例,"Type"必须是类全限定名,"java.lang"包除外,即该包下的类可以不指定包名;使用类类型表达式还可以进行访问类静态方法及类静态字段。

1
2
3
4
5
6
7
8
9
10
11
12
13
14
15
public static void test2_10() {
    //java.lang包类访问
    Class<String> result1 = parser.parseExpression("T(String)").getValue(Class.class);
    System.out.println("result1=" + result1);
    //其他包类访问
    String expression2 = "T(com.qunar.scm.spel.SpelParser)";
    Class<String> result2 = parser.parseExpression(expression2).getValue(Class.class);
    System.out.println("result2=" + result2);
    //类静态字段访问
    int result3=parser.parseExpression("T(Integer).MAX_VALUE").getValue(int.class);
    System.out.println("result3=" + result3);
    //类静态方法调用
    int result4 = parser.parseExpression("T(Integer).parseInt('1')").getValue(int.class);
    System.out.println("result4=" + result4);
}

2.11 类实例化

类实例化同样使用java关键字"new",类名必须是全限定名,但java.lang包内的类型除外,如String、Integer.

1
2
3
4
5
6
7
public static void test2_11() {
    String result1 = parser.parseExpression("new String('Spring SpEL')").getValue(String.class);
    System.out.println("result1=" + result1);

    Date result2 = parser.parseExpression("new java.util.Date()").getValue(Date.class);
    System.out.println("result2=" + result2);
}

2.12 instanceof表达式

SpEL支持instanceof运算符,跟Java内使用同义:

1
2
3
4
public static void test2_12() {
    boolean result1 = parser.parseExpression("'Spring SpEL' instanceof T(String)").getValue(Boolean.class);
    System.out.println("result1=" + result1);
}

2.13 变量定义及引用

变量定义通过EvaluationContext接口的setVariable(variableName, value)方法定义;在表达式中使用"#variableName"引用;

除了引用自定义变量,SpE还允许引用根对象及当前上下文对象,使用"#root"引用根对象,使用"#this"引用当前上下文对象;

1
2
3
4
5
6
7
8
9
10
11
12
public static void test2_13() {
    EvaluationContext context = new StandardEvaluationContext();
    context.setVariable("variable", "Spring SpEL");
    String result1 = parser.parseExpression("#variable").getValue(context, String.class);
    System.out.println("result1=" + result1);   //Spring SpEL

    context = new StandardEvaluationContext("Spring SpEL");
    String result2 = parser.parseExpression("#root").getValue(context, String.class);
    System.out.println("result2=" + result2);   //Spring SpEL
    String result3 = parser.parseExpression("#this").getValue(context, String.class);
    System.out.println("result3=" + result3);   //Spring SpEL
}

2.14 自定义函数

学习编写自定义的函数并将其注册,这样这个函数就可以在SpEL表达式中使用.

首先是两个工具类的代码

1
2
3
4
5
6
7
8
9
10
11
12
13
14
15
16
17
18
19
20
21
22
23
24
25
26
27
28
29
30
31
32
33
34
35
36
37
38
39
40
41
42
43
44
45
46
47
public class CollectionUtils {
    /**
     * 集合中的最大元素
     * @param collection
     * @return
     */
    public static Integer maxElement(Collection<Integer> collection) {
        Integer maxElement = null;
        Iterator iterator = collection.iterator();
        while (iterator.hasNext()) {

            Integer integer = (Integer) iterator.next();

            if (maxElement == null) {
                maxElement = integer;
            } else {
                if (integer.intValue() > maxElement.intValue()) {
                    maxElement = integer;
                }
            }
        }
        return maxElement;
    }
}

public class MathUtils {
    /**
     * 测试一个数字是否为素数
     * @param number
     * @return
     */
    public static boolean isPrime(Integer number) {

        if (number == 0) {
            return false;
        }

        for (int index = 2; index < number; index++) {
            if (number % index == 0) {
                return false;
            } else {
                continue;
            }
        }
        return true;
    }
}

下面,我们首先初始化一个EvaluationContext,具体类是StandardEvaluationContext.

一个context evaluation object能用来存储任意多个对象,这些对象会在在随后的表达式解析中使用. 另外evaluation context也能用来注册用户自定义的方法.

1
2
3
4
5
6
7
8
9
10
11
12
13
14
15
16
17
18
19
20
21
22
23
24
25
26
27
28
29
public static void main(String[] args) throws Exception {
        ExpressionParser parser = new SpelExpressionParser();

        StandardEvaluationContext context = new StandardEvaluationContext();
        Method method = null;
        Expression expression = null;
        Boolean value = null;

        // 注册方法 isPrime() 为 prime
        method = MathUtils.class.getMethod("isPrime", Integer.class);
        context.registerFunction("prime", method);

        expression = parser.parseExpression("#prime(10)");
        value = expression.getValue(context, Boolean.class);
        System.out.println("Number 10 is prime: " + value);

        expression = parser.parseExpression("#prime(37)");
        value = expression.getValue(context, Boolean.class);
        System.out.println("Number 37 is prime: " + value);

        // 注册方法 maxElement() 为 max
        method = CollectionUtils.class.getMethod("maxElement", Collection.class);
        context.registerFunction("max", method);

        // Collection为参数maxElement()
        expression = parser.parseExpression("#max({10, 43, 45, 98, 32, 1})");
        Integer maxElement = expression.getValue(context, Integer.class);
        System.out.println("Max element in the list is : " + maxElement);
    }

注:EvaluationContext开销较大,所以多用于数据变化较少的情况。如果数据变化频繁,我们可以考虑直接引用对象(比如上例中的simple)以减小开销。

2.15 赋值表达式

SpEL即允许给自定义变量赋值,也允许给跟对象赋值,直接使用"#variableName=value"即可赋值:

1
2
3
4
5
6
7
8
9
10
11
public static void test2_15() {
    EvaluationContext context = new StandardEvaluationContext();
    //1.给自定义变量赋值
    context.setVariable("variable", "Spring SpEL");
    String result1 = parser.parseExpression("#variable").getValue(context, String.class);
    System.out.println("result1=" + result1);

    //修改
    String result2 = parser.parseExpression("#variable='ABC'").getValue(context, String.class);
    System.out.println("result2=" + result2);
}

2.16 对象属性存取及安全导航表达式

对象属性获取非常简单,即使用如"a.property.property"这种点缀式获取,SpEL对于属性名首字母是不区分大小写的;修改对象属性值则可以通过赋值表达式或Expression接口的setValue方法修改。

对于当前上下文对象属性及方法访问,可以直接使用属性或方法名访问,注意此处属性名首字母不区分大小写。

1
2
3
4
5
6
7
8
9
10
11
public static void test2_16() {
    ExpressionParser parser = new SpelExpressionParser();
    // 1.访问root对象属性
    Date date = new Date();
    System.out.println("date=" + date);
    StandardEvaluationContext context = new StandardEvaluationContext(date);
    int result1 = parser.parseExpression("Month").getValue(context, int.class);
    System.out.println("result1=" + result1);
    int result2 = parser.parseExpression("month").getValue(context, int.class);
    System.out.println("result2=" + result2);
}

SpEL还引入了Groovy语言中的安全导航运算符"(对象|属性)?.属性",用来避免但"?.“前边的表达式为null时抛出空指针异常,而是返回null;

1
2
3
4
5
6
7
public static void test2_16() {
    ExpressionParser parser = new SpelExpressionParser();
    // 2.安全访问
    context.setRootObject(null);
    Object result3 = parser.parseExpression("#root?.year").getValue(context, Object.class);
    System.out.println("result3=" + result3);   //null
}

2.17 对象方法调用

对象方法调用更简单,跟Java语法一样;如"‘Spring’.substring(2,4)“将返回"ri";而对于根对象可以直接调用方法;

1
2
3
4
5
6
7
8
9
10
public static void test2_17() {
    String result1 = parser.parseExpression("'Spring SpEL'.substring(2,4)").getValue(String.class);
    System.out.println("result1=" + result1);

    //root对象date方法"getYear"可以直接调用
    Date date = new Date();
    StandardEvaluationContext context = new StandardEvaluationContext(date);
    int result2 = parser.parseExpression("getMonth()").getValue(context, int.class);
    System.out.println("result2=" + result2);
}

2.18 Bean引用

SpEL支持使用"@“符号来引用Bean,在引用Bean时需要使用BeanResolver接口实现来查找Bean,Spring提供BeanFactoryResolver实现;

1
2
3
4
5
6
7
8
9
public static void test2_18() {
    ClassPathXmlApplicationContext ctx = new ClassPathXmlApplicationContext();
    ctx.refresh();
    ExpressionParser parser = new SpelExpressionParser();
    StandardEvaluationContext context = new StandardEvaluationContext();
    context.setBeanResolver(new BeanFactoryResolver(ctx));
    Properties result1 = parser.parseExpression("@systemProperties").getValue(context, Properties.class);
    System.out.println("result1=" + result1);
}

在示例中我们首先初始化了一个IoC容器,ClassPathXmlApplicationContext实现默认会把"System.getProperties()“注册为"systemProperties"Bean,因此我们使用 ”@systemProperties"来引用该Bean。

2.19 内联List

1
2
3
4
5
6
7
8
9
10
11
12
13
14
15
16
17
18
19
20
21
public static void test2_19() {
    // 将返回不可修改的空List
    List<Integer> result0 = parser.parseExpression("{}").getValue(List.class);
    System.out.println("result0=" + result0);   //[]

    //对于字面量列表也将返回不可修改的List
    List<Integer> result1 = parser.parseExpression("{1,2,3}").getValue(List.class);
    System.out.println("result1=" + result1);   //[1, 2, 3]
    Assert.assertEquals(new Integer(1), result1.get(0));
    try {
        result1.set(0, 2);
        //不可能执行到这,对于字面量列表不可修改
    } catch (Exception e) {
        e.printStackTrace();
    }

    //对于列表中只要有一个不是字面量表达式,将只返回原始List, 会进行不可修改处理
    String expression3 = "\{\{1+2,2+4\},\{3,4+4\}\}";
    List<List<Integer>> result2 = parser.parseExpression(expression3).getValue(List.class);
    System.out.println("result2=" + result2);   //[[3, 6], [3, 8]]
}

2.20 内联数组

和Java 数组定义类似,只是在定义时进行多维数组初始化

1
2
3
4
5
6
7
8
9
10
11
12
13
14
15
16
17
18
19
20
21
22
public static void test2_20() {
    //定义一维数组并初始化
    int[] result1 = parser.parseExpression("new int[1]{8}").getValue(int[].class);
    System.out.println("result1.length=" + result1.length + ",result1=" + result1);

    // 定义多维数组但不初始化, 多维数组不能初始化
    String expression1 = "new int[1][2]";
    //String expression2 = "new int[1][2]\{\{1}\{2\}\}"; //多维数组不能初始化
    int[][] result2 = parser.parseExpression(expression1).getValue(int[][].class);
    System.out.println("result2.length=" + result2.length + ",result2=" + result2);

    //解析到多维数据
    String expression3 = "\{\{3,4\},\{5,6\}\}";
    int[][] result3 = parser.parseExpression(expression3).getValue(int[][].class);
    System.out.println("result3=" + result3);   //[[3, 6], [3, 8]]
    for (int[] row : result3) {
        for(int data : row) {
            System.out.print(data + "   ");
        }
        System.out.println();
    }
}

2.21 集合,字典元素访问

SpEL目前支持所有集合类型和字典类型的元素访问,使用"集合[索引]“访问集合元素,使用"map[key]"访问字典元素;

1
2
3
4
5
6
7
8
9
10
11
12
13
14
15
16
17
18
19
20
21
22
public static void test2_21() {
    // SpEL内联List访问
    int result1 = parser.parseExpression("{1,2,3}[0]").getValue(int.class);
    System.out.println("result1=" + result1);   //1

    EvaluationContext context = new StandardEvaluationContext();

    //SpEL目前支持所有集合类型的访问
    Collection<Integer> collection = new HashSet<Integer>();
    collection.add(1);
    collection.add(2);
    context.setVariable("collection", collection);
    int result2 = parser.parseExpression("#collection[1]").getValue(context, int.class);
    System.out.println("result2=" + result2);   //2

    //SpEL对Map字典元素访问的支持
    Map<String, Integer> map = new HashMap<String, Integer>();
    map.put("A", 3);
    context.setVariable("map", map);
    int result3 = parser.parseExpression("#map['A']").getValue(context, int.class);
    System.out.println("result3=" + result3);
}

2.22 列表,字典,数组元素修改

可以使用赋值表达式或Expression接口的setValue方法修改

1
2
3
4
5
6
7
8
9
10
11
12
13
14
15
16
17
18
19
20
21
22
23
24
25
26
27
public static void test2_22() {
    EvaluationContext context = new StandardEvaluationContext();

    //1.修改数组元素值
    int[] array = new int[] {1, 2};
    context.setVariable("array", array);
    int result1 = parser.parseExpression("#array[1] = 3").getValue(context, int.class);
    System.out.println("result1=" + result1);   //3

    //2.修改集合值
    Collection<Integer> collection = new ArrayList<Integer>();
    collection.add(1);
    collection.add(2);
    context.setVariable("collection", collection);
    int result2 = parser.parseExpression("#collection[1] = 4").getValue(context, int.class);
    System.out.println("result2=" + result2);   //4
    parser.parseExpression("#collection[1]").setValue(context, 5);
    int result3 = parser.parseExpression("#collection[1]").getValue(context, int.class);
    System.out.println("result3=" + result3);   //5

    //3.修改map元素值
    Map<String, Integer> map = new HashMap<String, Integer>();
    map.put("A", 1);
    context.setVariable("map", map);
    int result4 = parser.parseExpression("#map['A'] = 6").getValue(context, int.class);
    System.out.println("result4=" + result4);   //6
}

2.23 集合投影

在SQL中投影指从表中选择出列,而在SpEL指根据集合中的元素中通过选择来构造另一个集合,该集合和原集合具有相同数量的元素;SpEL使用"(list|map).![投影表达式]“来进行投影运算.

对于集合或数组使用如上表达式进行投影运算,其中投影表达式中"#this"代表每个集合或数组元素,可以使用比如"#this.property"来获取集合元素的属性,其中"#this"可以省略。

SpEL投影运算还支持Map投影,但Map投影最终只能得到List结果,如上所示,对于投影表达式中的"#this"将是Map.Entry,所以可以使用"value"来获取值,使用"key"来获取键。

1
2
3
4
5
6
7
8
9
10
11
12
13
14
15
16
17
18
19
20
21
22
23
public static void test2_23() {
    EvaluationContext context = new StandardEvaluationContext();

    //1.首先准备测试数据
    Collection<Integer> collection = new ArrayList<Integer>();
    collection.add(4);
    collection.add(5);

    Map<String, Integer> map = new HashMap<String, Integer>();
    map.put("A", 1);
    map.put("B", 2);

    //2.collection中每个值加1
    context.setVariable("collection", collection);
    Collection<Integer> result1 = parser.parseExpression("#collection.![#this+1]").getValue(context,
            Collection.class);
    System.out.println("result1.size()=" + result1.size() + ", result1=" + result1);//result1.size()=2, result1=[5, 6]

    //3.测试map
    context.setVariable("map", map);
    List<Integer> result2 = parser.parseExpression("#map.![value+1]").getValue(context, List.class);
    System.out.println("result2.size()=" + result2.size() + ", result2=" + result2);    //result2.size()=2, result2=[2, 3]
}

2.24 集合选择

在SQL中指使用select进行选择行数据,而在SpEL指根据原集合通过条件表达式选择出满足条件的元素并构造为新的集合,SpEL使用"(list|map).?[选择表达式]“,其中选择表达式结果必须是boolean类型,如果true则选择的元素将添加到新集合中,false将不添加到新集合中。

1
2
3
4
5
6
7
8
9
10
11
12
13
14
15
16
17
18
19
20
21
22
23
24
25
26
public static void test2_24() {
    EvaluationContext context = new StandardEvaluationContext();

    // 1.首先准备测试数据
    Collection<Integer> collection = new ArrayList<Integer>();
    collection.add(4);
    collection.add(5);

    Map<String, Integer> map = new HashMap<String, Integer>();
    map.put("A", 1);
    map.put("B", 2);

    // 2.集合或数组测试:出集合元素值大于4的所有元素
    context.setVariable("collection", collection);
    Collection<Integer> result1 = parser.parseExpression("#collection.?[#this>4]").getValue(context,
            Collection.class);
    System.out.println("result1.size()=" + result1.size() + ", result1=" + result1); // result1.size()=1, result1=[5]

    // 3.字典测试:选择键值不等于"A"的,注意map选择表达式中"#this"是Map.Entry类型
    context.setVariable("map", map);
    Map<String, Integer> result2 = parser.parseExpression("#map.?[#this.key != 'A']").getValue(context, Map.class);
    System.out.println("result2=" + result2); // result2={B=2}

    List<Integer> result3 = parser.parseExpression("#map.?[key != 'A'].![value+1]").getValue(context, List.class);
    System.out.println("result3.size()=" + result3.size() + ", result3=" + result3); // result3.size()=1,
}

2.25 表达式模板

3.Spring Cache

Spring 3.1引入了激动人心的基于注释(annotation)的缓存(cache)技术,它本质上不是一个具体的缓存实现方案(例如 EHCache等),而是一个对缓存使用的抽象,通过在既有代码中添加少量它定义的各种 annotation,即能够达到缓存方法的返回对象的效果。

Spring Cache是使用SpEL表达式的一个地方.将会另起一篇单独介绍Sping Cache.

4.参考

http://sishuok.com/forum/blogPost/list/2463.html