xiaobaoqiu Blog

Think More, Code Less

动态数据源

1.数据库层面的动态数据源

比如多个读库(Read),可以配置一个虚拟IP,每次读数据库的请求被均衡的分配到各个读库(使用Keepalived等).

这中方式对应用程序是透明的.

2.数据库Proxy

很多现成的数据库Proxy,在Proxy中可以做负载均衡(一般使用LVS,Keepalived等现成应用),权限验证,过滤,业务缓存等控制逻辑.比如:

1.360基于mysql-proxy的Atlas
Atlas是由 Qihoo 360,Web平台部基础架构团队开发维护的一个基于MySQL协议的数据中间层项目。它是在mysql-proxy 0.8.2版本的基础上,对其进行了优化,增加了一些新的功能特性。360内部使用Atlas运行的mysql业务,每天承载的读写请求数达几十亿条。
github:https://github.com/Qihoo360/Atlas
参考:https://github.com/Qihoo360/Atlas/wiki/Atlas%E7%9A%84%E6%9E%B6%E6%9E%84

2.阿里的DRDS
分布式关系型数据库服务(Distribute Relational Database Service,简称DRDS)是一种水平拆分、可平滑扩缩容、读写分离的在线分布式数据库服务。前身为淘宝开源的TDDL,是近千个应用首选组件,已稳定服务了七年以上。已经商业化.
参考:http://docs.aliyun.com/?spm=5176.7622920.9.2.qGx2nq#/pub/drds/brief-manual/summary&summary

3.网易的分布式数据库中间件DDB
DDB(Distributed database)是网易杭研院立项最早,应用最为广泛的后台产品之一,也是国内最早出现的基于现有database之上开发的分布式数据库中间件,目前依然在为网易易信,云音乐,云阅读等大型互联网产品提供稳定的数据库服务。
参考:http://www.majin163.com/2014/09/24/ddb-introduce/

4.百度DDBS

3.代码层面

使用Spring实现数据源动态配置,可以在代码层面达到Master-Slave数据库分离的效果.

其实原理很简单,需要做两个工作:

1.实现一个根据不同key使用不同实际DataSource的自定义DataSource;
2.在请求的ThreadLocal中保存当前请求需要使用的数据库的key;

其中第一个工作Spring已经帮我们做了,见类org.springframework.jdbc.datasource.lookup.AbstractRoutingDataSource.

3.1 AbstractRoutingDataSource简介

下面简单介绍这个类:

1
2
3
4
5
6
7
8
9
10
11
12
13
14
15
16
17
18
19
20
21
22
23
24
25
26
27
28
29
30
31
32
33
34
35
36
37
38
39
40
41
42
43
44
45
46
47
48
49
50
51
52
53
54
55
56
57
58
59
60
61
62
63
64
65
66
67
68
69
70
71
72
73
74
75
76
77
78
79
80
81
82
83
84
85
86
87
88
89
90
91
92
93
94
95
96
97
98
99
100
101
102
103
104
105
106
107
108
109
110
111
112
113
114
115
116
117
118
119
120
121
/**
 * 抽象的javax.sql.DataSource实现,可以完成基于一个查找key来路由 #getConnection()到某些特性目标DataSourcesd的一个。一般通过绑定线程上下文来决定。
 */
public abstract class AbstractRoutingDataSource extends AbstractDataSource implements InitializingBean {
private Map<Object, Object> targetDataSources;

    private Object defaultTargetDataSource;

    private boolean lenientFallback = true;

    private DataSourceLookup dataSourceLookup = new JndiDataSourceLookup();

    private Map<Object, DataSource> resolvedDataSources;

    private DataSource resolvedDefaultDataSource;

    /**
     * 设置目标DataSources的map映射,其中查找key作为 map的key。
     * 这个映射的value可以是对象的DataSource实例,或者是一个数据源name的字符串(可以被DataSourceLookup解析)。
     *
     * key可以是任意的类型,只要实现了普通的查找处理。
     * 具体的key表示形式,将会被resolveSpecifiedLookupKey和determineCurrentLookupKey处理
     *
     */
    public void setTargetDataSources(Map<Object, Object> targetDataSources) {
        this.targetDataSources = targetDataSources;
    }

    /**
     * 设置默认目标数据源。如果我们在map中找不到对应的key时,则会使用这里设置的默认数据源
     */
    public void setDefaultTargetDataSource(Object defaultTargetDataSource) {
        this.defaultTargetDataSource = defaultTargetDataSource;
    }

    /**
     * 指定默认的DataSource,当通过指定的查找key不能找到对应的DataSource。
     * 如果为false,则直接返回失败,如果为true,则使用默认的数据源。默认为true
     */
    public void setLenientFallback(boolean lenientFallback) {
        this.lenientFallback = lenientFallback;
    }

    /**
     * 设置DataSourceLookup的实现类,该实现类可以把字符串配置的数据源,解析成我们需要的DataSource类.默认使用JndiDataSourceLookup。
     *
     * JndiDataSourceLookup方法使用ref bean方式获取配置文件中配置的dataSource数据源,也就是我们一般使用xml中配置datasource的方式就是jndi。
     */
    public void setDataSourceLookup(DataSourceLookup dataSourceLookup) {
        this.dataSourceLookup = (dataSourceLookup != null ? dataSourceLookup : new JndiDataSourceLookup());
    }

    /**
    * 初始化,将targetDataSources转换成resolvedDataSources
    */
    public void afterPropertiesSet() {
        if (this.targetDataSources == null) {
            throw new IllegalArgumentException("Property 'targetDataSources' is required");
        }
        this.resolvedDataSources = new HashMap<Object, DataSource>(this.targetDataSources.size());
        for (Map.Entry entry : this.targetDataSources.entrySet()) {
            Object lookupKey = resolveSpecifiedLookupKey(entry.getKey());
            DataSource dataSource = resolveSpecifiedDataSource(entry.getValue());
            this.resolvedDataSources.put(lookupKey, dataSource);
        }
        if (this.defaultTargetDataSource != null) {
            this.resolvedDefaultDataSource = resolveSpecifiedDataSource(this.defaultTargetDataSource);
        }
    }

    /**
     * 根据lookupKey获取map中存放的key值,默认两者是一样的
     */
    protected Object resolveSpecifiedLookupKey(Object lookupKey) {
        return lookupKey;
    }
    /**
     * 转换从获取map中存放的dataSource
     */
    protected DataSource resolveSpecifiedDataSource(Object dataSource) throws IllegalArgumentException {
        if (dataSource instanceof DataSource) {
            return (DataSource) dataSource;
        }
        else if (dataSource instanceof String) {
            return this.dataSourceLookup.getDataSource((String) dataSource);
        }
        else {
            throw new IllegalArgumentException(
                    "Illegal data source value - only [javax.sql.DataSource] and String supported: " + dataSource);
        }
    }

    /**
    * 这里就是抽象类给我们实现的接口方法,根据我们的配置上下文,抽象类决定实现哪个连接
    */
    public Connection getConnection() throws SQLException {
        return determineTargetDataSource().getConnection();
    }

    public Connection getConnection(String username, String password) throws SQLException {
        return determineTargetDataSource().getConnection(username, password);
    }

    protected DataSource determineTargetDataSource() {
        Assert.notNull(this.resolvedDataSources, "DataSource router not initialized");
        Object lookupKey = determineCurrentLookupKey();
        DataSource dataSource = this.resolvedDataSources.get(lookupKey);
        if (dataSource == null && (this.lenientFallback || lookupKey == null)) {
            dataSource = this.resolvedDefaultDataSource;
        }
        if (dataSource == null) {
            throw new IllegalStateException("Cannot determine target DataSource for lookup key [" + lookupKey + "]");
        }
        return dataSource;
    }

    /**
    * 这里是我们使用这个抽象类需要实现的方法,主要就是告诉该抽象类,当前需要使用的数据源的key是什么,这样抽象类就可以知道使用哪个数据库连接
    */
    protected abstract Object determineCurrentLookupKey();
}

我们可以继承这个类实现自己的RoutingDataSource,只需要实现determineCurrentLookupKey()方法.下面是一个实现示例,其中DataSourceKeyHolder用来在ThreadLocal中保存key,而我们的RoutingDataSource就可以从ThreadLocal中获取key来决定使用那个具体的数据源:

1
2
3
4
5
6
7
8
9
10
11
12
13
14
15
16
17
18
19
20
21
22
public class RoutingDataSource extends AbstractRoutingDataSource {
    @Override
    protected Object determineCurrentLookupKey() {
        return DataSourceKeyHolder.getDataSource();
    }
}

public class DataSourceKeyHolder {
    private static final ThreadLocal<String> holder = new ThreadLocal<String>();

    public static String getDataSource() {
        return holder.get();
    }

    public static void putDataSource(String value) {
        holder.set(value);
    }

    public static void clear(){
        holder.remove();
    }
}

3.2 自己实现RoutingDataSource

Spring自带的AbstractRoutingDataSource功能强大,但是略先麻烦(最终使用的其实只有resolvedDataSources这个Map).我们完全可以自己实现一个简单的RoutingDataSource,比如我们要实现读写分离的动态数据库,一个简单实现如下:

1
2
3
4
5
6
7
8
9
10
11
12
13
14
15
16
17
18
19
20
21
22
23
24
25
26
27
28
29
30
31
32
33
34
35
36
37
38
39
40
41
42
43
44
45
46
47
48
49
50
51
52
53
54
55
56
57
58
59
60
61
62
63
64
65
66
67
68
69
70
71
72
73
74
75
76
77
78
79
80
81
82
83
84
85
86
87
88
89
90
91
92
93
94
95
96
97
98
99
100
101
102
103
104
105
106
107
108
109
110
111
112
113
114
115
116
117
118
119
120
121
122
123
124
125
126
127
128
129
130
131
132
133
134
135
136
137
138
139
140
141
142
143
144
145
public class RoutingDataSource extends AbstractDataSource implements InitializingBean {
    /**
     * 写库, key是String
     */
    private Map<String, DataSource> writeDataSourceMap;
    /**
     * 读库, key是String
     */
    private Map<String, DataSource> readDataSourceMap;

    @Override
    public Connection getConnection() throws SQLException {
        //从上下文中获取key
        ConnectionKey connectionKey = ConnectionKeyHolder.get();
        try {
            //默认情况,返回随机一个写库
            if (connectionKey == null) {
                return fetchConnection(writeDataSourceMap, null);
            }

            //只读
            if (connectionKey.getType().equals(ConnectionKey.READ)) {
                return fetchConnection(readDataSourceMap, connectionKey.getKey());
            }

            //可读可写
            if (connectionKey.getType().equals(ConnectionKey.READ_WRITE)) {
                return fetchConnection(writeDataSourceMap, connectionKey.getKey());
            }
        } catch (Exception e) {
            logger.error("getConnectionError", e);
            if (e instanceof SQLException) {
                throw (SQLException) e;
            } else {
                throw new SQLException(e);
            }
        }

        // impossible code
        throw new IllegalArgumentException("invalid connection type: " + connectionKey.getType() + ", key: "
                + connectionKey.getKey());
    }

    /**
     * 根据key从对应的Map中获取数据库连接
     *
     * @param dbSourceMap
     * @param key
     * @return
     * @throws SQLException
     */
    private Connection fetchConnection(final Map<String, DataSource> dbSourceMap, String key) throws SQLException {
        if (key == null || key.length() == 0) { // null key, return a random read connection
            key = randomKey(dbSourceMap);
        }
        if (dbSourceMap.get(key) == null) {
            key = randomKey(dbSourceMap);
        }
        return dbSourceMap.get(key).getConnection();
    }

    /**
     * 随机获取一个Key
     * @return
     */
    private String randomKey(final Map<String, DataSource> dbSourceMap) {
        String[] keys = dbSourceMap.keySet().toArray(new String[0]);
        int size = dbSourceMap.size();
        int rand = new Random().nextInt(size);
        return keys[rand];
    }

    @Override
    public Connection getConnection(String username, String password) throws SQLException {
        throw new UnsupportedOperationException();
    }

    @Override
    public void afterPropertiesSet() throws Exception {
        Preconditions.checkArgument(MapUtils.isNotEmpty(writeDataSourceMap));
        Preconditions.checkArgument(MapUtils.isNotEmpty(readDataSourceMap));
    }

    public void setWriteDataSource(Map<String, DataSource> writeDataSourceMap) {
        this.writeDataSourceMap = writeDataSourceMap;
    }

    public void setReadDataSourceMap(Map<String, DataSource> readDataSourceMap) {
        this.readDataSourceMap = readDataSourceMap;
    }
}

public class ConnectionKey {
    /**
     * 读库,只读
     */
    public static final String READ = "R";
    /**
     * 写库,可读可写
     */
    public static final String READ_WRITE = "RW";

    private String type;
    private String key;

    public ConnectionKey() {
    }

    public ConnectionKey(String type, String key) {
        this.type = type;
        this.key = key;
    }

    public String getType() {
        return type;
    }

    public String getKey() {
        return key;
    }

    public void setType(String type) {
        this.type = type;
    }

    public void setKey(String key) {
        this.key = key;
    }
}

public class ConnectionKeyHolder {
    private static ThreadLocal<ConnectionKey> connType = new ThreadLocal<ConnectionKey>();

    public static void set(ConnectionKey type) {
        connType.set(type);
    }

    public static ConnectionKey get() {
        return connType.get();
    }

    public static void release() {
        connType.remove();
    }
}

3.3 使用实现动态数据源

以我们自己实现的为例子,我们简单展示一下如何使用Spring加上AOP使用我们的动态数据源.

首先定义使用读库和使用写库的注解:

1
2
3
4
5
6
7
8
9
10
11
12
13
14
15
16
17
18
/**
* 使用读库的注解,value()代表key
*/
@Target({ ElementType.TYPE, ElementType.METHOD })
@Retention(RetentionPolicy.RUNTIME)
@Documented
public @interface Read {
    String value() default "";
}
/**
* 使用写库的注解,value()代表key
*/
@Target({ ElementType.TYPE, ElementType.METHOD })
@Retention(RetentionPolicy.RUNTIME)
@Documented
public @interface Write {
    String value() default "";
}

然后定义Aspect,逻辑很简单,只是在执行我们的业务逻辑之前给线程上文写入ConnectionKey信息:

1
2
3
4
5
6
7
8
9
10
11
12
13
14
15
16
17
18
19
20
21
22
23
24
25
26
27
28
29
30
31
32
33
34
35
36
37
38
39
40
41
42
43
44
45
46
47
48
49
50
51
52
53
54
55
56
public class RoutingAop {

    protected Logger log = LoggerFactory.getLogger(getClass());

    /**
     * 解析读库的注解
     *
     * @param pjp
     * @param read
     * @return
     * @throws Throwable
     */
    public Object aroundRead(ProceedingJoinPoint pjp, Read read) throws Throwable {
        ConnectionKey origType = ConnectionKeyHolder.get();
        try {
            ConnectionKey newType = ConnectionKey.buildReadConnectionKey(read.value());
            ConnectionKeyHolder.set(newType);
            return pjp.proceed();
        } catch (Throwable throwable) {
            log.warn("error while processing read method", throwable);
            throw throwable;
        } finally {
            if (origType != null) {
                ConnectionKeyHolder.set(origType);
            } else {
                ConnectionKeyHolder.release();
            }
        }
    }

    /**
     * 解析写库的注解
     *
     * @param pjp
     * @param write
     * @return
     * @throws Throwable
     */
    public Object aroundWrite(ProceedingJoinPoint pjp, Write write) throws Throwable {
        ConnectionKey origType = ConnectionKeyHolder.get();
        try {
            ConnectionKey newType = ConnectionKey.buildWriteConnectionKey(write.value());
            ConnectionKeyHolder.set(newType);
            return pjp.proceed();
        } catch (Throwable throwable) {
            log.warn("error while processing write method", throwable);
            throw throwable;
        } finally {
            if (origType != null) {
                ConnectionKeyHolder.set(origType);
            } else {
                ConnectionKeyHolder.release();
            }
        }
    }
}

在Spring配置文件中定义好各个读库和各个写库,定义我们的RoutingDataSource的bean,之后扫描注解就可以了:

1
2
3
4
5
6
7
8
9
10
11
12
13
14
15
16
17
18
19
20
21
22
23
24
25
26
27
28
29
30
<!-- DataSource 写库  -->
<bean id="writeDataSource" class="...">

<!-- DataSource 读库  -->
<bean id="readDataSource" class="...">

<bean id="routingDataSource" class="com.Xxx.RoutingDataSource">
    <property name="writeDataSourceMap">
        <map key-type="java.lang.String" value-type="javax.sql.DataSource">
            <entry key="write1" value-ref="writeDataSource"/>
        </map>
    </property>
    <property name="readDataSourceMap">
        <map key-type="java.lang.String" value-type="javax.sql.DataSource">
            <entry key="read1" value-ref="readDataSource"/>
        </map>
    </property>
</bean>

<bean id="routingAop" class="com.Xxx.RoutingAop"/>
<!-- 定义Read Write注解扫描  -->
<aop:config>
    <aop:aspect ref="routingAop">
        <aop:around method="aroundRead" arg-names="read" pointcut="@annotation(read) && execution(public * com.Xxx.controller.*.*(..))" />
    </aop:aspect>

    <aop:aspect ref="routingAop">
        <aop:around method="aroundWrite" arg-names="write" pointcut="@annotation(write) && execution(public * com.Xxx.controller.*.*(..)) " />
    </aop:aspect>
</aop:config>

Elasticsearch配置解析

可以使用正则grep出各个配置项:

1
grep '^#\w' elasticsearch.yml

解析Elasticsearch的配置文件elasticsearch.yml中各个关键参数的意义:

1
2
3
4
5
6
7
8
9
10
11
12
13
14
15
16
17
18
19
20
21
22
23
24
25
26
27
28
29
30
31
32
33
34
35
36
37
38
39
40
41
42
43
44
45
46
47
48
49
50
51
52
53
54
55
56
57
58
59
60
61
62
63
64
65
66
67
68
69
70
71
72
73
74
75
76
77
78
79
80
81
82
83
84
85
86
87
88
89
90
91
92
93
94
95
96
97
98
99
100
101
102
103
104
105
106
107
108
109
110
111
112
113
114
115
116
117
118
119
120
121
122
123
124
125
126
127
128
################################### Cluster ###################################
elasticsearch的config文件夹里面有两个配置文件:elasticsearch.yml和logging.yml,第一个是es的基本配置文件,第二个是日志配置文件,es也是使用log4j来记录日志的,所以logging.yml里的设置按普通log4j配置文件来设置就行了。下面主要讲解下elasticsearch.yml这个文件中可配置的东西。

cluster.name: elasticsearch
配置es的集群名称,默认是elasticsearch,es会自动发现在同一网段下的es,如果在同一网段下有多个集群,就可以用这个属性来区分不同的集群。

node.name: "Franz Kafka"
节点名,默认随机指定一个name列表中名字,该列表在es的jar包中config文件夹里name.txt文件中,其中有很多作者添加的有趣名字。

node.master: true
指定该节点是否有资格被选举成为node,默认是true,es是默认集群中的第一台机器为master,如果这台机挂了就会重新选举master。

node.data: true
指定该节点是否存储索引数据,默认为true。

index.number_of_shards: 5
设置默认索引分片个数,默认为5片。

index.number_of_replicas: 1
设置默认索引副本个数,默认为1个副本。

path.conf: /path/to/conf
设置配置文件的存储路径,默认是es根目录下的config文件夹。

path.data: /path/to/data
设置索引数据的存储路径,默认是es根目录下的data文件夹,可以设置多个存储路径,用逗号隔开,例:
path.data: /path/to/data1,/path/to/data2

path.work: /path/to/work
设置临时文件的存储路径,默认是es根目录下的work文件夹。

path.logs: /path/to/logs
设置日志文件的存储路径,默认是es根目录下的logs文件夹

path.plugins: /path/to/plugins
设置插件的存放路径,默认是es根目录下的plugins文件夹

bootstrap.mlockall: true
设置为true来锁住内存。因为当jvm开始swapping时es的效率会降低,所以要保证它不swap,可以把ES_MIN_MEM和ES_MAX_MEM两个环境变量设置成同一个值,并且保证机器有足够的内存分配给es。同时也要允许elasticsearch的进程可以锁住内存,linux下可以通过`ulimit -l unlimited`命令。设置ES_HEAP_SIZE表示ES_MIN_MEM和ES_MAX_MEM相同且为ES_HEAP_SIZE的值.

network.bind_host: 192.168.0.1
设置绑定的ip地址,可以是ipv4或ipv6的,默认为0.0.0.0。

network.publish_host: 192.168.0.1
设置其它节点和该节点交互的ip地址,如果不设置它会自动判断,值必须是个真实的ip地址。

network.host: 192.168.0.1
这个参数是用来同时设置bind_host和publish_host上面两个参数。

transport.tcp.port: 9300
设置节点间交互的tcp端口,默认是9300。

transport.tcp.compress: true
设置是否压缩tcp传输时的数据,默认为false,不压缩。

http.port: 9200
设置对外服务的http端口,默认为9200。

http.max_content_length: 100mb
设置内容的最大容量,默认100mb

http.enabled: false
是否使用http协议对外提供服务,默认为true,开启。

gateway.type: local
gateway的类型,默认为local即为本地文件系统,可以设置为本地文件系统,分布式文件系统,hadoop的HDFS,和amazon的s3服务器,其它文件系统的设置方法下次再详细说。

gateway.recover_after_nodes: 1
设置集群中N个节点启动时进行数据恢复,默认为1。

gateway.recover_after_time: 5m
设置初始化数据恢复进程的超时时间,默认是5分钟。

gateway.expected_nodes: 2
设置这个集群中节点的数量,默认为2.一旦一旦这N个节点启动(并且数字和recover_after_nodes相同),就会立即开始数据恢复而不用等待gateway.recover_after_time时间之后再开始.

cluster.routing.allocation.node_initial_primaries_recoveries: 4
初始化数据恢复时,并发恢复线程的个数,默认为4。

cluster.routing.allocation.node_concurrent_recoveries: 2
添加删除节点或负载均衡时并发恢复线程的个数,默认为4。

indices.recovery.max_size_per_sec: 0
设置数据恢复时限制的带宽,如入100mb,默认为0,即无限制。

indices.recovery.concurrent_streams: 5
设置这个参数来限制从其它分片恢复数据时最大同时打开并发流的个数,默认为5。

discovery.zen.minimum_master_nodes: 1
设置这个参数来保证集群中的节点可以知道其它N个有master资格的节点。默认为1,对于大的集群来说,可以设置大一点的值(2-4).

discovery.zen.ping.timeout: 3s
设置集群中自动发现其它节点时ping连接超时时间,默认为3秒,对于比较差的网络环境可以高点的值来防止自动发现时出错。

discovery.zen.ping.multicast.enabled: false
设置是否打开多播发现节点,默认是true。使用单播发现节点策略(Unicast discovery)允许显示的控制使用哪个节点去发现集群.

discovery.zen.ping.unicast.hosts: ["host1", "host2:port", "host3[portX-portY]"]
设置集群中master节点的初始列表,可以通过这些节点来自动发现新加入集群的节点。

下面是一些查询时的慢日志参数设置,默认日志级别为TRACE.
超过10秒的查询打印warn日志,超过5秒的查询打印info日志,超过2秒的查询打印debug日志,超过0.5秒的查询打印trace日志
index.search.slowlog.level: TRACE
index.search.slowlog.threshold.query.warn: 10s
index.search.slowlog.threshold.query.info: 5s
index.search.slowlog.threshold.query.debug: 2s
index.search.slowlog.threshold.query.trace: 500ms

index.search.slowlog.threshold.fetch.warn: 1s
index.search.slowlog.threshold.fetch.info: 800ms
index.search.slowlog.threshold.fetch.debug:500ms
index.search.slowlog.threshold.fetch.trace: 200ms

超过10秒的查检索引打印warn日志,超过5秒的查检索引打印info日志,超过2秒的查检索引打印debug日志,超过0.5秒的查检索引打印trace日志
index.indexing.slowlog.threshold.index.warn: 10s
index.indexing.slowlog.threshold.index.info: 5s
index.indexing.slowlog.threshold.index.debug: 2s
index.indexing.slowlog.threshold.index.trace: 500ms

下面是GC日志相关的配置,young GC超过1000ms打印warn日志,超过700ms打印info日志,超过400ms打印的debug日志
monitor.jvm.gc.young.warn: 1000ms
monitor.jvm.gc.young.info: 700ms
monitor.jvm.gc.young.debug: 400ms

full GC超过10s打印warn日志,超过5s打印info日志,超过2s打印的debug日志
monitor.jvm.gc.old.warn: 10s
monitor.jvm.gc.old.info: 5s
monitor.jvm.gc.old.debug: 2s

Elasticsearch

1.简介

Elasticsearch 是一个建立在全文搜索引擎 Apache Lucene™ 基础上的分布式的,高可用的,基于json格式的数据构建索引,准实时查询的搜索引擎。Lucene 是当今最先进最高效的全功能开源搜索引擎框架,但是Lucene使用非常复杂。

Elasticsearch使用 Lucene 作为内部引擎,但是在你使用它做全文搜索时,只需要使用统一开发好的API即可,而并不需要了解其背后复杂的 Lucene 的运行原理。

Elasticsearch是一种准实时搜索,其实是可以做到实时的,因为lucene是可以做到实时的,但是这样做,要么是牺牲索引的效率(每次都索引之后刷新),要么就是牺牲查询的效率(每次查询之前都进行刷新),所以 采取一种折中的方案,每隔n秒自动刷新,这样你创建索引之后,最多在ns之内肯定能查到,这就是所谓的准实时(near real-time)查询,缺省是刷新间隔时间是1秒,可以通过index.refresh_interval参数修改间隔.

刷新是为了让文档可以搜索到,但是不保证这些数据被写入disk进入一个永久的存储状态,数据会被先被写入一个事务日志,然后在适当的时候持久化到磁盘中.

官网:https://www.elastic.co/products/elasticsearch

文档:https://www.elastic.co/guide/index.html

github地址:https://github.com/elastic/elasticsearch

博客地址:https://www.elastic.co/blog

其优点很吸引人:

1.分布式,可扩展,高科用(Distributed, scalable, and highly available);
2.提供实时搜索和分析(Real-time search and analytics capabilities);
3.复杂的RESTful API接口(Sophisticated RESTful API);

其特征如下:

1.Real-Time Data
2.Real-Time Analytics
3.Distributed
最开始规模可能很小,elasticsearch很方便的支持横向扩展,通过简单的在集群中增加节点就可以
4.High Availability
Elasticsearch集群是弹性的,它可以自动的感知新增的或者失效的节点,自动做数据的分发和均衡,保证数据客房问并且是安全的.
5.Multitenancy
集群可能包含多个索引(index),它们可以独立的提供查询服务,也可以组合在一起对外提供查询服务.
6.Full-Text Search
支持多种开发语言
7.Document-Oriented
将真实世界的复杂对象结构化乘JSON文档.所有字段默认都建立索引,所有的索引都可以单独提供查询.并且瞬间(breathtaking speed)返回复杂结果.
8.Schema-Free
对一个JSON文档建立索引,就会自动识别数据的结构和类型,创建所有并对外提供搜索服务.同时也可以自定义数据如何建立索引.
9.Developer-Friendly, RESTful API
Elasticsearch是API驱动的.基本所有的操作都可以通过一个简单的使用JSON格式数据的HTTP上的RESTful API.提供了很多种语言的Client.
10.Per-Operation Persistence
Elasticsearch将数据安全放在第一位.任何文档的变更都会记录在集群中多个节点上的事物日志,以此来将数据丢失几率降低到最小.
11.Apache 2 Open Source License
12.Build on top of Apache Lucene
Elasticsearch以Lucene为基础提供其优秀的分布式搜索和分析能力.
13.Conflict Management

2.安装

2.1 elasticsearch安装

安装很简单:

1.下载并解压
下载地址:https://www.elastic.co/downloads/elasticsearch
这里下载是1.5.2版本,解压之后可以创建软链es:

```
xiaobaoqiu@xiaobaoqiu:~/elasticsearch$ ln -s elasticsearch-1.5.2 es
```

目录下主要三个文件夹:

```
xiaobaoqiu@xiaobaoqiu:~/elasticsearch/es$ ll
总用量 48
drwxr-xr-x 5 xiaobaoqiu xiaobaoqiu  4096  4月 27 09:22 ./
drwxr-xr-x 3 xiaobaoqiu xiaobaoqiu  4096  5月 20 14:40 ../
drwxr-xr-x 2 xiaobaoqiu xiaobaoqiu  4096  4月 27 09:22 bin/
drwxr-xr-x 2 xiaobaoqiu xiaobaoqiu  4096  5月 20 14:42 config/
drwxr-xr-x 3 xiaobaoqiu xiaobaoqiu  4096  4月 27 09:22 lib/
-rw-rw-r-- 1 xiaobaoqiu xiaobaoqiu 11358  4月 27 07:05 LICENSE.txt
-rw-rw-r-- 1 xiaobaoqiu xiaobaoqiu   150  4月 27 07:05 NOTICE.txt
-rw-rw-r-- 1 xiaobaoqiu xiaobaoqiu  8499  4月 27 09:03 README.textile
```
其中bin包含一些启动脚本(包括windows下的bat脚本和linux下的shell脚本),config主要是配置文件,lib包括es依赖的jar,在里面就可以看到熟悉的Lucene,查询,高亮等依赖的jar包.

启动elasticsearch之后会产生log目录,用于记录elasticsearch系统的一些中心日志信息:

```
-rw-r--r-- 1    0  5月 20 15:05 elasticsearch_index_indexing_slowlog.log
-rw-r--r-- 1    0  5月 20 15:05 elasticsearch_index_search_slowlog.log
-rw-r--r-- 1 1254  5月 20 15:06 elasticsearch.log
```
其中elasticsearch.log是系统日志,记录什么类型的日志,日志的命名及日志文件的滚动(Rolling)策略等由config目录下的logging.yml配置文件决定.

启动elasticsearch之后会产生data目录,用于
elasticSearch的数据存放位置

2.启动
直接启动bin目录下的elasticsearch的shell:

```
xiaobaoqiu@xiaobaoqiu:~/elasticsearch/es/bin$ ./elasticsearch -d
```

3.验证
直接本机浏览器访问:http://localhost:9200/

```
{
status: 200,
name: "Agon",
cluster_name: "elasticsearch",
version: {
    number: "1.5.2",
    build_hash: "62ff9868b4c8a0c45860bebb259e21980778ab1c",
    build_timestamp: "2015-04-27T09:21:06Z",
    build_snapshot: false,
    lucene_version: "4.10.4"
},
tagline: "You Know, for Search"
}
```
这说明Elasticsearch集群已经上线运行了,这时我们就可以进行各种实验了.

2.2 集群管理工具插件

elasticsearch-head是一个elasticsearch的集群管理工具,它是完全由html5编写的独立网页程序,其他它可以更好的获得各个切片和节点的信息.

该工具的git地址是: https://github.com/Aconex/elasticsearch-head

安装该插件:

1
2
3
xiaobaoqiu@xiaobaoqiu:~/elasticsearch$ ./es/bin/plugin -install mobz/elasticsearch-head
-> Installing mobz/elasticsearch-head...
...//省略若干

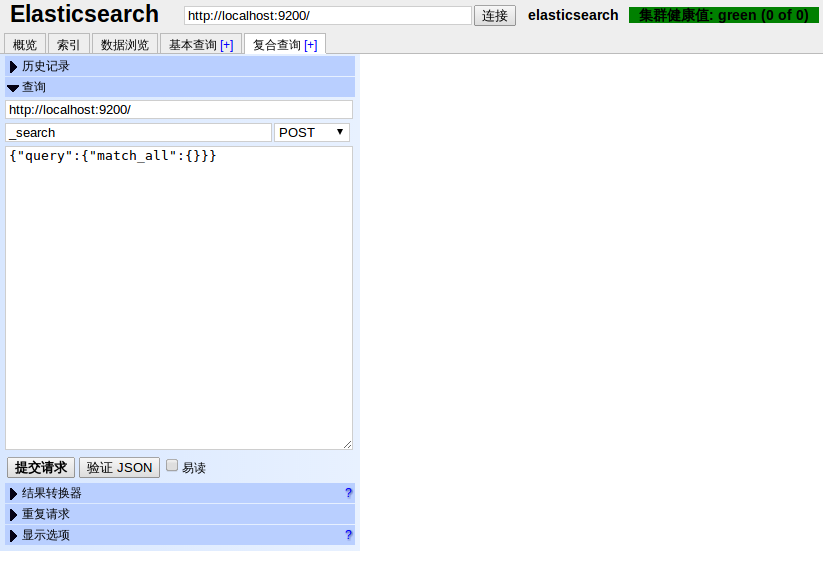
然后就可以访问(可以使用具体节点的IP): http://localhost:9200/_plugin/head/

图形化界面如下,包括集群的健康状况等信息:

2.3 集群监控工具插件

bigdesk是elasticsearch的一个集群监控工具,可以通过它来查看es集群的各种状态,如:cpu、内存使用情况,索引数据、搜索情况,http连接数等。

项目git地址: https://github.com/lukas-vlcek/bigdesk

安装该插件:

1
2
3
xiaobaoqiu@xiaobaoqiu:~/elasticsearch$ ./es/bin/plugin -install lukas-vlcek/bigdesk
-> Installing lukas-vlcek/bigdesk...
...//省略若干

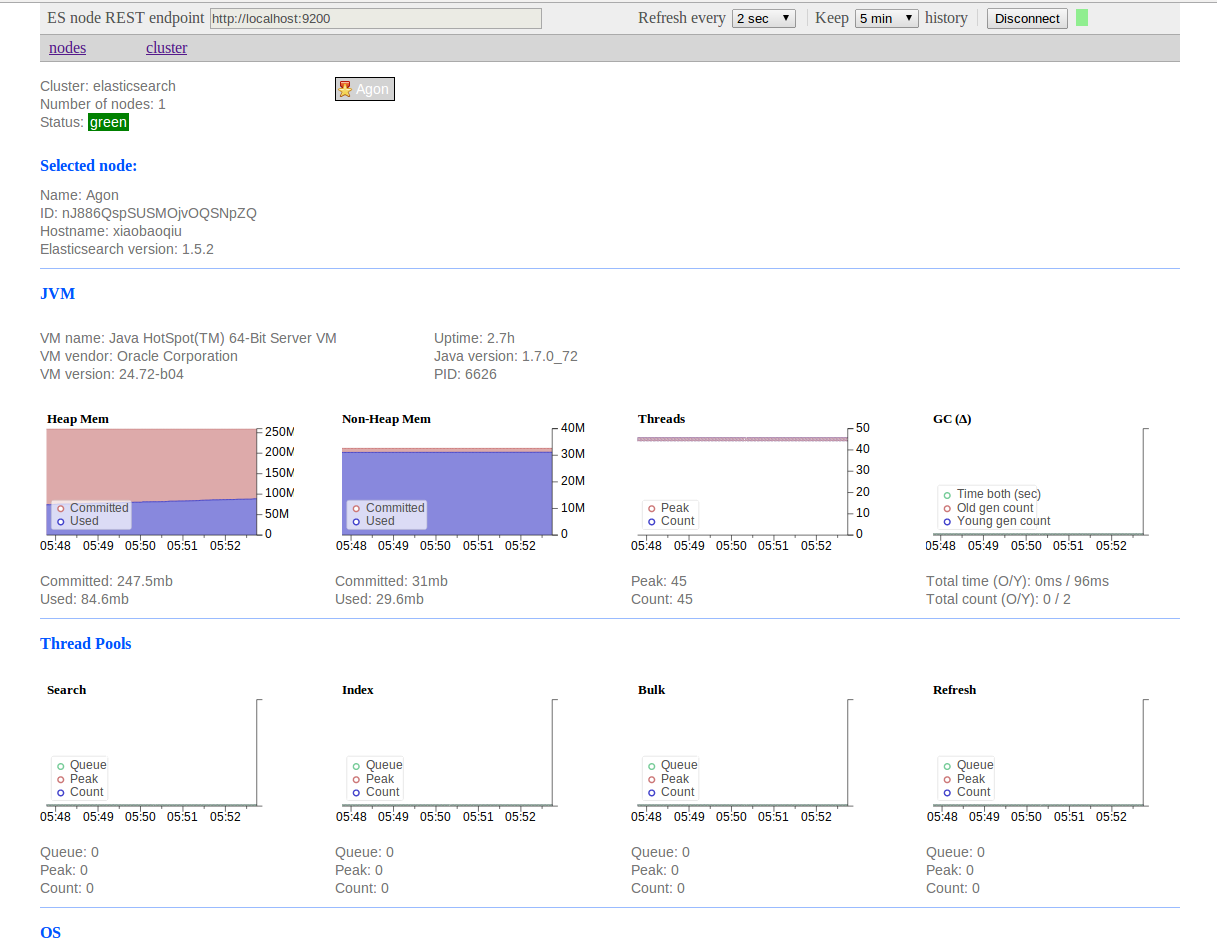
然后就可以访问(可以使用具体节点的IP): http://localhost:9200/_plugin/bigdesk/

图形化界面如下,包括JVM,Thread Pools,OS,Process,HTTP & Transport,Indices和File system等监控图:

2.4 安装Marvel

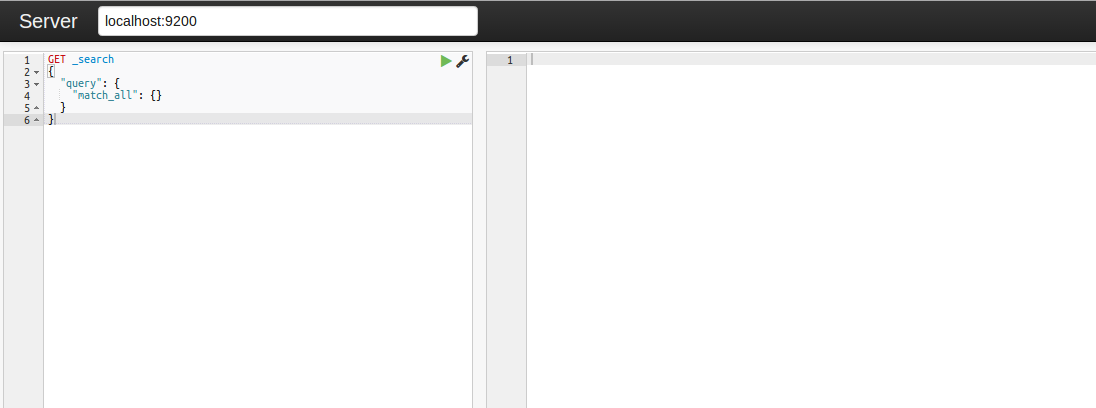
Marvel是Elasticsearch的管理和监控工具,是一个商业版本的插件,在开发环境下免费使用。它包含了一个叫做Sense的交互式控制台,使用户方便的通过浏览器直接与Elasticsearch进行交互。

运行以下命令来下载和安装Marvel:

1
2
3
xiaobaoqiu@xiaobaoqiu:~/elasticsearch$ ./es/bin/plugin -i elasticsearch/marvel/latest
-> Installing elasticsearch/marvel/latest...
...//省略若干

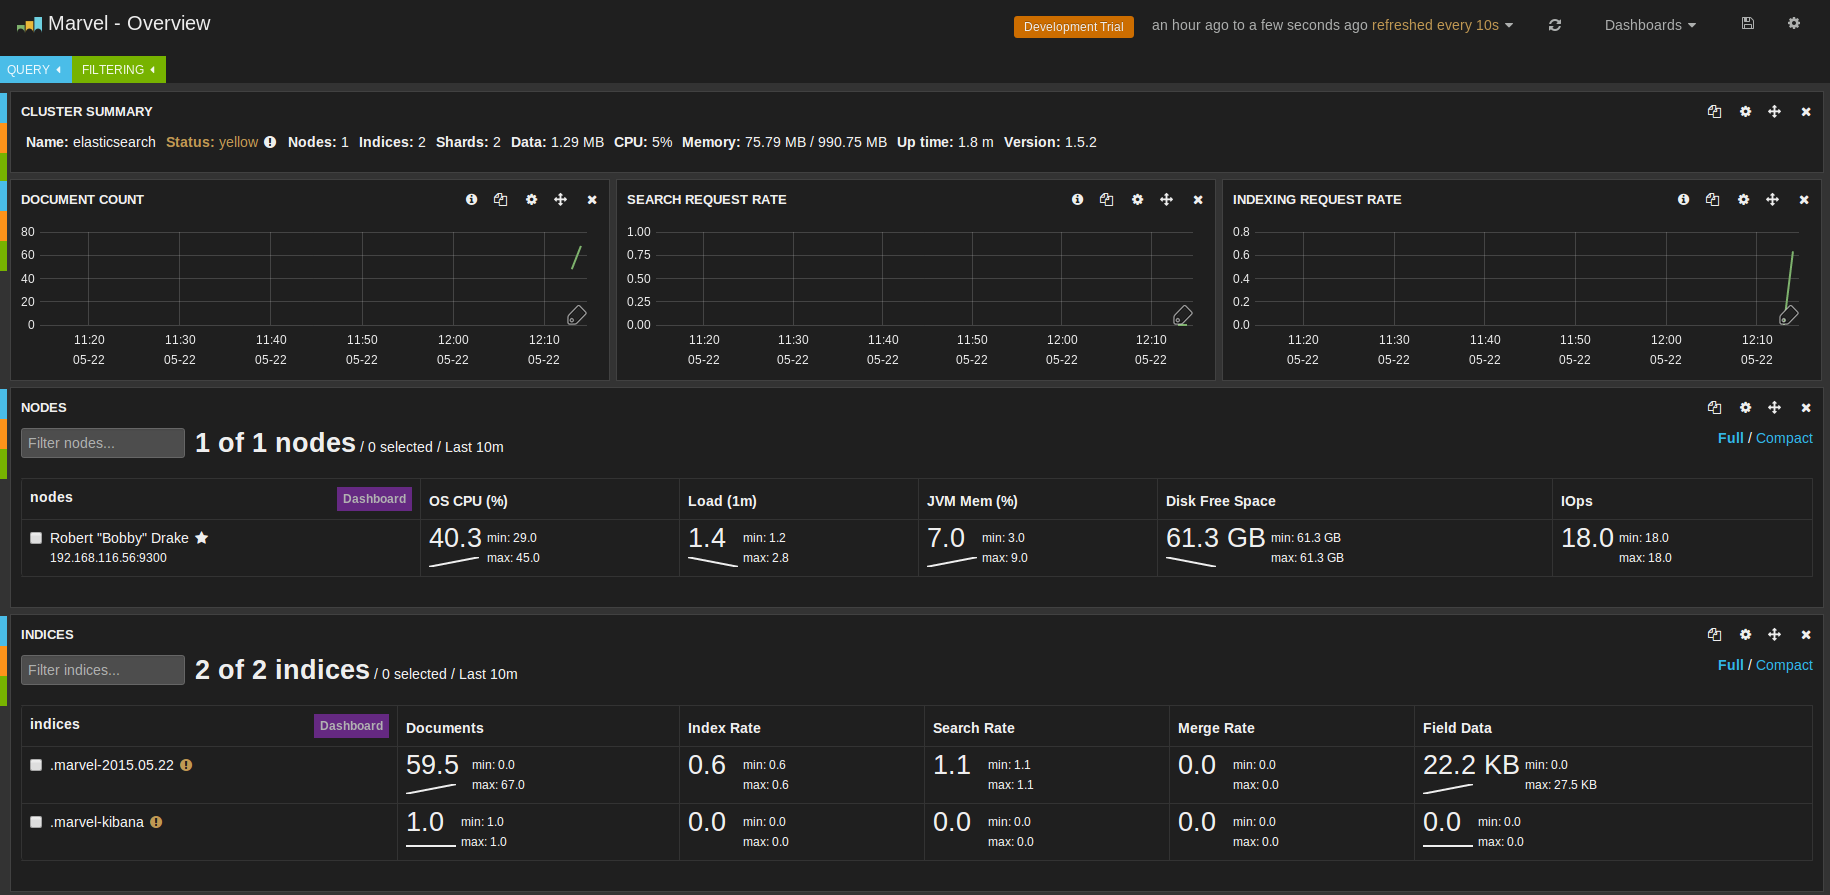
Marvel包括一系列酷炫的监控,还有一个Sense的交互式控制台:

你可能想要禁用监控,你可以通过以下命令关闭Marvel:

1
echo 'marvel.agent.enabled: false' >> ./config/elasticsearch.yml

3.基本概念

3.1 集群和节点

节点是Elasticsearch运行的实例。集群是一组有着同样cluster.name的节点,它们协同工作,互相分享数据,提供了故障转移和扩展的功能。当然一个节点也可以是一个集群。ES集群有自动发现的机制,只要几个节点用的是一个clustername,并且在一个局域网内,那么这些节点就可以自动的发现对方,并组成一个集群.

我们上面的运行就是一个单节点的集群.节点的cluster.name在配置文件elasticsearch.yml中配置,默认就叫elasticsearch:

1
cluster.name: elasticsearch

ES的集群是一个去中心化的集群,每一个节点都可以被选举为主节点,如果主节点挂了,集群就会选举出新的主节点。

主节点的作用主要是管理集群,例如感知集群节点的增加和减少,平衡数据分配等.

ES集群对外是透明的,各个节点之间协同工作,分享数据,我们不管访问的是哪一个节点,这个节点都知道数据存在于哪个节点上,然后转发请求到数据所在的节点上,并且负责收集各节点返回的数据,最后一起返回给客户端.

3.2 分片(shard)

一个索引会被分割为多个片段存储,这样可以充分使用节点的吞吐率

3.2 索引(index)

相当于数据库

3.3 类型(type)

相当于数据库中的表

3.4 文档(doc)

相当于数据库中的一条记录,json串

3.5 字段(Field)

相当路数据库中的列。

参考: http://es.xiaoleilu.com/

TPCC-MySQL简介

TPC(Tracsaction Processing Performance Council) 事务处理性能协会是一个评价大型数据库系统软硬件性能的非盈利的组织,TPC-C是TPC协会制定的,用来测试典型的复杂OLTP系统的性能;

Tpcc-mysql是percona基于tpcc衍生出来的产品,专用于mysql基准测试,其源码放在bazaar上,因此需要先安装bazaar客户端.

1.OLTP and OLAP

一般来说,可将数据库的应用类型分为OLTP(OnLine Transaction Processing,联机事务处理)和OLAP(OnLine Analysis Processing,联机分析处理)两种。OLTP是传统关系型数据库的主要应用,其主要面向基本的、日常的事务处理,例如银行交易。OLAP是数据仓库系统的主要应用,支持复杂的分析操作,侧重决策支持,并且提供直观易懂的查询结果.

OLTP也被称为面向交易的处理系统,其基本特征是可以立即将顾客的原始数据传送到计算中心进行处理,并在很短的时间内给出处理结果,这个过程的最大优点是可以即时地处理输入的数据、及时地回答,因此OLTP又被称为实时系统(Real Time System)。衡量OLTP系统的一个重要性能指标是系统性能,具体体现为实时响应时间(Response Time,简称RT),即从用户在终端输入数据到计算机对这个请求做出回复所需的时间。OLTP 数据库旨在使事务应用程序仅完成对所需数据的写入,以便尽快处理单个事务。

OLAP的概念最早是由关系数据库之父E.F.Codd博士于1993年提出的,是一种用于组织大型商务数据库和支持商务智能的技术。OLAP数据库分为一个或多个多维数据集,每个多维数据集都由多维数据集管理员组织和设计,以适应用户检索和分析数据的方式,从而更易于创建和使用所需的数据透视表和数据透视图。

2.Tpcc-mysql

Tpcc-mysql简单说就是mysql的一个基准测试工具.一般用于比较Mysql在不同配置下的性能差异,从而选择一个相对较优的配置.

参考: http://www.zhaokunyao.com/archives/5793

3.NoSQL测试

顺便记录一下一个NOSQL的测试case:

https://www.aerospike.com/wp-content/uploads/2013/02/Ultra-High-Performance-NoSQL-Benchmarking_zh-CN.pdf

Crate Jdbc查询死循环bug

历经一个月的项目,使用Crate提升搜索速度终于要上线.先交代一下背景,我们使用的crate相关的依赖的版本:

1.crate-client  0.47.8
2.crate-jdbc    1.5.1

发布之后,验证阶段一切正常,等把流量入口打开,一段时间之后,猛然发现crate的一个查询服务所在的机器load飙到20往上,机器是4核CPU,4G内存的虚拟机.

top -H发现有大量的tomcat线程(10+),每个线程占用的CPU都达到20%,并且这种线程有增多的趋势.

vmstat命令发现r数字特别高,即正在等待CPU的线程非常多.

jstack的结果发现runnable的线程多达300多.

看现象,感觉问题是线程池分配没有回收,但是定位不到问题在哪.

最终定位的问题是在特定场景下存在死循环,并且直接才crate服务器执行相同的查询逻辑正常返回,因此基本定位在crate-jdbc中.

1.死循环场景

1.crate中数据为空,这是很从crate中查询数据;
2.crate中存在满足查询条件数据,我们分页查询,假设总数据量为10页,我们因为代码问题,直接查询第11页的内容(实际上肯定不存在);

2.原因

原因是这个版本crate-jdbc和mybatis一起存在死循环,如下,我们对crate的查询首先经过mybatis,从

1.MapperProxy.invoke
2.MapperMethod.execute
3.SqlSessionTemplate.selectList, SqlSessionTemplate.invoke
4.DefaultSqlSession.selectList
5.BaseExecutor.query, BaseExecutor.queryFromDatabase
6.ReuseExecutor.doQuery
7.RoutingStatementHandler.query
8.PreparedStatementHandler.query
9.CratePreparedStatement.execute()
10.DefaultResultSetHandler.handleResultSets, DefaultResultSetHandler.getFirstResultSet

问题的代码就在DefaultResultSetHandler.getFirstResultSet中:

1
2
3
4
5
6
7
8
9
10
11
12
13
14
15
16
private ResultSetWrapper getFirstResultSet(Statement stmt) throws SQLException {
    ResultSet rs = stmt.getResultSet();
    while (rs == null) {
        // move forward to get the first resultset in case the driver
        // doesn't return the resultset as the first result (HSQLDB 2.1)
        if (stmt.getMoreResults()) {
            rs = stmt.getResultSet();
        } else {
            if (stmt.getUpdateCount() == -1) {
                // no more results. Must be no resultset
                break;
            }
        }
    }
    return rs != null ? new ResultSetWrapper(rs, configuration) : null;
}

其中stmt为CratePreparedStatement,其getMoreResults()实现:

1
2
3
4
@Override
public boolean getMoreResults() throws SQLException {
    return false;
}

因此逻辑进入到else中,stmt.getUpdateCount()的实现:

1
2
3
4
5
6
7
8
@Override
public int getUpdateCount() throws SQLException {
    checkClosed();  //check connection是否被关闭
    if (resultSet == null && sqlResponse != null) {
        return (int) sqlResponse.rowCount();
    }
    return -1;
}

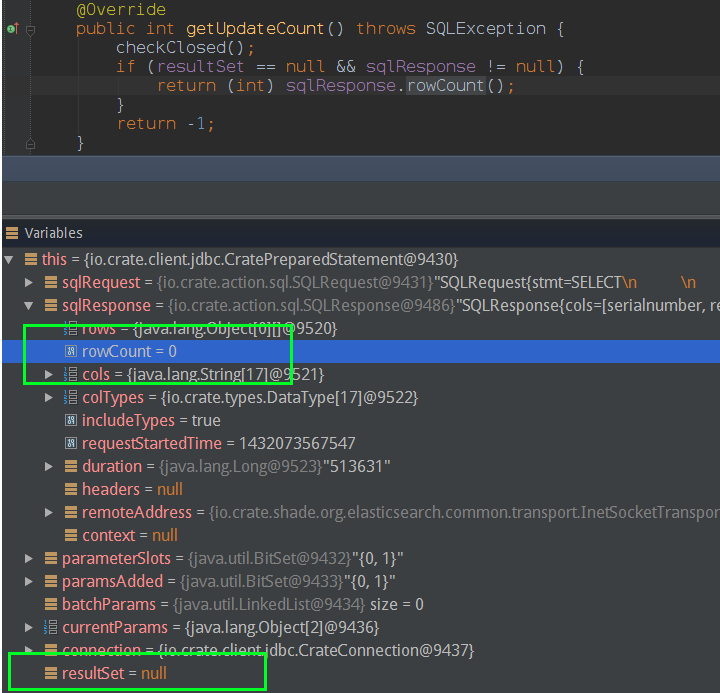
其中CratePreparedStatement的resultSet为null,并且sqlResponse不为空,sqlResponse的rowCount为0,因此getUpdateCount()返回值为0.因此getFirstResultSet中继续在while循环中,无法跳出.

3.绕过

归结起来产生问题的很简单,就是查询的结果集为空的时候,就会产生死循环,针对两种死循环场景,我们都可以绕过:

1.查询之前,先执行count查询,当count为0,即crate中没有满足我们查询条件的数据,则直接返回空数据集;
2.分页查询的时候,先执行count查询,当分页的offset大于等于count,则值额节返回空数据集;